


Showing posts with label quick cooking. Show all posts

Sunday, March 11, 2007

Brunch Braised Eggs


*Just Braise has moved. Please visit me at www.justbraise.com!*

Happy Daylight Savings Day if you live in the US in one of those cities that enjoy torturing inhabitants’ internal clocks with bi-yearly time changes. I am embracing bags under the eyes today to push through the pain. Remember to go to your computer maker's homepage and download the necessary plug in to update your operating system.

Thank you to everyone who participated in the last giveaway. As more suppliers come to me offering samples I will attempt to make them available to you so keep posted! Another offer coming up shortly…

Some of you may have noticed that JustBraise.com appears different than the current Blogspot site you are reading. I am working with a brilliant designer now to modernize, slim down and in general make clear what I can offer you. I am not fully aware of the final vision, but please be patient in the future if either site experiences loading problems or content is missing. I promise it will not last too long.

All that being said… brunch!

Here in NYC, yesterday blessed us with a hint of Spring. I took a short walk outside to enjoy the mild weather and even went so far as to open a window to let a refreshing breeze pass through (read: to cool the kitchen). Spring weather in NYC reminds me of brunch. Seemingly every New Yorkers' favorite weekend pastime when the weather finally reaches mild temperatures, outdoor seating emerges to take the place. Sidewalks are no longer crowded with bushy jackets but chairs overflowing with revelers of their leisurely 2pm brunching hour.

In the suburbs and many other cities, I seem to recall brunch falling around 10 or 11 am. For whatever reason, in New York City, the later you are able to make it to brunch the more it says “I don’t care, I am spending today drinking bloody marys.” For whatever reason, if your time is being spent brunching, your waste of a day is perfectly justified (it also says, “that’s right, I was at the secret after hours location until 6am, pssshhhh.”). One will often find brunch menus extend well past 4pm, overlapping with those early bird dinner specials.

In honor of brunch, my slightly early awakening this morning and the change of the season, I present this decadent dish. Soon it will be too warm to enjoy such a luxury— When a hot breakfast is about as appealing as that industrial air conditioner’s exhaust hitting your face on a 90 degree day in what seems to be 100% humidity and the soles of your shoes are melting and the buildings around you create a fabulously effective canyon for retaining heat and you become increasingly bitter at those who were smart enough (or simply have the means and schedule) to flee the City for the duration of the summer and bask in the cool waves of the ocean. No bitterness, I have my bucket garden to tend to.

On the other hand, this recipe may allow you to forget the beach and the heat of the summer and bask in the rich joys of winter.

BRUNCH BRAISED EGGS
Serving Size= 2. Active time= about 8 minutes. Cook time= about 10 minutes.
* 1-2 tablespoons butter
* 1 bunch spinach, washed well and drained
* ½ cup heavy cream or milk
* 2 tablespoons ricotta cheese
* 1 tablespoon parmesan
* 2 tablespoons cognac or brandy
* salt/ pepper
* 2 eggs

1) Preheat oven to 400F. In a large sauce pan on medium high heat, melt the butter. Once bubbling, add the spinach, cover and allow to wilt, about 3 minutes. Stir to bring wilted leaves to the top and complete wilting.
2) Add cream, ricotta, parmesan, salt and pepper. Bring just to a simmer, stirring often, about 2 minutes. Add cognac and return to simmer. Taste the broth and add more salt/ pepper if needed.
3) Divide the spinach and cream mixture between two oven safe bowls, reserving about 2 tablespoons of the cream-cognac mixture. Crack an egg over the top and add the remaining cream-cognac sauce.
4) Place the bowls on a cookie sheet for easy removal. Bake for 10 minutes, or until whites just set for runny yolks, longer for firmer yolks.
5) Serve warm with buttery toasted bread.

Monday, March 05, 2007

Cajun Salmon & Herb Marinated Calamari


*Just Braise has moved. Please visit me at www.justbraise.com!*

It is often that when I buy seafood I tend to go a little crazy. The briny smell, the lobsters swimming around, the gracious smiles and even the slight attitude I get when I ask something possibly(?) silly like, “what does that taste like?” Response: “White fish.” Or: “How do I cook this?” Response: “However you like.” Or my recent favorite, “I’m cooking this with capers, do you have capers?” Response: “I don’t even know what that is lady.” It all makes for that authenticity that screams burly fisherman and has me coming back for more than I really need.

Okay, so my local fishmonger spends little to no time on a boat actually fishing. More of it is spent “fishing” up in the Bronx at the newly relocated Fulton Fish Market. Still, entering the place is like hanging out with the boys on the docks—on a recent visit I overheard a few stories about the original Woodstock and how the “experience” was “a total trip.” I can guess a few enhancers that would lead to “trippy experiences” that my friendly fisherman might have partaken in. Instead, I kindly smiled and asked for a pound of calamari, cleaned, yes, thank you. And a pound of salmon too please.

While the two in combination are not totally exotic, they started to sound really good when I put words like “cajun blackening” and “Thai herb marinated” in front of them, albeit spicey. It also helps to have a winning cookbook (that’s right, The Cook’s Book, where every recipe is clearly laid out with fabulous photography and claims both these recipes as a cinch to make (which is true).

With a helper tuned to the task at hand, this meal can be whipped up in about 30 minutes, less if you are really on cue. The procession:

Person 1: Prep/ marinate salmon, prep/ marinate calamari.
Person 2: Prepare salad
Together: Prepare fish. The calamari takes a mere 3 minutes to cook and the salmon 6. If you start the salmon, get the calamari going, flip the salmon, remove calamari, the salmon is just about done, all remains hot to serve and you’re good to go.

Throw in a new favorite quick salad (our own invention) this meal is golden-- or better yet, a deliciously trippy experience.

The salmon and calamari recipe are as they appear in The Cook’s Book. When I made this I bought 1 pound of calamari and almost 1 pound of salmon and cut the salmon into 4 fillets. This meal was a satisfying dinner and an even better lunch the next day. It will definitely be made again. The salmon looks daunting, but many of the spices are staples (or should be) or could possibly be left out.

SALMON WITH CAJUN BLACKENING SPICES
Serving Size= 4. Active time= about 20 minutes. Cook time= about 8 minutes.
* 1 tablespoon ground cumin
* 1 tablespoon coriander seeds, crushed
* 1 tablespoon dried ground garlic
* 2 tablespoons paprika or pimento (smoked Spanish paprika)
* 1 tablespoon coarsely ground white or black pepper
* 1 tablespoon dried thyme
* 1 teaspoon dried oregano
* 2 tablespoons fine salt
* 4 salmon fillets, about 6 oz each (skinned)
* vegetable oil

1) Mix together all spices, herbs and salt. Using half the mixture [per side], rub into both sides of the pieces of salmon and lay them on a tray. Cover and leave at room temperature for up to 30 minutes.
2) Heat a heavy-based frying pan over high heat until very hot. Brush the pan with oil, then place the fillets in the pan. Let cook for 2 minutes without moving them. Turn the fish over, cover the pan, and cook for 2 more minutes. The spices will have blackened and the fish will be barely cooked inside. Transfer the salmon to warm plates and serve. [We cooked ours 3 minutes each side and they came out perfect, cooked almost all the way through.]


THAI BASIL & CILANTRO MARINATED SQUID
Serving Size= 4. Active time= about 8 minutes. Cook time= about 2 minutes.
* 1-½ heaped teaspoons white peppercorns [use about half if you only have black or mixed]
* ½ teaspoon salt
* 1 garlic clove
* handful of Thai basil [regular tastes good too]
* handful of cilantro, including roots, steams and leaves
* 14 oz squid, cleaned, then body finely sliced into rings and tentacles separated
* 2 teaspoons peanut oil
* 1 teaspoon nam pla (fish sauce)
* 2 teaspoons finely chopped or grated pale palm sugar [I omitted this ingredient]

1) Lightly pound the peppercorns, salt and garlic in a mortar with a pestle until combined. Add the basil and cilantro, and work into a chunky paste [alternately a food processor can be used]. Put the quid into a bowl and coat with the paste. Leave at room temperature for 15 minutes.
2) Heat a wok until smoking. Add half the oil and swirl it around. Add half the squid and cook over high heat for 30 seconds, tossing it a little. Tip the squid into a bowl. Wipe the wok clean, then cook the remaining squid in the same way.
3) Return the first batch of squid to the wok and add the fish sauce and palm sugar. Toss together and cook for 20 seconds longer.


OUR NEW FAVORITE WINTER SALAD
Serving Size= 4. Active time= about 8 minutes.
* ½ small red cabbage, thinly sliced (alternatively, a fennel bulb is delicious)
* 1 orange, peeled and cut into 1 inch pieces
* 1 grapefruit, peeled and cut into 1 inch pieces
* juice of ½ a lemon
* 2 tablespoons cider vinegar (or champagne vinegar)
* ¼ cup parmesan cheese, grated
* 1 teaspoon anise seeds (if using fennel bulb omit this)
* salt/ pepper to taste

1) Slice the vegetable and fruit. Put everything into a bowl, toss and serve.

Saturday, January 13, 2007

Sunchoke (Jerusalem Artichoke) Salad


Last year, I read so much about the little Sunchoke that I grew overwhelmed with joy when they finally appeared at the market. I bought a bunch and made some hearty soup that whisked away cold days. The sunchoke is hearty, sweet and not only tastes great raw, but is a great substitute for the potato.

Over the holidays I was around San Francisco visiting family. My uncle is taking a Master Gardening class and over the years built a substantial garden on his property. It is one that I am extremely jealous of and if he happened to have an avocado tree I would seriously consider moving in. Still, it does include blueberry and raspberry bushes, plum trees and strawberries all for my grandmother to make jams from (nothing but fruit and sugar, not even water she'll proudly tell you multiple times), tons of nasturtium flowers (that my uncle says proliferate like weeds), herbs of all kinds, artichokes, sunflowers, grape vines, tomatoes, a massive worm farm for compost, roses, a myer lemon tree and sunchokes.

He showed me around his garden saying most of what he has is just for play: he plants things and watches how they grow, rarely harvesting anything. One morning, I nabbed one of the last non-flowered artichokes for myself and boiled it up. I don't think there is anything more tasty and satisfying than eating something straight from a garden. He showed me the sunchoke bin, telling me they grew so robustly that the bin almost burst. He dug some up to show me there was literally wall-to-wall sunchokes growing underneath the dirt.

The next day while sauerkraut and ham was being served, I ran out to the garden and grabbed a handful of sunchokes and clipped some lavender leaves. I sliced the sunchokes thin and sauteed them until crisp with lots of butter, garlic and the lavender. My grandmother and mother were both pleasantly surprised at this previous unknown vegetable and refused to share them with anyone. I was pleasantly surprised at the mild taste of the lavender with the sunchokes.

My uncle gave me a bag of sunchokes to take home and plant in my own (pathetic in comparison) bucket garden. They are perfect because from the outset they appear to be weeds-- perfect in a city where old ladies steel my tomatoes and chicken wire. They are safely hibernating and will hopefully produce well come harvest next fall.

In the meantime, it's difficult to let a bag of fresh organic sunchokes go untouched. I made this salad for dinner the other day and D surprisingly applauded it (when I initially told him the ingredients he said the salad sounded like "weird girly veggie mush"). I'm not totally sure I know what that classifies as (I think zucchini is on the "veggie mush" list though), but once he ate this he assured me he would eat it again-- especially the sunchokes!

This is a visually stunning winter salad. It is hearty and really shows off that winter food can be just as beautiful as summer food. It also has fabulous texture layers and an interesting array of flavors. If you are dexterous you can cut down on cook time by sauteing the mushroom at the same time as frying the sunchok (since the sunchokes only take about 2 minutes in the oil).

Sunchoke Salad
Serves 2. Active time= about 30 minutes.
* 1 cup green beans, cut into 1 inch spears
*1 head endive, sliced thin
* 1 yellow pepper, left whole
* 1 portabello mushroom, sliced into 1/2 inch shoots
* 1 cup vegetable oil (more or less depending on pan)
* 1 sunchoke, well scrubbed and sliced into 1/8 inch rounds
* 1 tablespoon goat cheese
* 4-6 grape tomatoes

1) On the serving plate/ bowl, arrange green beans and endive.
2) Prep: Set a paper bag in a bowl aside. Set paper towels on a plate aside.
3) Roast the yellow pepper: Using long metal tongs, set pepper over burner set on medium-high flame. Rotate the pepper until all sides are blackened, about 6 minutes total (this only works with gas stoves as an open flame is needed. Another option is to dry roast the pepper on a non-stick pan until blackened). Place the pepper into the paper bag and seal. Set aside. This completes the pepper's cooking.
4) In a small pan on medium heat, saute the portabello mushroom. While the mushroom is cooking, put the vegetable oil in a medium sauce pan on high heat. While oil is warming, finish the mushrooms, cooking until reduced and darkened, about 8 minutes. Arrange the mushrooms on the serving plate.
5) When the oil is hot, fry the sunchokes quickly, removing when they turn brown around the edges. About 2-3 minutes total should turn them crisp. Remove from oil, place on the napkin covered plate and sprinkle lightly with salt.
6) Remove the yellow (now blackened) pepper from the paper bag. The skin will begin to flake off. For fast removal, place whole pepper under lukewarm water, gently rubbing ashes from the pepper. Dry off and slice into 1/2 inch spears, add to serving plate.
7) Sprinkle grape tomatoes over salad arrangement. Add goat cheese in a single lump. Spear sunchokes into the goat cheese to allow the sunchoke chips to stand verticle. Top salad with olive oil, a light sprinkle of salt and a spritz of lemon (optional). Any more dressing would ruin the flavors in this salad.

Monday, December 04, 2006

Dark Peppermint Bark


Last Thanksgiving I was in Chicago when some family friends gifted us a tin of Williams Sonoma Peppermint Bark. It was so frighteningly addictive that I was eating sheets of it a day. My mother forced me to take it home to New York City and it was gone in a matter of days.

Little did I know that this might just be the easiest dessert to put together. I'll be making it again in white chocolate/ dark chocolate layers (a la Williams Sonoma for a fraction of the cost) for my ceramic studio's holiday sale, but just had to get this out to you now to create and be swayed by paying $25 for a box at the store! If you have some chocolate lying around and some peppermints piled up nabbed from restaurants, this is perfect use for them.

It is one of those recipes people will think you bought or spent all day laboring over and you will tell them you did and laugh to yourself. It would make a perfect holiday gift for friends—just buy a nice tin at the dollar store!

I will not even put quantities down because however much chocolate you have can be used and the peppermint quantity will depend on how strong you want the final product.

DARK PEPPERMINT BARK
Qty Depends on amount of chocolate used. Active time= 10 minutes. Inactive time= 6 hours-overnight.
* 1 bar dark chocolate
* peppermint canes or candy, crushed
* 1 teaspoon peppermint extract (optional)

1) Lay parchment paper on a cookie sheet.
2) Put peppermint in a paper bag and wrap with a clean dish towel. Use a hammer to crush the peppermint into pieces from dust to chunks.
3) Melt the chocolate in a double boiler*, add the peppermint extract and mix as it melts.
4) Once melted, pour onto parchment paper and use a spatula to spread chocolate about ¼ inch thick. Sprinkle with peppermint and allow to dry 6 hours to overnight.
5) Once dry, break chocolate apart into uneven chunks, store covered.
* If a double boiler is not available use two non-stick sauté pans. One should be larger and filled half way with water, brought to a boil. Place the smaller pan on top of the water, without it touching the other pan and melt chocolate in the smaller pan.

Saturday, December 02, 2006

Thyme Cornbread


I was never a very big fan of cornbread. I had it at restaurants slathered in butter, sure. More often than not though, I preferred filling up with a heaping spoonful of mashed potatoes or thick creamed spinach. Delicious. Cornbread was too often dry and overly crumbly and needed too much butter to be palatable. That, or an attempt to moisten it with jalapeno peppers just made it soggy instead of giving it a due kick.

Well, D is a southern boy who likes his cornbread. Come to think of it, because of his Indiana roots, it’s really corn that he loves-- In any form, preferably fresh. Well, we’re out of fresh corn. The junk the markets are hawking as “late summer” corn is limp, withered and disgusting. So we turn to cornmeal for our corny fixings.

Since D has been around, I have been quite surprised to see just how far cornmeal can go. It appears in our mainstay breakfast pancakes and pops up in light fries like battered calamari. Over time I have begun to think highly of cornmeal and thought maybe cornbread should be given another try.

And so, with a little leftover thyme and a new cast iron pan c/o my mother, some “I  Cornbread” was created. When warm and fresh with a dab of butter this cornbread is moist and delicious. The thyme imparts the perfect herby sweetness to the final product making you think you might just be eating healthy—although even better with a side of cracklings.

THYME CORNBREAD
Makes about 12 sticks or small muffins. Active time= 10 minutes. Bake time= 15-20 minutes.
Have all ingredients at 70F
*3/4 cup sifted all-purpose flour
* 2-½ teaspoons double acting baking powder
* 1 to 2 tablespoons sugar
* 3/4 teaspoon salt
* 1-¼ cups yellow or white stone-ground cornmeal
* 1 egg
* 2 to 3 tablespoons melted butter or drippings
* 1 cup milk

1) Preheat oven to 425F. Grease cornbread pan with butter (cast iron is best) and place in oven while prepping ingredients
2) Sift flour, baking powder, sugar and salt together in a medium bowl.
3) Add cornmeal and stir until evenly combined (I recommend Sunny Slopes Farms Cornmeal in Indiana, email me for their phone number)
4) In a separate bowl beat the egg. Beat into it the butter and milk.
5) Combine all ingredients with a few quick rapid strokes until evenly combined.
6) Carefully remove pan from oven and place batter in hot pan about ¾ of the way full. Bake 15-20 minutes until just golden on top. Serve immediately.

Friday, November 24, 2006

Shrimp Bisque


It has been so long… I have a holiday sale coming up at my studio and made a mad push to fire one last kiln load before the big day. If you’re in the New York City area and think handmade ceramics might be up your gift giving alley (or for you personally), all are welcome. Eleven ceramic artists all with very different styles will have pieces on sale. Food, drinks and even some live music--music on Saturday only--will be part of the celebrations. The sale is Dec 7-10 in Long Island City, Queens (first stop into Queens from Manhattan, 15 minutes from midtown). Email me if you would like more details-- the bad news: this is our last sale, the building that houses our studio will be turned into luxury condos!

So are you already tired of all that turkey? Or maybe it’s the turkey that is making you tired. I’ve already turned my leftovers into my grandmother’s savory Latvian Pancakes and stashed them in the freezer for a rainy day. Okay, I popped a few along the way. But I learned that making these time consuming treasures is much easier taken in steps: day 1 make crepe batter and filling; day 2 make crepes, fill and finish. Mmm, I might go grab another one…

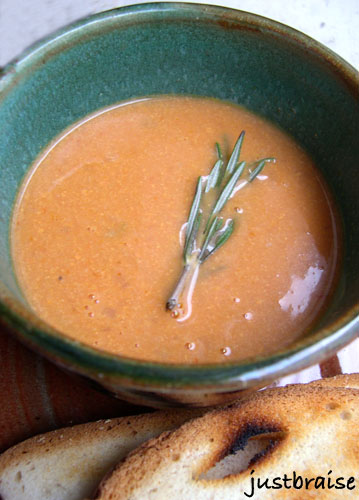
But really, the shrimp bisque already. If you have fish stock on hand this recipe is a cinch. It is quick, filling and warming on a cold, rainy day. With some warm bread (or in a bread bowl) this makes a fantastic meal.

My mother sent me Ina Garten’s new book Barefoot Contessa at Home: Everyday Recipes You'll Make Over and Over Again. Most recipes are pretty basic with ingredients that can easily be substituted for what you have on hand. I’ve heard the writing matches Ina’s personality, and if you don’t like her show, you won’t like the book. I don’t have cable (so I have never seen the show) and I haven't really taken the time to read her stories, so the recipes suit me well enough as a jumping off point.

I saw this shrimp bisque recipe and while I was really craving clam chowder, this recipe seemed a little less labor intensive (and I had clam chowder at a restaurant the previous night so why over due it?). With my old lean to, the handheld blender, I was able to whip this one up in just about 30 minutes. I had fish stock frozen and waiting for use from the seafood paella and today was its day!

SHRIMP BISQUE
Adapted from The Barefoot’s Contessa at Home cookbook
Makes about 6 servings. Active time= 20 minutes. Inactive time= about 10 minutes.
*1 pound shrimp, shells removed and set aside
* 1 tablespoon butter (or olive oil)
* 1 onion, chopped
* 3-4 cloves garlic, crushed
* 2 celery stalks, chopped
* 1 rosemary branch, 4-6 inches
* 2 teaspoons paprkia
* ½ cup brandy
* 5 cups fish stock (see my paella for a recipe if you cannot find it at the store)
* 1 8oz can tomato paste (get one with no salt/ no flavors added)
* 1 pint heavy cream or half and half

1) In a small pot on medium heat, bring fish stock and shrimp shells to a simmer, about 15 minutes. Do not boil.
2) While stock is warming, in your main stock pot over medium heat, warm 1 tablespoon butter. Add onions, garlic, celery and rosemary. Sauté 8-10 minutes, until onions turn translucent.
3) Add paprika and shrimp, cook for 3 minutes until shrimp begin to turn pink and curl.
4) Add brandy and cook for 3 minutes more.
5) Remove the rosemary branch (okay if some leaves remain). Strain the fish stock to remove the shrimp shells and add to the main pot.
6) Add tomato paste and stir until dissolved.
7) Using a handheld blender (or carefully in batches with a regular blender) pulse the soup. Break down most of the shrimp, but overall, leave the soup chunky. Add cream, bring to a simmer and serve.

Saturday, November 11, 2006

Cranberry Sweet Bread


The other week I was at the grocery store and noticed the bags of cranberries were finally set out. Mmmm, cranberry juice I mumbled, and in a trance walked over and placed them in the basket D was carrying.

“What are you going to do with those?”
“I dunno, they’re pretty.”

And so the pretty little rubies sat in the fridge for the better part of a week while I researched some recipes. I was looking for something fast and easy that would still look and taste delicious. I finally found it on a Chowhound forum-- a one bowl, just add, stir and bake recipe. I checked the comments and someone had already made it with wowed reaction so I decided to dig in as well.

This cake-like bread was delicious warm right out of the oven. The recipe recommends a caramel sauce, but I think whipped cream would be great too. I had it plain with coffee and it made a great mid-afternoon pick-me-up or breakfast.

This is the recipe list as it appears in Chowhound. There are other fabulous cranberry recipes listed there too so check it out.

*Note: This is not my mother listed below. Also, I cannot vouch for the caramel sauce because I did not make it. The changes I made are as follows: I used 2% milk instead of whole milk and increased the cranberries to one whole 16 ounce bag (from 2 cups). Lastly, I used a 7x11 pan as I wanted a thicker bread. I had to bake mine about 10 min more.

MOM’S CRANBERRY CAKE W/ CARAMEL SAUCE
Makes 1- 9x13 loaf. Active time= 10 minutes. Inactive time= about 30 minutes.
* 2 cups unsifted flour
* 1-½ cups sugar
* ½ teaspoon salt
* 2 teaspoons baking powder
* 4 tablespoons unsalted butter, soft
* 1 cup whole milk [2% works well too]
* 2 cups whole fresh cranberries [or 1-16 ounce bag]

1) Preheat the oven to 350F
2) Mix the flour, sugar, salt, baking powder and butter together until it resembles coarse crumbs.
3) Add milk and stir until evenly distributed. Fold in cranberries.
4) Pour batter into a buttered 9x13 pan. Bake for 30 minutes or until golden. Pour caramel sauce (below) over individual servings and serve.


CARAMEL SAUCE
* ½ cup butter
* ½ cup sugar
* ½ cup brown sugar
* ½ cup half and half

1) Combine all ingredients on stovetop and heat until thickened; do not boil.


Head over to Sweetnicks for the ARF roundup

Thursday, October 19, 2006

Applesauce


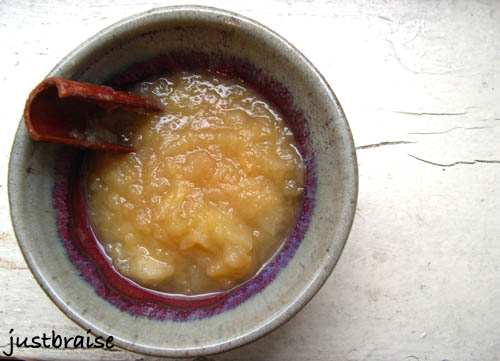
I almost forgot how much I enjoy applesauce as a snack on its own. Sweet, spiced and best of all, warm and fresh.

As noted, applesauce makes a great side to pork chops and is great as a side to almost any sandwich. I sometimes throw some applesauce into brownies and cake or pancake batters for some extra flavor and moistness.

Applesauce is incredibly easy to make so if you have the dregs of your picked apples lying around, just beginning to turn (or not), throw this on the stove, sit back and enjoy the fruits of your minimal labor in just about 20 minutes. I made mine with apple cider to give it extra sweetness and spices, but you can just as easily use water, some brown sugar and spices like nutmeg and cinnamon.

APPLESAUCE
Serving Size= 6. Active time= about 8 minutes. Cook time= 20 minutes.
* 8-10 small to medium sized apples, peeled, cored and chopped
* ½ cup apple cider
* 1 cinnamon stick, about 3 inches

1) Peel, core and loosely chop the apples into about ½ inch pieces. If you want smooth applesauce, chop all pieces uniform size. If chunky applesauce is desired, chop ¼ of the apples in larger chunks (1 inch or larger).
2) Place apple pieces, cider and cinnamon stick into a small stock pot over medium high heat. Bring to a boil then lower heat to medium. Simmer, slightly uncovered 15-20 minutes until applesauce is at desired consistency. Enjoy warm or cooled.


Check out other Fall Feast-ival items over at WellFed's FitFare!

Tags: , , , .

Thursday, September 21, 2006

Soba Seafood Pasta


While in Indiana at the State Fair, D and I made our way into the 4-H barn “after hours”. Okay, it was really about 5pm, but this was when the real deal started: Well after top-notch vegetables had been judged, local wines swirled and alfalfa blocks adorned, the local apiaries took the stage for a little bee demonstration and hints of the trade.

We seemed to be the only ones fascinated by the discussion, complete with a live demonstration behind the speaker (a man relating the talk with live bees and hive). We asked our questions then dove into samples of over one dozen honey varieties as well as honey butter, honey laced yogurts, honey sticks, honeycomb, beeswax blocks and more.

Slightly stunned when we asked for a good contrasting honey for the soon-to-be-purchased molasses-hued buckwheat honey, we were given a deep shrug: “it’s honey.” Obviously not one of their top salespersons. Buckwheat honey and an amber toned wildflower honey made it into our bags and to New York in one piece-- along with sorghum, whole wheat flour and cracklin’s still fresh on the mind.

Back in New York, worlds away from Indiana, I was avoiding tourists in Chinatown. Ducking into one of the hundreds of food stalls that line the narrow streets, I found myself confronted with noodles. Hundreds of noodles: cellophane, egg, rice, ramen and soba (or buckwheat). The honey must have been on my mind because I grabbed a pack of soba noodles before heading home.

The excitement ended there and for weeks the noodles sat in the cupboard. The honey on the other hand, made excellent hot toddies-- a quick fix-me-up for a recent sick spell. Yet still the noodles sat.

But as the fridge progressed to barrenness (with a half bag of arugula) and the shelves held a few cloves of mighty garlic as well as my sweet looking noodles, I took the initiative and headed for the fish monger…

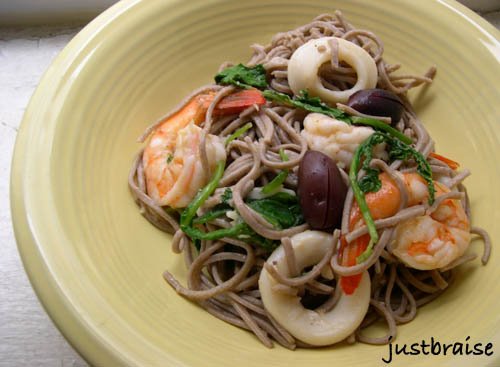
This dish is beyond simple to make. The rich buttery taste these noodles provide is a luxurious accompaniment to seafood. And because buckwheat is actually a fruit (a relative of rhubarb), not a wheat, it is safe for all those non-gluten folks, full of fiber, potassium, manganese and helps keep blood pressure and cholesterol levels down—how is that for tricking someone into eating pasta? Even better (I’m a visual person), the purplish hue of these noodles look amazing against bright vegetables and seafood.

SOBA SEAFOOD PASTA
Serving Size= 6 persons. Active time= about 20 minutes (less with pre-cleaned shrimp)
* 1 handful dry soba noodles (about 16 ounces)
* 2 tablespoons olive oil
* 4-5 cloves garlic, crushed
* 1 lb large shrimp, peeled and deveined
* 1 lb calamari rings, rinsed
* 1 large handful arugula, rinsed well
* ¼ cup Parmesan shavings (optional)
* 6-12 Kalamata olives

1) Peel and devein the shrimp, rinse calamari; set aside.
2) Bring water to a rapid boil in a medium pot. Add noodles, stir to separate and cook about 5 minutes, until done.
3) Drain water, rinse noodles with cold water and place in serving bowl. Return pot to stovetop over medium-high heat; add olive oil.
4) Add garlic and bring to a sizzle; about 3 minutes.
5) Add shrimp, calamari and arugula, cook until shrimp turn pink and curl; about 4 minutes.
6) Add shrimp, calamari, arugula, Parmesan and olives to soba noodles. Toss to incorporate. Add more olive oil if desired. Serve warm or cold.


Tags: , , , , ,

Tuesday, September 19, 2006

Zucchini Pancakes


I can remember the moist zucchini-walnut bread my mother used to make when I was growing up. That, coupled with her infamous carrot bread, were worthy treats in the house and always much appreciated. In my years away from home I craved the breads (mind you, not cakes) and often called, requesting a loaf to be air-mailed to me without haste. Lucky for me, my mother usually obliged.

These days she has misplaced the treasured zucchini bread recipe. Sure it came from the depths of Joy of Cooking, we have failed to find the true source of the recipe; unable to replicate its sweet and wholesome moistness.
I bought these zucchinis craving that loved bread. Knowing D has a (vocal) aversion to squash—though once confronted with it will often happily eat it—I was sure I would be dining on these fruits alone. (And yes, zucchinis are in fact, a fruit.)

Knowing the bread eluded me, I began preparing these zucchinis much the same way my mother would have: by grating them into a tall pile. I continued on the fly: Throwing in a few more ingredients and sticking these on a hot buttered skillet. These might just be the next best thing—even better, D played a vanishing act finishing his in no time flat-- allowing me to dine with company.

Though I still crave that bread, I can happily buy zucchinis for the remainder of its soon-to-be-over season. We enjoyed these cakes so much, I’m thinking of attempting them in the bucket garden next year (even better, we would then have fresh squash flowers for frying!)

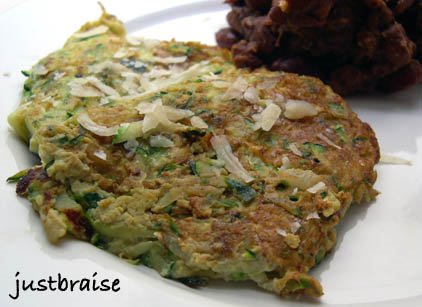
Oh, and that menacing darkness that hovers closely behind the zucchini cakes in this picture? Some leftover Louisiana-style beans made with a leftover ham shoulder—the combination was delicious! These pancakes are great for breakfast with a poached egg or as a dinner with beans (as pictured here). They can be added to a sandwich (a sort of veggie burger), had with a sour cream based dipping sauce, or simply snacked on the go. They are also quick and easy to make.

ZUCCHINI PANCAKES
Makes about 12 4-inch pancakes. Active time= about 30 minutes.
* 2 large zucchinis
* 2 eggs
* 2 teaspoons cumin
* 2 dashes Worcestershire sauce
* ¼ cup Parmesan cheese, grated
* 1 teaspoon chili pepper
* 2 dashes Tabasco sauce
* 1 teaspoon salt
* fresh ground pepper to taste
* 1 tablespoon butter or olive oil

1) Grate zucchinis. Grab up a small handful of grated zucchini and wring out the excess water over the sink. Set drained zucchini in a medium bowl, set aside. Continue until all zucchini is drained then dab with a paper towel to get remaining moisture out.
2) Add eggs, cumin, Worcestershire sauce, Parmesan, chili pepper, Tabasco sauce, salt and pepper to the bowl.
3) Use hands to incorporate all ingredients evenly.
4) Place butter on a medium sauté pan over medium-high heat. Once pan and butter are hot (butter will subside its bubbling and smell nutty), place small even handfuls of the zucchini mixture around the pan, use a spatula to gently press the pancakes flat. Allow to cook about 5 minutes each side, until golden brown. Serve warm, topped with fresh grated Parmesan.


Hop on over to Sweetnick's for ARF Tuesday!

Tags: , , , .

Sunday, August 20, 2006

Rainbow Salad


*Just Braise has moved. Please visit me at www.justbraise.com!*

As the nights begin to cool and we turn the first corner into the fall season, it is best to take advantage of the freshness still available. Late season produce are some of my favorites; full of the warm juices of summer. They include certain berries, corn, peaches, beets and nectarines (amongst others). Keep to the seasons and you are guaranteed some of the best tasting produce.

When I started going hog wild for the peaches at my local fruit stand, D and I were overwhelmed (but they smell so good!)—there are only so many that can be sliced and frozen for mid-winter smoothie binges! Pretty soon, every time I made a dish, I just tossed a few peaches onto the mix. D thought me crazed at first, tainting his otherwise prized pork and sandwiches, but pretty soon, the boy caught on.

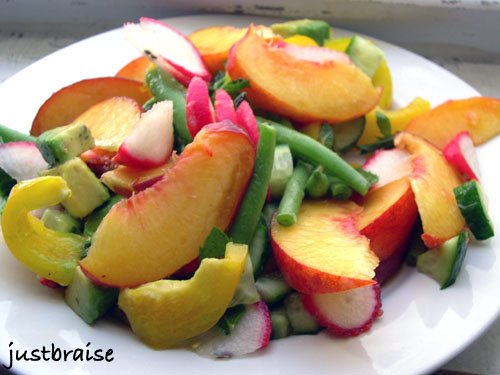
One morning as we were rushing out the door I pulled out anything and everything fresh from the fridge. It ended with a very colorful salad that appeared to taste as good as it looked. A few hours later I received emails from D that his officemates wouldn’t allow him to get a bite in—they were all admiring the colors! While we ate separately, we came together later commenting on the perfect harmony that the salad offered. No longer questioning my peach plundering, D and I made this salad again and again—a fast and fresh summer pick-me-up that can be altered in many ways, remaining a delicious feast for belly and eyes.

The colors on this salad are stunning--- an ideal side for a summer picnic or BBQ. So go ahead and stock up on peaches. Put a few aside for the winter, and indulge in this salad while peaches are at their best.

RAINBOW SALAD w/ BASIL VINAIGRETTE
Serving Size= 2 persons. Active time= 10 minutes.
* 2 ripe peaches, each sliced into 8 wedges
* 4 radish, sliced
* 1 avocado, cubed
* 1 yellow bell pepper, sliced thin
* 1 small cucumber, cubed
* 1 small handful green beans, blanched and halved
* 1 cup lightly packed fresh basil
* ¼ cup Tarragon vinegar
* juice of 1 lime
* salt/ pepper to taste

1) In a medium bowl, gently toss cut fruit and vegetables: peach, radish, avocado, bell pepper and beans.
2) In a food processor or blender, combine basil, vinegar and lime juice. Blend until basil is finely chopped and well incorporated. Season to taste with salt and pepper and pour over salad.
NOTE: Other tasty additions to this salad include celery, mango (in lieu of peach), corn, new potatoes, or anything else you enjoy.

Wednesday, August 16, 2006

Lebanese Potatoes


I was never too fond of potato salad growing up; the same goes for coleslaw and most macaroni salads. Often heavy with mayonnaise, I felt true flavors were hidden under a thick suffocating whiteness. I grew tired of finding a good, let alone perfect, potato salad, and my life of avoiding the tot began.

People accused me of being anti-carbohydrate. It simply is not so! I would proclaim. I love baked potatoes, bread, and most every carbohydrate there is. Then there was a jab that I was a food snob. Okay, maybe a bit. But it is when the wet white blanket covers my pure fare that I cringe and must walk away, head bowed low in a quiet, mournful state—that pastiness just sticks to my mouth too readily.

Being a frequenter of BBQs and returns to the Midwest does not help matters. Some sort of mayonnaise-based salad is always happy to make an appearance. It is not that I cannot give new foods a try, but I follow a mantra that the lesser the mayo the better.

One day, my good friend A showed me the light.

I sat at her aunt’s home for a wholesome Lebanese-American Thanksgiving. It was complete with hummus, flat bread, ful, turkey and a bowl of Lebanese potatoes. For once, I saw a potato salad where, surprise upon surprises, the potato shown through. One bite, and I pocketed this recipe with delight.

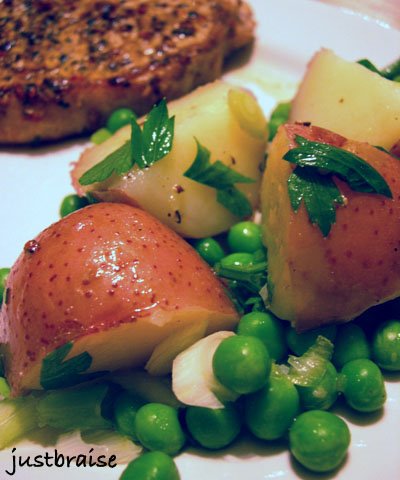
It is the lightness of the salad and ease of preparation that draws me back to this dish again and again. I have made it for others with the same promising accolades; it is simple and delicious. Below I have spruced it up by adding green peas. The brightness of these peas gave the red potatoes a sensational contrast. For those who are have fought off one too many mayonnaise dripping salads, now is your chance to bring the potato back to flavor.

LEBANESE POTATOES
Serving Size= 6-8 persons. Active time= 10 minutes. Inactive time= 2 hours.
* 8-10 small red new potatoes, washed and cut in half
* 1 bunch parsley, washed and chopped
* juice of 1-½ lemons
* 1 cup peas, lightly cooked (optional; not traditional, but good)
* 1 bunch scallions, chopped whites only
* 2 cloves garlic, crushed
* 4 Tbl olive oil
* salt/ pepper to taste

1) In a medium saucepan, bring 4 cups of salted water to a boil. Add potatoes and cook until tender, about 20 minutes. Run cold water over to stop cooking and begin cool down.
2) In a medium sauté pan, flash-cook the peas with a small amount of water, about 4 minutes until peas turn dark green.
3) Place all ingredients into a large bowl. Mix well and refrigerate until cool, about 1-½ hours.

Saturday, August 05, 2006

Garden Pasta


My first personal (known) encounter with Swiss chard was the other year. While I am sure I have dined on it in restaurants, I had never sought to purchase the funky colored vegetable before. While at the grocery, the vegetable caught my eye and I scooped it into my basket. As D often does when he notices I am plucking items for their unique beauty rather than possible utility he queried what we could make with it. “I don’t know, but we’ll think of something.”

We turned “something” into Braised Swiss Chard wrapped in Sole. Swiss chard’s bitter sweetness won us over and D rarely questioned my random fruit and vegetable acquisitions again.

Over the months the rainbow vegetable remained on my mind and I eventually bought seeds for planting them when the bucket garden was a mere dream. They would soon sprout into their glory and remain a site as the stalks matured.

One day, impatient for my own chard to mature, I hit up the vegetable market for a bunch. They became a perfect accent to a delicious cold summer soup.

Finally the glory of my rainbow swiss chard in the buckets was breathtaking. Glowing yellows, radiant reds and electric pinks made the calling to me. I plucked them from their buckets and presented them to D. What to make when the temperature is too hot to handle the kitchen? Some quick and easy pasta, requiring minimal cooking.

As residents of Queens suffered through blackouts in the high temperatures D and I considered ourselves fortunate with our minimized power—at least we still had the refrigerator (and if that failed a few buckets of bounty outside). We ran to the grocery to pick up fresh pasta. Requiring a mere 2 minute boiling time, it would serve as an ideal backdrop to a cold dish.

Whipping up a large batch of pasta, D and I had a fresh meal to last us through the week; no stovetops required.

GARDEN PASTAspan>
Serving Size= 6-8 persons. Active time= 10 minutes.
* 2 pounds fresh spinach pasta
* 1 bunch rainbow swiss chard, loosely chopped
* 1- 15 ounce can garbanzo beans (chick peas), washed and drained
* 1 red bell pepper, sliced into ¼-inch strips
* 1 medium Spanish onion, chopped
* 3 large garlic cloves, crushed
* ½ cup fresh firm ricotta cheese, crumbled
* ½ cup kalamata olives
* 2 Tbl olive oil

1) In a sauce pot on medium-high heat, bring salted water to a boil. Add pasta, cover and cook for 2 minutes. Remove from heat, wash and drain. Set aside in a large bowl.
2) In a large skillet on medium heat, warm 2 Tbl olive oil. Add pepper, onion, garlic and cook until aroma is loosened (about 3 minutes). Add swiss chard, cover and cook until leaves wilt (4-6 minutes).
3) Add swiss chard, peppers, onions, garlic, garbanzo beans, ricotta and olives to pasta. Serve warm or cold.


Below is Kitty and her beloved squirrel toy. We train her to search and destroy these little critters that attack my garden—if only she were allowed outside to put her training work. The glazed look in her eye? We get her good and high so she can forget her killer instinct (the squirrel is full of catnip). Check out this weekend’s cat antic WCB over at Eat Stuff.

Sunday, July 30, 2006

Arepa con Salsa


Continuing with the southern theme mentioned here and here, I will dip further south with this entry. As previously mentioned, I do not make much Mexican (or South American) food. I love its spice and freshness, but hold a few restaurants close to my heart that have mastered it better than I ever could (although I have a promised empanada recipe eventually making its way towards me from a family friend). About 1 year ago, one of those restaurants closed.

Pollos y Mas was an amazing family-run Columbian hole-in-the-wall. Serving up steak or whole chickens with ginormous sides of beans, rice, plantains and whole sliced avocado (my favorite) for astonishingly low prices (around $8). My roommates at the time ordered from the restaurant weekly and as I entered the apartment the sweet savory smell of rotisserie chicken would get me salivating in no time.

D and I found the scent overpowering as we walked by one night and were pulled in for dinner. We started the meal with an arepa con queso. Ordered without knowing what we would get-- I knew that D liked his corn and I liked my cheese. A thick, bright yellow corn pancake was brought to us covered with a snow white cheese. Upon tasting, the cheese’s light-saltiness complemented the sweet corn arepa perfectly. No sooner were D and I hooked than Pollos y Mas closed down, our arepa lost forever-- Or so we thought.

A few months back as D and I meandered slowly over the refrigerated section of our local grocery, we noticed what seemed to be a cousin of the arepa once had. By no means freshly made like the Pollos y Mas one, it would do for our purpose. Settled in nearby were various packets of queso fresco. Grabbing up a pack of each, we attempted to replicate our first tasting of the arepa at home. We started simple, as it was at Pollos y Mas, a thick corn patty covered in cheese, toasted warm until the cheese produced hints of melting. How could something so simple taste so decadent?

In the months to come, D and I expanded our arepa tastings. Sometimes with fresh tomato or avocado sliced on top, other times with salsa, and when we were really hungry, a poached egg, would cap it—always with the queso fresco. The recent heat wave has kept us out of the kitchen and yearning for quick food solutions. The arepa with queso fresco and other accoutrements has been our go-to to the delight of us and others.

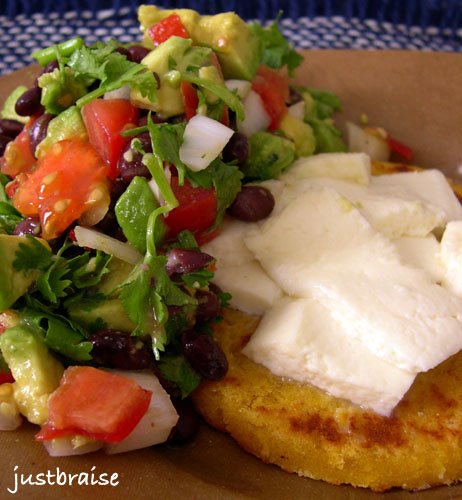
Today was no different as D attempted to hold back his excitement when he suggested the arepa for lunch. Because I knew we had a few other fresh ingredients to accompany the meal, I agreed. I must say, this was the best salsa accompaniment yet and why it was deserving of a picture.

Note: Arepa and queso fresco are available at many groceries where usual South American products are available. Look in the refrigerated section.

AREPA CON SALSA
Serving Size= 2 persons. Active time= 10 minutes.
* 2 corn Arepa
* ¼ cup queso fresco, sliced long to cover arepa
* 1 large vine-ripe tomato, diced
* 1 small Spanish onion, diced
* 1 ripe avocado, diced
* 1- 15oz can of black beans, rinsed and drained
* ¼ cup fresh cilantro, chopped
* 1 fresh red Serrano pepper, chopped
* juice of 1 lime

1) Arrange queso fresco over arepa and place in toaster oven on medium heat. (D likes to do 2 rounds of toasting on medium because the queso fresco just begins to lose form.)
2) While arepa toast, prepare the salsa. In a medium bowl place the tomato, onion, avocado, black beans, cilantro, pepper and lime juice. Mix and serve over arepa.
NOTE: A tasty addition to this is a poached egg.


Head on over to Sweetnick's for Tuesday's ARF roundup!

Saturday, July 29, 2006

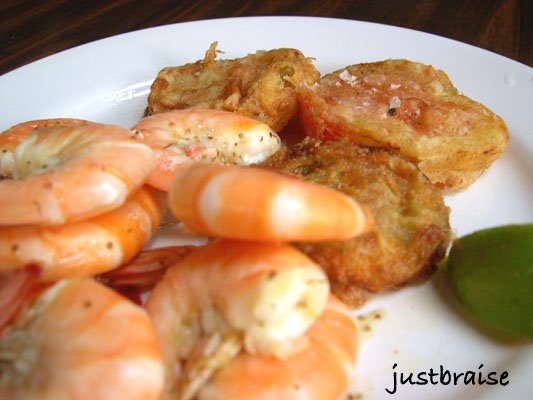
Cayenne Shrimp & Fried Green Tomatoes


The sticky heat making its way through the east coast brings me memories of the south. Even though the most south I have been is the northern reaches (Kentucky, Tennessee, North Carolina, Virginia and Florida), I hold images of sweeping porches, ice cold lemonade, rocking chairs and the tales of my Georgia-living friend. Complementing these images is the lemon meringue pie recently whipped up and rounding off the stereotype, I’ll add today’s fried green tomatoes and cayenne shrimp.

This simple meal kept us out of the kitchen, with the longest moment being the wait for the oil to heat up. It has already been repeated this summer, and will be made many more times for sure—it’s too easy and delicious not to indulge. The heat of the shrimp is cooled by the sweet tomatoes and when served with a cold white wine, this meal is perfection. The combination would stun eaters into awed delight on a sandwich (with the addition of arugula, avocado or perhaps some spicy mayonnaise or mustard).

So while I anxiously await my own tomatoes to ripen on the vine (I spied them yellowing at the edges today), I’ll enjoy these greenmarket finds.

FRIED GREEN TOMATOES
Serving Size= 2 persons. Active time= 15 minutes. Inactive time= 8 minutes.
* 2 large green tomatoes
* 1 cup 2% or whole milk
* 1-½ cups flour
* ½ Tbl paprika
* 2 tsp salt
* 1 tsp pepper
* vegetable oil

1) With a sauce pot, or deep skillet, on high heat, fill oil 1-inch up the sides of the pan. Slice the tomatoes into ¼-inch thick discs.
2) Place milk in one shallow bowl and flour, paprika, salt and pepper in another.
3) Dredge the tomato slices in the milk. [At this time you can start the Cayenne Shrimp; below]
4) Once oil is hot, transfer tomatoes to the dry ingredients and coat both sides. Transfer to oil and cook until lightly browned, about 3 minutes each side.
5) Remove the tomatoes from the oil once done and transfer to a paper towel covered plate. Sprinkle with a little more salt/ pepper and serve.


CAYENNE SHRIMP
Serving Size= 2 persons. Active time= 8 minutes.
* 1 pound large fresh shrimp, cleaned and de-veined
* 1 Tbl butter
* ½ Tbl cayenne pepper
* 1 tsp celery seed
* juice of 1 lime
* hot sauce to taste
* salt/ pepper to taste

1) In a large skillet on medium-high heat, melt butter.
2) When nutty smell of butter comes out, add shrimp and toss in pan to coat
3) Add remaining ingredients and toss again to coat.
4) Cook shrimp about 3 minutes each side, until pink and curled.

Tuesday, July 11, 2006

Cold Corn Soup


My mother loves buttermilk. When I was growing up, she would buy vats of it and sit happily curled up with a clear glass of thick creamy buttermilk. She tipped the glass and the milk receded, leaving its history in filthy chunky streaks. If the glass was rotated with each drink, the clear would turn white and there was no telling how much of the vile matter was left.

My dislike towards buttermilk probably began when my mother first brought it home: “Ew! Buttermilk?! Why would you drink butter?!” I obediently tasted it, confirming my suspicion of its disgusting nature, spat it back into the cup and thoroughly washed my mouth clean with water and crackers. My brothers held similar sentiments to the fraud milk.

Regardless of her children’s opinions, every few weeks my mother would buy a quart of it. Her prized purchase, she coddled the slim carton like a newborn, setting it gently between the two mammothly awkward gallons of milk and silhouettes of my father’s beer in the refrigerator. We sat down to dinner, places set, milk all around: 2% milk poured for the kids, buttermilk for my mother. I watched my mother’s clear glass turn progressively scum-covered, grimacing with the thought of its improperly heavy consistency.

Sometimes we ran out of 2% milk. My mother, thinking she was so clever, would pour our glasses full of buttermilk. My brothers and I saw the scam before we ever sat down: “I’m not drinking that.”
“What are you talking about? It’s just milk.”
“That’s not milk. That’s that… buttermilk.”
“No it’s not.”
“Yes it is. I can tell because it’s not white.”
White, pristine, pure, the color of half a cow. The color of milk. Real milk. The only milk my brothers and I consumed. We went to the refrigerator to confirm our suspicion: there was no gallon of 2%: “See, I told you. It’s buttermilk.”
“No, it’s the last of the 2%. I threw the container away.”
…Walking to the trash compactor.
“Oh, I already took the trash out…”
A lie. The trash was full. I fetched a glass of juice and sat slumped with crossed arms as my mother’s glass grew opaque throughout dinner. I pushed my buttermilk glass her way, she happily took seconds.

More often than not, a fresh gallon of milk would grace the shelves of the refrigerator after an episode like this. Sometimes, time passed too quickly and the buttermilk remained an intruder on the dinner table. The episode repeated itself with little variation:
“I’m not drinking that.”
“What are you talking about?”
“That’s not milk. That’s the buttermilk.”
“No it’s not. I bought regular milk, look:” My mother would lift a glass and slosh the milk around a bit, coating the sides and comparing it to her own glass, “see, mine’s thicker,” she would proudly proclaim.
I knew her trick: “That’s just because you watered ours down. I’m not drinking that.”

Life continued and sooner than later my mother stopped attempting to pass buttermilk off as regular milk. If it was spied in the refrigerator, I pushed it off to the back recesses, allowing real beverages to hold court.

Strangely enough, I love buttermilk. I now happily reach for it every few weeks in the grocery and pull it from my refrigerator. I love it in pancakes and as the base to decadently rich frostings. It is delicious-- Just not alone.

It must have been with a severe lapse in my childhood trauma memory bank that I read a M.F.K. Fisher recipe and thought Cold Buttermilk Soup actually sounded good. Surprisingly refreshing so I copied the recipe down. Adapting it a
bit to suit my own flavors (scallops instead of shrimp, the addition of corn and broth and no sugar).

This soup has become a summertime favorite, especially when corn hits peak season.

COLD CORN SOUP
Serving size= 6 people. Active time= 15 minutes. Inactive time= 1-2 hours
* 1 quart buttermilk
* 2 cups vegetable or chicken broth or stock
* 4 ears of corn
* 1 pound of scallops (or shrimp)
* 1 cucumber, diced
* 2 Tbl spicy mustard
* ¼ cup chopped dill
* 1 Tbl butter
* salt/ pepper to taste

1) Using a sharp knife, carefully slice the kernels off the ears of corn. If using large scallops, cut into quarters.
2) Over medium heat in a large skillet, melt the butter. When pan is hot, add the corn and scallops. Cook about 8 minutes, stirring occasionally, until both change darker shades of their respective original coloring.
3) While the corn and scallops are cooking, dice the cucumber and chop the dill.
4) In a large bowl, place the buttermilk, broth, cucumber, mustard and dill.
5) Once corn and scallops are done, add to buttermilk mixture. Add salt/ pepper to taste. Stir and refrigerate until cooled.

Monday, June 26, 2006

Radish & Peach Sandwich


As previously mentioned the garden has produced crisp, slightly bitter and tremendously juicy White Hailstone radishes, smelling faintly of blossoms and soil. Pulled from the ground (rather, bucket) and washed clean, Kitty even had a taste of the thick green stalks (see picture from June 24).

Desiring more than a salad and noting the meager contents of my pantry I went to the inspiration of cookbooks. Cracking each one, I went straight to the index only to find many a radish laden salad. D grew hungry and impatient, Kitty kept at the stalks and I finally found what I vaguely remembered I had: the Best of Gourmet Paris. The cover image, burned in my memory, showcased two mouth-watering baguettes: one brimming over with a thick schmear of goat cheese covered with raspberries, the other a candy cane assortment of radishes over a blue speckled blanket of cheese.

Using the recipe as inspiration, I headed to the grocery for the best Roquefort I know: Société (with a nod to a certain Frenchman currently displaced in Nottingham, England whose mother used to work at the dairy). Then to the bakery for a (Greek) baguette. In no time, this amazingly simple summer sandwich was produced.

Though D thoroughly rejected my notion that peach would be a sweet and colorful addition to the sandwich, I won in the end and crowned my prized radishes. One bite and I am hooked on the summery nature of this sandwich. The bread, an airy bed for the slightly pungent and salty creaminess of the Roquefort. The garden radishes crisp, with each bite sprinkling dew upon my nose. The peach, pure icing on the cake—the perfect representation of summer that left warm juice dribbling down my chin.

Each ingredient complimented each other to perfection. With a few slices of radish leftover, I placed them on the side, gave them a sprinkling of Lots Wyfe Hawaiian sea salt, creating radish “chips” and popped them in my mouth as a palate cleanser. Hunger problems solved and more refreshing radish sandwiches in the future warming months.

RADISH & PEACH SANDWICH
Serving size= 2 persons. Active time= 8 minutes.
*4 medium-sized White Hailstone Radish (preferred)
* 1 ripe peach
* 4 Tbl Roquefort cheese (Société preferred)
* 1 loaf crispy bread (baguette)

1) Cut the baguette in 2 and slice open (this is an open-faced sandwich)
2) Smear Roquefort over the insides of the 4 bread pieces.
3) Chop radish into 1/4-inch thick discs and layer over Roquefort
4) Slice peach into half. Remove pit and slice each half into 8 wedges. Place over radish.


Check out some Chewy Chocolate Chip Cookies over at WellFed's Paper Palate.

Head on over to Sweetnick's for more ARF friendly items!

Sunday, April 30, 2006

Open-Faced FBS


The BLT [Bacon-Lettuce-Tomato if you dare not know], might just be the most underrated sandwich there is. It shares its lowly status with the sardine sandwich, liver sandwich, and tongue. There might even be an equation—or possibly just a graphable body of data-- that while young, it is the holy grail of grilled cheese that rates as favorite. As we age we teeter off for the more classic sliced meats, and as old age creeps in, we can return to the classics: sardine, liver and tongue.

But where is the BLT in the equation. And more importantly, am I old too young because I appreciate a good sardine sandwich on rye? A schmear of liver? A slab of tongue? Actually, scratch the tongue—I could never get over the bumpy texture.

Who orders a BLT? It is a perfect meat-to-vegetable-to-crisp-lettuce ratio in every bite and yet, it is too often overlooked for something “more hearty”. I am known to pass by it on a menu, even when that sweet-salty bacon is all I crave, unable to spend $5 for what I consider a $3 sandwich. To spruce the classic up, I have seen restaurants create the BALT (adding avocado), a BBLT (with brie), and even [gasp] TBLT (turkey bacon)! But nobody seems to understand it is no longer its simple and perfect self when this happens.

I awoke Sunday morning craving breakfast, but also a BLT. How to make a breakfast version without destroying the BLT's simplicity? I headed over to the butcher while I considered my options. I had him slice up fresh bacon, ¼ inch thick (thick bacon being the key to a BLT). As I passed the bakery to grab my bread I saw the solution: Sureki. Sureki is the Greek’s Challah-- a sweet braided egg bread. I picked up the loaf envisioning my goal: The FBS.

Still at a loss?

FBS, or French Toast-Bacon-Strawberry, is the perfect Sunday morning breakfast sandwich. Offering the best parts of the BLT: crisp bacon and fluffy bread, with a sweeter breakfast flare. Instead of your daily vegetable you receive your daily fruit. For an extra zing, lime and orange zest are used, fresh orange juice and basil as your greens (instead of lettuce).

OPEN-FACED FBS
Makes 2 servings. Active Time= 15 minutes.
* 4 thick-slices egg-based bread (challah works well)
* 4 eggs
* ½ orange, zested and juiced
* 1 tsp lime zest (about ½ a lime)
* 2 Tbl milk (preferred percentage)
* 4-¼ inch thick slices of bacon (ask your butcher to slice it thick)
* 10 strawberries
* 4-5 leaves fresh basil, chopped
* 1 Tbl butter
* cinnamon/ sugar

1) Place one skillet (for bacon) on medium-high heat. Place one skillet on medium heat (for the French toast) with butter.
2) In a wide-brimmed bowl, crack eggs, add milk, juice from ¼ of the orange and orange zest. Beat until well mixed. Drench bread slices in egg mixture until well-drenched. Once egg mixture is done, the two skillets should be warmed.
3) Place bacon on skillet to cook. Place bread on second skillet. Cook 3-4 minutes one side, flip, 3-4 minutes opposite side. Cook until golden brown. Depending on preferred doneness, bacon should receive 4-5 minutes each side. If bacon finishes before bread, place bread in oven to stay warm, set at 250F.
4) Keeping an eye on the bread, make the strawberry topping: Combine strawberries, lime zest, juice from ¼ orange and basil in a small bowl. Using a fork, mash the strawberries into a thick pulp. Serve at room temperature, set aside until ready to serve.
5) Once bread is done, sprinkle with cinnamon and sugar (*do not put this on while on the skillet as it will just burn. Putting this on after it is done cooking will allow the mixture to melt right into the bread).
6) Remove bacon when ready.
7) Sandwich can be open-faced or closed. Layer the sandwich: French Toast, Bacon, Strawberry mixture.


Head on over to Sweetnick's for today's ARF roundup!

Head on over to Kalyn's Kitchen for the WHB roundup!

Saturday, April 29, 2006

Chipotle-Mustard Glazed Chilean Sea Bass w/ Green Beans


*Just Braise has moved. Please visit me at www.justbraise.com!*


I first encountered the chipotle pepper a few years back. It was my birthday and a friend brought me an orange can of La Morena Chipotle Peppers in Adobo Sauce. He had passed a Mexican bodega on the way to the party, stopped in, and bought the cheapest bizarre food item he could find—the 50 cent-7 ounce can was perfect. It was not the only strange food-related gift I would receive that year: a small jar of mint chutney, a bag of stale cotton candy, a can of tuna fish and gunpowder tea were some others. All, much to my own surprise, were put to use—except the chipotle peppers—I just did not know what to do with them.

I cannot say I was afraid of the little shriveled smoked pepper. I just did not make much Mexican food at home (a friend of mine worked at a fabulous Mexican restaurant that offered me a good deal on my meals). I did not know what to do with it. As I said, this was a few years ago. My adventures in mixing world cuisines were not so daring, that can of peppers sat in my cupboard for at least 1 year.

After years of eating chicken mole at said establishment, I finally craved that bittersweet chocolate sauce one night at home. I called my friend for the recipe, attempted my own measurements (since they make it in large vats) and low and behold, I had all the ingredients-- chipotle chili peppers being one of them. I whipped up a batch and I might say, mine was just as delicious as the one I had been eating for years.

I no longer shy away from buying that little orange can of peppers. Their deep smoky flavor is unique and their subtle spice is superb. So when I was sent a bottle of Chipotle-Mustard, I knew it would be delicious. That mustard started popping up in my tuna fish sandwiches, replacing regular deli mustard. I used it on kielbasas, in dips, for dressings on salads.

Inspiration hit the other day as D and I purchased some Chilean Sea Bass from the fishmonger. The problem I often have with D: I want to experiment and he will say something in the realm of: “We purchased the most expensive fish in there, nothing should be added, it’s like drenching a filet mignon in sauce! Fish should be simple: butter, lemon juice, done.” I assured him that even though I had no idea what I was doing, I knew what I was doing. The more you cook, the more you understand flavors and how they might coexist. I was finally able to convince D that replacing plain mustard with chipotle mustard would taste good.

The result? The fish just melted in the mouth. It was a superb combination of smoky chili to sweet mustard to buttery fish. Served alongside green beans this meal will have to be made again—possibly with more chipotle oomph.

CHIPOTLE-MUSTARD GLAZED CHILEAN SEA BASS w/ GREEN BEANS
Makes 2 servings. Active Time= 8 minutes. Cook Time= 20 minutes.
* 1 pound Chilean Sea Bass
* 1 Tbl Silver Springs Chipotle-Mustard
* 2 tsp granulated sugar
* 1 Tbl butter
* about 20 green beans, washed and ends plucked clean

1) Preheat oven to 250F. Melt butter over stovetop on medium-high in an oven-safe pan. While the pan is warming, mix the chipotle-mustard and sugar in a small bowl. Wash and pat dry the Sea Bass.
2) When pan is hot, sear the Sea Bass, skin side up for 2-3 minutes. Flip and sear skin side down for 2-3 minutes. (The thickest part of the fish should still be raw).
3) Brush the chipotle mix over the Sea Bass, place the green beans around the fish and put in center shelf of oven, uncovered, for 20 minutes.


For non-food related activities we have WCB over at Eat Stuff. Below we have one very inactive post-op Whiskey drugged up and sleepy.

As well as one comatose self-drugged (cat nip) Kitty BoJangles (note the fluffy toy that is stuffed full of nip).

Monday, April 24, 2006

Mediterranean Pasta (or Red Pepper-Broccoli Rabe-White Bean & Procuitto Pasta)


There are some people that live and die by pasta. It is their favorite food, it is served at every meal-- it is utterly perfect. For myself, I (still) cannot really understand the effect pasta has on people. I have the same non-chalance with white rice. Sure, I can add butter and salt and it has a great flavor, but… it’s just... there. Does that make any sense? I mean, sure, it tastes good, but in a head-to-head with another starch: warm crisp bread or a baked potato; I’ll take the bread or potato.

Now, I know pasta is not just pasta, and it can be dolled up to create something beautiful on its own. Just like adding olive to bread, tomato paste, spinach or octopus ink added to pasta, all of a sudden creates an attractive taste sensation on the tongue. It is no longer mere pasta. This I accept.

But because of my initial blasé attitude towards pasta in general, I tend to walk past the pasta shelves with hardly a glance; even when they may have “enhanced” pastas. So when D complained that I “don’t let him eat pasta” I was slightly appalled (and quite content) that my own stance had taken hold: D finds his way to the grocery store just as much as I do and I have never not allowed him to buy anything he may want.

So when I was making a run for some flour my eyes were averted by my grocery’s newly expanding organic section. I noticed organic wheat pasta and figured I would give it a try. When I returned with pasta in tow and shared the news with D he could barely fathom his good fortune: “really, pasta?!” You would think we had been living on rations for months and had finally found the black market.

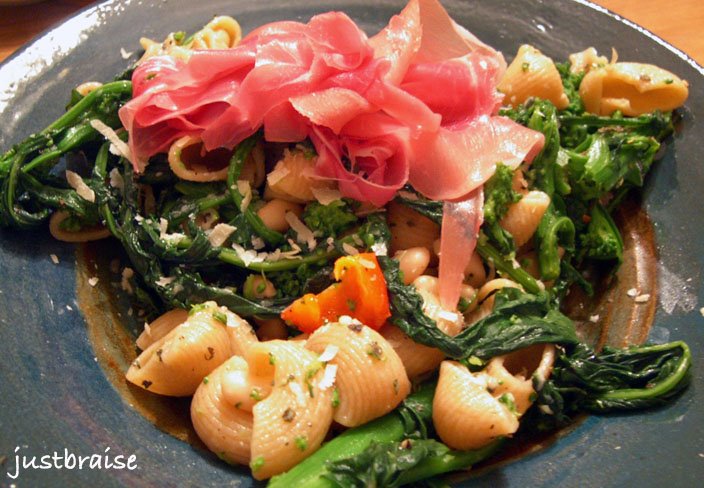
I must admit, there is so much flavor in this dish, the pasta is hardly noticed. If pasta was served like this all the time, I might eat it more often. Because there is no sauce beyond a drizzle of olive oil and sprinkle of Parmesan and fresh herbs, this dish is a pure breeze in terms of cleanup—it also tastes great warm or cold. The broccoli rabe offers a sweet bitterness that can hold its own against the salty procuitto. The white beans are little bundles of surprise as they dance in and out of the pasta “cups”. Most importantly of all, this dish was a rainbow of colors on the plate and palate.

MEDITERRANEAN PASTA
Makes: 4 servings. Active Time= 15 minutes. Cook Time= about 10 minutes. (Depends on pasta variety.)
* 2 cups pasta
* 6-8 stalks Broccoli Rabe, washed (left whole or chopped into large 2-3 inch pieces)
* ½ Red Bell Pepper, chopped into bite-size pieces
* 1 16-oz can White Beans, washed and drained
* 8 slices Procuitto
* 3-4 Tbl olive oil
* Parmesan to taste, freshly grated
* 2 tsp fresh thyme
* salt/ pepper to taste

1) Prepare pasta according to package instructions. While pasta cooks, prepare the vegetables. (If using fresh pasta, prepare after vegetables are combined, just before serving.)
2) In a large-sized skillet on medium-high heat, warm 1 Tbl olive oil. When hot, Add broccoli rabe and red peppers. Cover and allow to cook until broccoli rabe darkens and begins to wilt; about 4 minutes.
3) Add white beans to the vegetables. Stir, cover and cook another 3-4 minutes; until beans are warmed through. Turn heat low and keep covered until pasta is ready.
4) Drain pasta once ready and wash with cold water (this stops the pasta from cooking without cooling it down too much). Throw warm vegetables over, add a about 2 Tbl Parmesan (allow people to add most of their own quantity), olive oil, salt/ pepper and thyme. Toss to mix.
5) Serve up, adding Procuitto at last moment over the pasta (since Procuitto is already smoked, you want it to retain this flavor. Add it at the last moment to avoid cooking it.)


Head on over to Sweetnick's for today's ARF roundup!


View Stats
Rankingblogs.com: Defining your blogs worth..