


Showing posts with label nuts. Show all posts

Sunday, March 18, 2007

Almond Tuiles Cookies


*Just Braise has moved. Please visit me at www.justbraise.com!*


It's true, I've been posting a lot of sweets lately. It's not because I'm not cooking "real" food, but because the past few weeks have seen me working more than usual. Returning around 8 PM (or later) and cooking while hungry and exhausted just does not put one in the mood to set up lighting for a shot. It also makes for more quick meals-- we're making great progress depleting the frozen soup stocks.

Cookies are a relaxing thing to cook for me. They are comforting and delicious and can usually be made fairly quickly. The bonus is that you know they will be delicious.

To make myself feel better I called these, "healthy cookies." They are full of almonds and egg whites and have very little flour-- the dessert version of ordering an egg white omelette I'd say. They are delicate yet filling and go nicely with an afternoon tea or coffee. Another plus, they are another winner from The Cook's Book.

Tuiles means tile in French and refers to the old curved roof tiles that are layered on homes.

Almond Tuiles Cookies
Serving Size= 25 large cookies. Active time= about 8 minutes. Inactive time= about 12 hours.
* 1-1/3 cups sliced almonds
* 1/2 cup + 2 tablespoons sugar
* 2 drops of vanilla extract or 2 pinches vanilla powder
* drop of bitter almond extract
* 2 egg whites
* 2 tablespoons butter
* 2-1/2 tablespoons cake or pastry flour

1) Using a rubber spatula, mix the almonds, sugar, vanilla extract or powder, bitter almond extract, and egg whites together in a bowl.
2) Melt the butter gently and, while it is still warm, pour it into the bowl. Mix thoroughly. Cover the bowl with plastic wrap and refrigerate overnight.
3) The next day, sift the flour into the bowl and mix in thoroughly. Place teaspoonfulls of the dough on a nonstick baking sheet, spaced well apart.
4) Preheat the oven to 300F. Flatten each cookie with the back of a large spoon dipped in cold water, then bake for 15-18 minutes. The cookies should be an even golden color with no white in the center.
5) Remove the cookies from the baking sheet using a metal spatula and slide into a sheet of parchment paper. Let cool.
Note on Shaped Tuiles: For the traditional roof-tile shape, lift each cookie off the baking sheet with a metal spatula and, while still hot, drape it over a [clean] wine bottle or rolling pin. Let cool and set.

Saturday, March 03, 2007

Revelations Part I


*Just Braise has moved. Please visit me at www.justbraise.com!*


I apologize, but prompt drinking was essential...

Almond milk (homemade) + chocolate ice cream (Breyer's) = an amazing milkshake

Okay, so it's a little icier than creamy, but flavor makes up for it. If there is an almond infused chocolate bar out there please tell me. When Hershey's begins to make almond-chocolate syrup for my chocolate milk don't even attempt to hold me back.

I made one small milkshake for myself and all D heard was, "Oh gosh."
"What?"
"This is so good."
"Gimme. [Taste] Oh... this is so good. Make me one?"

As I've been going through The Cook's Book, I've been making random foods if I have ingredients on hand. In the Fruits & Nuts section I found a simple recipe for almond milk:

1 part blanched and skinned almonds (you can buy them like this, they are the all white, slightly unappetizing looking ones.
4 parts boiling water

1) Grind almonds in a food processor until they resemble course breadcrumbs. Put in bowl
2) Add boiling water, cover and let steep for at least 30 minutes.
3) Pour the mixture through a fine mesh strainer, press the ground nuts to release all the milk

It is good like this but I added a touch of honey and a dash of pure vanilla extract to spike the senses.

I have bought almond milk before and love it, but often find the storebought kinds too sugary. This homemade recipe is so simple and far superior. D and I used this milk in coffee this morning, deliciously nutty. It would be great in oatmeal. But tonight it hit peak flavor mixed with chocolate ice cream. Pure loving decadence.

Tuesday, February 13, 2007

Red Velvet for Your Sweetheart... or Sweet Tooth


*Just Braise has moved. Please visit me at www.justbraise.com!*

It's getting to the last hours, do you know how you'll be spending your Valentine's Day?

If I had a fireplace mine would be spent in front of a roaring fire. Rather, that's how I would spend every night if I had a fireplace. If you're without fire, there are plenty of other options for this day of Hallmark-forced romance. I discussed many in this piece printed in the Queens Chronicle.

While your best bets are to keep the eats of the day light and healthy, who doesn’t love a little sugar high?

I had my first bite of the sweet seductress known as Red Velvet a few years ago. A yellow cake with a hint of cocoa and a strikingly white exterior, the cake won my heart from the first beat. I could soon be found getting my individual servings of Red Velvet cupcakes around town (my favorite are from Billy’s Bakery since they stick with a cream cheese based frosting).

A good recap of the red in Red Velvet can be found here, though I would like to amend the fact that baking soda and cocoa powder do still react to form red, it is a mere blush and these days we help our cakes along with a hefty dose of red food coloring.

I searched a number of online recipes for Red Velvet cakes and finally found a tried and tested one in Saveur's March 2006 issue. My boss, who swears by her local bakery, The Cake Man, in Brooklyn, will pick up a slice of his Red Velvet almost daily on her way home. Low and behold the recipe in Saveur is based on The Cake Man’s and after some slight tweaking of ingredients on my part, I have come up with a consistency of redness I like and a deliciously seductive cream cheese frosting.

This cupcake is sure to win the hearts of many. It is fast and easy to make and creates a perfect last minute cupid’s arrow.

RED VELVET CUPCAKES
Prep time= about 20 minutes. Makes about 18 cupcakes.
for the cake:
* 2-½ cups cake flour
* 1-½ cups sugar
* 1 teaspoon baking soda
* 1-½ tablespoons cocoa powder
* 1 teaspoon salt
* 2 eggs
* 1-½ cups vegetable oil
* 1 cup buttermilk
* 2 tablespoons (1 ounce) red food coloring
* 1 teaspoon vanilla extract
* 1 teaspoon white distilled vinegar

1) (Set cream cheese and butter for the frosting aside to soften.) Preheat oven to 350F. Line 18 cupcakes tins with cupcake liners.
2) In a large bowl, sift together flour, sugar, baking soda, cocoa and salt.
3) With an electric mixer, beat eggs, oil, buttermilk, food coloring, vanilla and vinegar together until evenly combined.
4) With the mixer on medium, slowly add dry ingredients to the wet ingredients until smooth, 1-2 minutes. Fill cupcake tins about ¾ full and bake on middle rack 20-25 minutes, until toothpick comes out clean. Remove from tins and cool onracks about 10 minutes. While cooling, make the frosting, below.


for the frosting:
* 8 ounces cream cheese, softened
* 1 stick butter, softened
* 1 teaspoon vanilla extract
* 2 cups confectioner’s sugar

* 1 cup chopped pecans

1) Beat cream cheese, butter and vanilla in a bowl with an electric mixer until well combined. Add sugar, beat until frosting is fluffy, about 5 minutes.
2) Cover each cupcake with about 1 heaping spoonful of frosting, spread with a knife. Sprinkle pecans over frosting and press in slightly so they stick.

Thursday, November 02, 2006

Asian Inspired Beef Braise


I know it’s a little vague to use the term “Asian Inspired” when describing this, or any, dish. Possibly Asian fusion works better, or simply, fusion braise (to go along with all the fusion restaurants we have these days).

For a few weeks now, D has been eyeing the 4-inch thick cuts of beef chuck at the butcher. They called out meat-protein overload to him, so when I finally okayed the purchase he was in heaven. As we headed next door to the vegetable stand and D picked out a few potatoes for the braise, he eyed me warily as I bagged up chestnuts and shiitake mushrooms. More than once I was told not to “ruin” his beef.

Last summer I was in China finishing up a Masters degree. Between tastings of dehydrated “rope” pork, emperor banquets of delicately crafted dim sum, ogling beetles and snakes on a stick and falling in love with the velvety sweet pulp of mangosteens, I became enthralled by the vibrant offerings of vegetables. Each dish was a still life: Broccoli was reshaped into flowering blossoms, mushrooms became lotus roots and lotus roots became dragon scales. I was constantly amazed by the care that was put into presentation, regardless of the establishment.

It was in these dishes that I came to re-appreciate the texture and versatility of the shiitake mushroom, amazed how it holds up in cooking. And it was here that I learned to love the chestnut-- popping up to add a rich flavor and thick creaminess to dishes I hadn’t known before. Used sparingly, mostly as a holiday embellishment (accordingly with their season), I don’t think the chestnut receives its fair exposure.

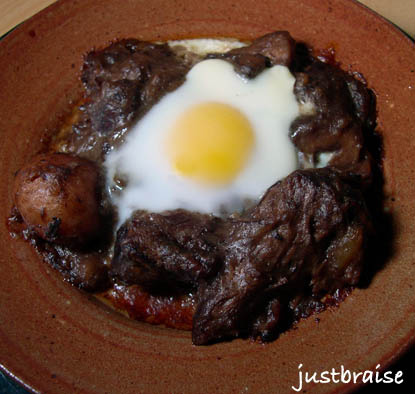
This dish is in some ways a remembrance of China, but more so, a way to incorporate the ingredients I came to appreciate in a succulent braise. We ate the braise bare at first and on the second and third day cracked an egg on top and enjoyed it baked. The egg adds another wonderful depth of texture and fabulous richness once the yolk is broken. And those little potatoes D gathered for the braise? Perfect for sopping all the juices up.

ASIAN INSPIRED BEEF BRAISE
Serves 6 persons. Active time= 20 minutes. Inactive time= 3-½ hours (depending on thickness of meat).
* 1 pound chestnuts, roasted and shelled
*5-6 pound cut of beef chuck (or other inexpensive cut)
* ½ pound shiitake mushrooms, cut into quarters
* 1 medium onion, sliced (or 2 bunches scallions)
* 3 tablespoons soy sauce
* 1 tablespoon sesame oil
* 1 teaspoon dried chili flakes
* ½ bottle red wine
* water
* ¾-1 pound (small) new potatoes, red or white, left whole

1) Roast the chestnuts before beginning. I apparently did not slice into the shells deep enough and a few exploded in the oven. Preheat oven to 350F. Carefully slice an “x” into the bottom flat nub of the chestnut. Place on a pan and roast for 30 minutes, until shells begin to peel away (or blow up in my case). Allow to cool and remove shells. Place meat aside in a bowl (okay if meat breaks apart).
2) Warm a dutch oven over medium high heat with a 1 tablespoon butter-1 tablespoon olive oil combination. Once warm, rinse off beef and pat dry. Salt and pepper both sides of the beef. Once pot of hot, add beef and brown on all sides, about 4-5 minutes each side. Remove meat from pot, set aside.
3) Add mushrooms, chestnuts and onion to pot. Sauté until onions turn translucent, mushrooms brown and chestnuts break down slightly; about 8 minutes.
4) Add soy sauce, chili flakes and sesame oil, stir to incorporate.
5) Push contents of pot to the sides and replace meat in the pot. Add red wine and enough water to come just below the top edge of the beef (depending on how thick your meat is, you might not need any).
6) Place potatoes around the top, but not in the liquid. Cover tightly, turn heat to low and allow to braise (slow cook) for 3-½-4 hours. Check on the pot once an hour. Turn heat down if liquid is boiling. Add more water if all liquid evaporates out. The dish is done when meat easily falls apart and sauce has thickened.
7) Enjoy warm as is or with a baked egg on top (see below).
8) With baked egg: Preheat oven to 350F. Dish up a portion in an oven safe bowl. Create a small divot and crack egg into the space. Place dish on cookie sheet for easy transport and place on middle rack in oven. For a runny yolk, bake for about 10 minutes, until yolk just begins to form a white covering.


Tags: , , , , , , .

Friday, October 06, 2006

Apple Spice Cake


Many may think we leave it to the wisdom and foresight of Johnny Appleseed to spread the goodness of apple orchards throughout the United States. While Johnny can be accredited to spreading the seeds, few of the apples that came to be would ever be worthy of eating fresh picked.

Edible apples, rather those sweet enough to make it into our lunch sacks or slathered with peanut butter, need splicing to reproduce. Meaning the Red Delicious we eat today is very much a piece of the original Red Delicious tree first produced (not a seed descendent). Planting seeds of apples produce 10 very different fruit trees, more than likely none of which will be as sweet as the original.

The short of the long of it, our dear Johnny enjoyed knocking back a few in his day and thought it best to spread the good cheer throughout the land. Spreading seeds of apples, and therefore many a tart variety, led to a massive production of cider (the hard kind). Unfortunately, due to Prohibition, many of the orchards that Johnny is accredited with helping along were chopped down. On the flipside, clearing the bitter orchards very well may have led to space for the cherished sweet varietals we know and love today (my current favorite is the new Honeycrisp-- crisp, juicy and tastes like honey mixed into apple cider).

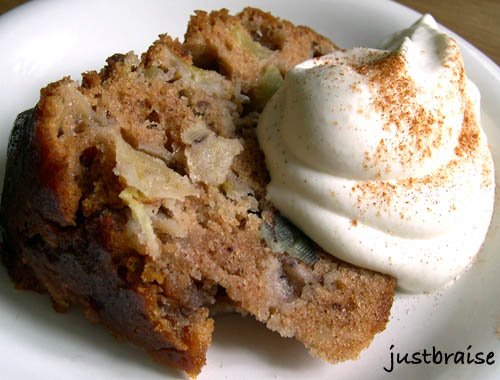
Any way you slice it, and any way you consume them, apples are delicious and deserve eating this time of year. Yet another tasty apple treat... (c/o D's favorite cake lady, Martha Stewart.)

APPLE SPICE CAKE
Serving Size= 10-12 servings. Active time= about 15 minutes. Cook time= 1-¼ hours.
*1-1/3 cups vegetable oil
* 3 cups all-purpose flour
* 1 tablespoon ground cinnamon
* 1 teaspoon baking soda
* 1 teaspoon salt
* 2 cups sugar
* 3 large eggs
* 3 to 4 Granny Smith apples [or other tart apple], cored and cut into 1/2-inch pieces (3 cups)
* 1 cup chopped assorted nuts, such as pecans and walnuts (optional)
* 1 teaspoon pure vanilla extract
* Nonstick cooking spray with flour
[* I also added a 1/2 tsp of ground ginger and 1/2 tsp of allspice]

1) Preheat oven to 350°. Spray a 12-cup bundt pan with cooking spray [or butter]; set aside.
2) Working over a large sheet of parchment paper, sift together flour, cinnamon,[allspice and ground ginger] baking soda, and salt; gather sifted ingredients into center of sheet; set aside.
3) In the bowl of an electric mixer fitted with the paddle attachment, combine vegetable oil, sugar, and eggs; mix on high speed until lemon yellow.
4) Fold reserved parchment in half lengthwise; with mixer on medium speed, gradually shake in dry ingredients until just incorporated.
5) Add apples and, if desired, nuts, to batter; mix to combine [using the electric beater. The juice from the apples will escape a little as they break down and loosen the batter]. Add vanilla, mixing until incorporated.
6) Pour batter into prepared pan, and bake until a cake tester inserted in the center comes out clean, 75 to 90 minutes.
7) Remove from oven, and cool slightly on a wire rack.
8) Invert cake onto rack; turn cake right-side up to cool completely on rack; serve with whipped cream, ice cream or plain.


Check out other Fall Feast-ival items over at WellFed's FitFare!

Tags: , , , ,

Wednesday, September 06, 2006

Mini Fruit Tart


I knowingly had lemon curd for the first time this past summer. I know, a late bloomer for all things delectable. The truth is, the stuff is not in my blood and I am sure my parents thought better than to get me started on another sugar addiction (I already had ice cream and cookies and found Nutella on my own).

D, on the other hand, has curd running through his veins: From his southern pull to his British blood, the boy is practically dripping the goop— and while we’re on it, clotted cream as well. It was when the two of us spent some time in London and around Scotland this summer that D ordered it with gusto and the stuff popped onto my radar. It did not take long for my cravings to begin.

The first tasting was at high tea: scones, clotted cream and lemon curd—oh awake from the dreaming-- the sweetest of combinations! How the Brits avoid title as World’s Fattest is beyond me. Upon arrival in Scotland we glutted ourselves on the substance and bought it in gift form for our return (I was informed it’s quite expensive in the U.S., which upon recent investigation found it is in fact, expensive).

We returned with our own little curd booty. Despite attempts of opening the sacred jar, it remains, stashed in the cupboard for a rainy day when the scent of scones fills the apartment.

A few weeks back when a whopping lemon meringue pie graced the table, I hadn’t the slightest notion that the filling I produced was, more or less, a curd. Sure, it was custardy, but when I think “curd” images of cottage cheese and sour milk fill the void.

In the attempt to work through an over zealous fruit purchase, images of vanilla custard clouds with mountains of fruit undulated through the sky. But as I searched for recipes, none caught my fancy. Instead I found this recipe for lime curd on epicurious.com and was shocked back to Britain. I prepared this little concoction. Let’s just pretend this is a healthy way to enjoy this stuff.

FRESH FRUIT TART
Serving Size= 6 persons. Active time= about 30 minutes. Inactive time= about 2 hours.
* walnut-graham cracker crusts (below)
* lime curd (below)
* fresh fruit topping (below)
* fresh mashed walnuts for topping (optional)

1) Just before serving, fill each walnut-graham cracker crust ramekin with lime curd (this will prevent the crust from becoming soggy).
2) Top with 2-3 large spoonfuls of fresh fruit mixture.
3) Can be served with a dusting of freshly ground walnuts, a splattering of heavy cream, fresh whipped cream, a scoop of ice cream or a light cookie.


THE CRUST
* 5 graham crackers
* 1/3 cup walnuts
* ½ stick butter, melted

1) Preheat oven to 350F.
2) Combine graham crackers and walnuts in food processor or blender. Process until grainy. Add melted butter, process until well combined.
3) Press graham cracker mixture around the edges and bottom of 6 ramekins. Arrange on a cookie sheet and bake 10 minutes, until edges turn golden.
4) While crusts bake, begin the lime curd (below).


THE LIME CURD
* ½ cup sugar
* 1/3 cup fresh lime juice
* 4 large egg yolks
* 5 tablespoons unsalted butter, cut into 1/2-inch cubes
* 1-½ teaspoons grated lime peel

1) Add sugar, lime juice, egg yolks and butter to a heavy saucepan over medium-high heat. Whisk to combine. Set lime peel in a heat-proof bowl aside.
2) Cook over medium-low heat until thick, smooth, and just beginning to bubble, stirring constantly, about 10 minutes.
3) Remove from heat and strain into bowl with lime peel. Stir to combine. Cover with plastic over the surface of the curd and refrigerate until cold; about two hours. (Can keep up to 1 week.)


FRESH FRUIT TOPPING
* ½ cup fresh blueberries
* 1 cup fresh Bing cherries, quartered and pits removed
* 1 mango, sliced into chunks
* 1 Tbl lime juice
* 1 Tbl sugar

1) Add all ingredients to a bowl and stir to combine. Let set for at least 10 minutes before assembling tart.


Tags: , , , , , , .

Monday, March 27, 2006

Orange-Pinenut Buckwheat Pancakes (ARF #13)


Breakfast for dinner? Come on, I’ve done dinner for breakfast so I'm practically expected to mix it up a little. Where in the book of life does it state we must keep our themes straight? As long as we get in our fruits and veggies for the day, what’s the harm? Plus, when the weather finally makes a turn for the better we crave a lighter fare. What is more suitable than to serve up a sweet and delicious breakfast for dinner?

The dear Sweetnick’s asked me to piggyback on an orange theme for this week’s ARF roundup. Being that Sweetnick’s was the first food blogger I befriended, the fact that I’ve been participating in the ARF roundup since its inception and the two of us are almost neighbors, I was more than happy to oblige.

I dared myself with a pancake. D and I have our pancake du jour pretty much settled and it was with a little trepidation that I picked up this recipe. But I will say, it was a success. Because really, what is better than the addition of fruits and nuts to a meal? [Thinking time…. ] Okay, maybe chocolate, caviar, wine…all three? But let us not be so decadent! Fruit is right up there with the natural nectars of the gods. So now, if any of you are those naughty breakfast-skippers you can have your breakfast, dinner and your dessert too-- all in one meal!

While the usual fruit addition to pancakes is usually banana or blueberry, the use of orange was quite an elegant one when presented. The result was that while our tried and true pancake will always win out, these were a nice break in the routine.

NOTES: As I am used to pancakes with a little more substance, I think this batter alone is a little bland. The orange zest really perked it up-- I even doubled the zest-- and believe this is a necessary addition. The nuts gave a much fuller flavor to the batter and were great crunchy surprises throughout, I would not go without these. I had no almonds and substituted pinenuts (walnuts would also be tasty). The result was a milky nutty flavor throughout. I found the nuts a little overwhelming and would lessen the amount; not only in the batter, but the syrup as well [especially if you are looking to cut the fat content]. Overall, the pancakes were nice and fluffy, as a pancake should be and a good change to my usual cornmeal-molasses pancakes.

This is the recipe as it appears on the Honeywell website. Note that the provided times for these pancakes were off for me. These took me about 50 minutes total active time (including prep work). You can find other orangey recipes there as well.

ORANGE-ALMOND BUCKWHEAT PANCAKES
Makes: 6 servings, 2 (4-inch) pancakes each. Prep time: 20 minutes
Cook time: 50 minutes.

PANCAKES:
* 1 cups sliced almonds*
* 1 whole orange
* 1 egg
* 2/3 cup 100% orange juice
* 1 cup 2% reduced fat milk
* 2 tablespoons grapeseed oil or canola oil
* ¾ cup buckwheat flour
* 1 cup all purpose flour
* 1 tablespoon baking powder
* ¼ teaspoon salt
* Non-stick cooking spray

1) Preheat oven to 375°F. Spread almonds over a cookie sheet and bake 5 to 7 minutes until nicely browned. Remove and cool at room temperature. Use grater to grate zest of the orange, while careful not to grate into the white pith. Peel remainder of skin and slice between membranes to separate each orange segment. Set aside for garnish.
2) Combine egg, orange juice, milk and oil in medium bowl and mix well. In large bowl, combine both flours, baking powder and salt with reserved orange zest.
3) Add liquid into the dry ingredients and mix thoroughly while being sure to leave some lumps. Set aside ¼ cup almonds for syrup, then gently mix remaining ¾ cup almonds into batter until ingredients are combined, but still lumpy. Do not over-beat or stir until smooth as this will make pancakes tough.
4) Ladle batter onto hot, non-stick skillet coated with cooking spray and cook until some bubbles begin to appear on top, about 3 minutes. Flip cake over and cook 2 minutes. Serve immediately with orange-almond syrup, and garnish with orange segments.

*Note: While almonds provide a healthy fat, this ingredient may be removed to reduce the recipe's fat content by 18 grams.


ORANGE-ALMOND SYRUP:
* 1 cup 100% orange juice
* 1 cinnamon stick
* ½ cup light maple syrup
* ¼ cup reserved roasted almonds

1) Simmer orange juice and cinnamon stick in small saucepot over medium heat until reduced to 1/2 cup, about 15 minutes.
2) Add maple syrup. Remove cinnamon stick, stir in reserved roasted almonds and serve warm.

Monday, March 06, 2006

Chicken Masala (ARF5/#10)


What happens when a fresh coconut in the middle of the winter is too hard to resist at the grocery store? When you try to impress friends from out of town by using your drill to get at the sweet, rich water inside (other than learn there are easier ways)? What do you do once everyone has had their fill of sweet coconut meat? You spend a week in coconut bliss…

It all started with a Coconut Banana Bread with Lime Glaze. Now, fresh coconut is not needed for this bread, but it tastes amazing sprinkled on top. Once all that coconut meat is shredded, there are about 4 cups to put to use. Coconut Banana Bread used about ½ cup. Today it was Chicken Masala. I must admit this was my first time ever cooking a “legitimate” Indian meal. In the past, I have sprinkled some curry, tumeric and cumin together and called it Indian. Sad, because I absolutely love Indian food. And bad, especially since I have most of the spices in my cabinet!

I found a fairly simple recipe on Mahanandi. This recipe was chosen over others because, well, I had all the ingredients. This recipe also did not take too much time—as long as everything is in front of you at the start. It also helps to have an extra hand in the kitchen (so while one is roasting spices, the other can grind). The final result was excellent and filled the home with an amazing aromatic essence.

First, the benefits of coconut.

At a recent dinner party, I ordered coconut milk. I offered some to a friend who dissed it, “Oh, that stuff is really high in saturated fats. I won’t touch it.” Your loss, it was good. Coconut Oil is one of the best oils a person can consume. For centuries, South East Asian cultures have called the coconut palm the Tree of Life. Coconut oil is antiviral, antibacterial, antimicrobial, and antiprotozoal. Not all saturated fats are alike. While coconut oil is one of the highest in saturated fats it is also one of the highest sources of medium chain triglycerides, many of which are important in building and maintaining the immune system. Some medium chain fatty acids, like coconut oil, help to maintain the metabolism. It is also very good for the skin as a moisturizer.

Coconut Meat is high in fiber, vitamins and minerals (vitamin C, E, calcium, magnesium, potassium and iron). It is also low in cholesterol and sodium. Other forms of coconut include Coconut Water which is the liquid found upon initially cracking the coconut open. And Coconut Milk, made by steeping coconut meat pulp in boiling water and then pressing for the milk. All these forms of coconut share similar health benefits up to a point.

Below is the second installation on coconuts. More to come shortly on this tasty and long lasting fruit! This recipe is taken from Mahanandi’s site. It is followed step by step with the replacement of chicken instead of potatoes. Interesting, because my masala turned out orangey-brown instead of red! It also was not as sauce-based as Mahanandi’s picture! Maybe more water (or plain tomato sauce?) would fix this. Well, it was still delicious! I served this on a bed of basmati rice. Once again, it is recommended to have all ingredients out before starting. And again, a second hand helps-- While D was roasting all ingredients on the stovetop I was busy puréeing the ingredients together in steps and keeping an eye on the rice. In the end, there is enough masala leftover for two lunches tomorrow.

The below recipe is the original Aloo Dum (Potatoes in Masala Sauce). This recipe seems like a lot of ingredients but it is really mostly spices. So give it a try.

ALOO DUM
Serving Size= 4. Active Time= 30-45 minutes.
The preparation is three step. First boil the baby potatoes until they are just tender. Roast and grind the spices, the vegetables and the nuts for masala sauce. Combine and cook them together. The whole preparation takes about 30 to 45 minutes, if you have everything at hand.:) And the main chunk of it is of course to wait for the potatoes to boil.

* 12 tiny baby potatoes

Veggies
* 4 medium sized ripe tomatoes, each cut into four quarters
* 1 medium sized red onion or 4 shallots cut into big chunks
* ¼ cup finely chopped coriander
* 1×1 inch piece of fresh ginger
* 2 big garlic cloves


Nuts
* ½ cup cashews
* ½ cup fresh grated coconut

Dry Masala
* 6 dried red chillies
* 1 teaspoon coriander seeds & cumin
* ½ teaspoon peppercorns
* 3 small cinnamon sticks and cloves
* 1 star anise


Popu/Tadka
* 2 teaspoons of peanut oil
*1 teaspoon of mustard seeds, cumin and some curry leaves
* ½ tsp of turmeric
* Salt to taste

1) Preparation is boil, roast-sauté-grind and cook.
Boil the potatoes until they are just fork-tender. When they are cool enough to handle, peel the skin. Prick them with a fork in multiple sites and keep them aside.
2) Gather the listed ingredients for masala sauce, ready on hand on a big plate. Heat an iron skillet and proceed like this.
3) Roast dry masala ingredients, for few minutes, until they release their smell. Remove them from the skillet and keep aside.
4) Roast cashews, then fresh grated coconut for few minutes. Remove them from the skillet and keep aside.
5) Roast ginger and garlic for few minutes. Remove them from the skillet and keep aside.
6) Finally heat one teaspoon of oil and roast onion and tomatoes for few minutes.
Let them cool down little bit. When they are cool enough to touch, put them in a blender. Add half glass of water and half teaspoon of salt. Grind them into smooth paste.
7) Cook: Heat one teaspoon of peanut oil in a big wide pan or kadai. Toast the popu ingredients (mustard seeds, cumin and curry leaves) until they start to splutter. Add the grinded masala paste and another half glass of water. Stir in turmeric. Taste and add salt if needed. Add baby potatoes. Cover and cook on medium heat for about 15 to 20 minutes. Finally stir in finely chopped cilantro and serve.

My Kitchen Notes: 
Don’t forget to prick the potatoes, so that they can absorb the sauce.
 Onions - avoid yellow onion and go with shallots or red onions. 
If you want, you can also stir in cream/yogurt at the end.


Head on over to Sweetnicks for all your ARF/5 round up!

Saturday, February 11, 2006

Baked Caramelized Pear (+ WCB 36)


There are two desserts of my youth I remember distinctly: baked caramelized fruit (pear or apple) and apple pie. The baked fruit was always my favorite. Overzealous trips to orchards in early fall would result in bins of apples stored in my family’s basement. As we got to the bottom of the bins, those sub par broken down apples became a sweet treat.

Unbeknownst to anyone else, my mother would rummage through the apples, plucking up bruised and downtrodden fruits. A sweet heavy haze of caramel would impregnate the house. Noses would turn skyward, tracking the smell like the expert scavengers my brothers and I were. Floating into the kitchen on the wings of our noses, we took our positions at the counter awaiting our prize.

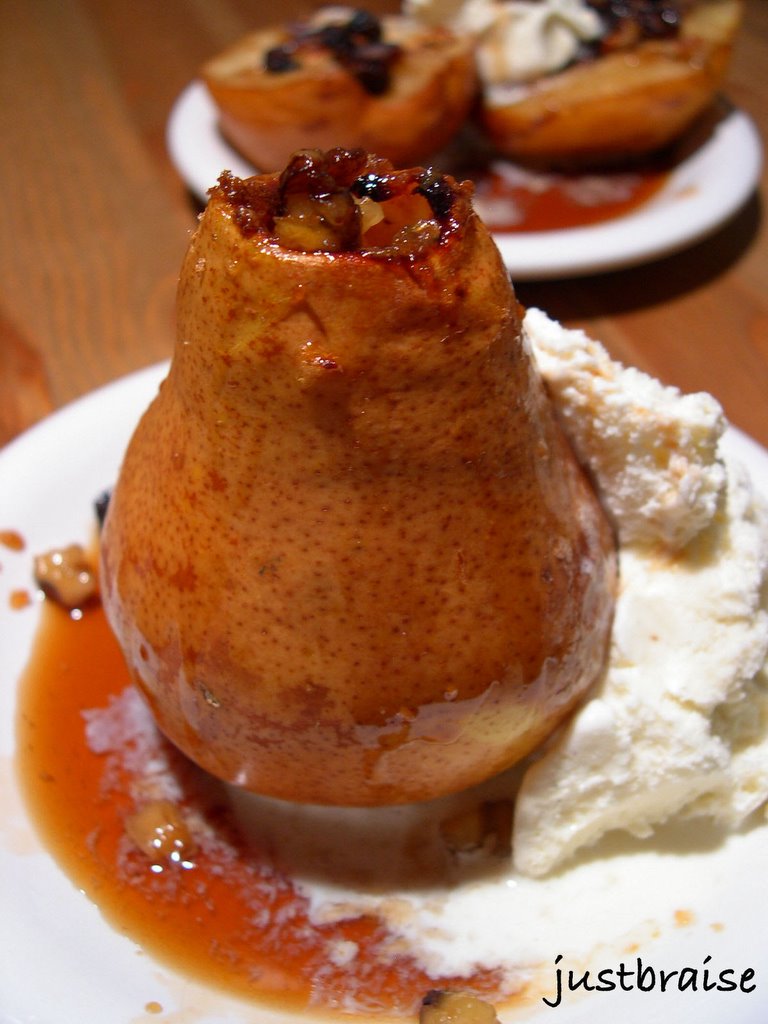
Soon enough, my mother would pull the fruit from the oven. Sepia tinged, wilted from heat, and bubbling over the top, once perfect fruit was transformed into a superior delicacy. Forks injected prey and all was liked clean.

Baked caramelized fruit is one of the easiest desserts to prepare. Healthiness can be altered according to personal preference, altering the quantity of brown sugar used. With little effort and some quality oven time, one can turn past-prime fruit into a splendid dish to savor. With a scoop of vanilla ice cream this dessert is brilliant. At my local French restaurant a pear is soaked in red wine over night and called, “Poire Belle Helene.” At another restaurant, a banana is caramelized and served with a rich molten peanut butter cake (the same as the molten lava chocolate cake but with a peanut butter center). Here it is simple, quick and delicious. The wolves will be brought with trickery to the table, devouring their fruit in a gluttonous huff.

BAKED CARAMELIZED PEAR
Serving Size= 2. Prep time= 5 minutes. Bake Time= 35-45 minutes.
* 2 overripe pears, washed and cored
* 2 Tbl brown sugar
* 2 Tbl raisins, dark or yellow
* 2 Tbl walnuts, chopped

1) Preheat oven to 375F. Prepare pears and set on a baking dish. Stuff each pear with ½ Tbl brown sugar, ½ Tbl raisins, ½ Tbl walnuts, layering, then the other ½ Tbl brown sugar, raisins and walnuts (each pear receives 1 Tbl of all ingredients). Place in center of oven and bake uncovered 35-45 minutes. Pears should be golden, slightly wilted and soft.
2) Serve on plates with a scoop of ice cream. Pour released juices over top.


And... Non-food related Weekend Cat Blogging #36
Devilish Whiskey has a talent for waking me up in the morning while he goes on blinds patrol:

His sister's great talent you ask? Sleeping, of course:

Friday, February 10, 2006

The "Waldorf" Salad


I often use walnuts and dried cranberries (not sweetened Craisins) in my salads. It sweetens as well as breaks up the usual routine of tomato-carrot-celery. I once did this for my friend B from Egypt. I brought out the salad and to my delight B took a bite and was wowed: “How did you think to add the nuts with cranberries-- and pear?! This is amazing.” High on the powers of praise, I neglected to tell B that it is actually a fairly popular salad combination here in the States; I merely shrugged.

Much to my delight many a variety of the Waldorf salad is making its way onto menus across the country. Health conscious clientele are pushing the traditional mayonnaise-based dressing out of habit, calling for a more delicate covering, allowing natural tastes to break through.

The Waldorf salad’s namesake comes from the hotel it originated from: The Waldorf Astoria, in New York City. Created in 1886 by the maître d’hôtel, Oscar Tschirky, the original recipe calls for apples, celery and mayonnaise; it was later that walnuts were added to the mix. Since then, the salad has morphed into many variations.

I was recently taken to the famed Waldorf Astoria for a luncheon. The Waldorf salad was ordered out of respect for the establishment. The hotel now adds avocado to their salad, an excellent surprise. I unfortunately (or maybe happily) left that meal so stuffed I was in a food daze the remainder of the day. This meal was the catalyst to the birthday week of gluttony, ending with pants splitting along the leg seam. This incident will also cause me to take a more (somewhat) subdued and healthy approach to cooking this week, starting with this salad today.

There are too many modifications to suit specific tastes over the years that I will only say this: mix and match your favorite nuts, dried and fresh fruits, and lettuce bedding, and you will most likely produce a delicious, healthy salad. For my own, I usually stick with endive, pear and a tossing of good crumbly feta. Today I went without cheese and added radicchio (which resembles a small red cabbage with a slightly spicy taste). I also coated the salad liberally with Lot’s Wyfe New Zealand pink coral salt, and a sprinkle of Manicardi Balsamic Vinegar, my two new favorite kitchen additions. One can also make a light mustard-lemon juice-olive oil vinaigrette.

”WALDORF” SALAD
Serving Size= 2. Prep time= 5 minutes.
* 1 endive head, thinly sliced
* ½ radicchio head, thinly sliced
* ½ fennel bulb, thinly sliced
* 1 apple, thinly sliced (or pear)
* small handful of green beans, washed, trimmed and halved (optional; blanched or raw)
* ¼ cup dried cranberries (or other dried berry)
* ¼ cup chopped walnuts

1) Combine and mix the endive, radicchio, fennel, apple and green beans. Distribute onto 2 plates, sprinkle cranberries and walnuts on top. Drizzle with a good balsamic vinegar, or a homemade mustard-lemon based vinaigrette. Add salt/ fresh ground pepper to taste.
NOTE: Crumbled feta or blue cheese make excellent additions to this salad

Wednesday, November 30, 2005

Stuffed Eggplants w/ Pomegranate & Pine Nuts

In a previous post, I mentioned feasting under a whole moon on the beaches of Sinai. Even with the moon’s reflection off the water, stars were out in the millions and I gazed drunk with delight at the sky. My cohorts and I, sun-kissed and hungry after a day of swimming in perfectly clear, warm waters, were famished. We stumbled away from the beach to the bright bungalow for the meal that awaited us. Forever when I eat a pomegranate, I will think of this beach and our shared gluttony.

A, one of my closest college friends, was moving to Cairo for the year. I did what any selfless friend would do in the situation and sent her off properly, accompanying her with one week in Cairo and one in Lebanon. D, another friend of ours, is Egyptian. Even though she would be knee-deep in her studies (a blossoming PhD), D offered to take us to her beach hideaway for a weekend away from the craze that is Cairo. (D also introduced me to roasted pigeon on this trip, a succulent feast that should be eaten with your hands, courtside the main Cairo market.)

D’s mother is yet another food goddess incarnate I have met in the voyage of life. Upon our arrival, she fluttered about, pushing her homemade and fresh delights onto us: Stuffed grape leaves, stuffed eggplants, chicken, lamb, flatbreads, olives, fruits, and countless varieties of feta. At each meal we merrily plunged more and more food into our bellies, and D’s mother, in true Middle Eastern hospitality, kept pushing more onto us. In between bites I discussed recipes with her, especially for my favorite, the stuffed eggplants. We would finish each meal with fresh brewed Arabic coffee on the roof, smelling the salted air now tainted with cardamom, while D’s mother would hurry off to bed in preparation for her dawn beach appointment.

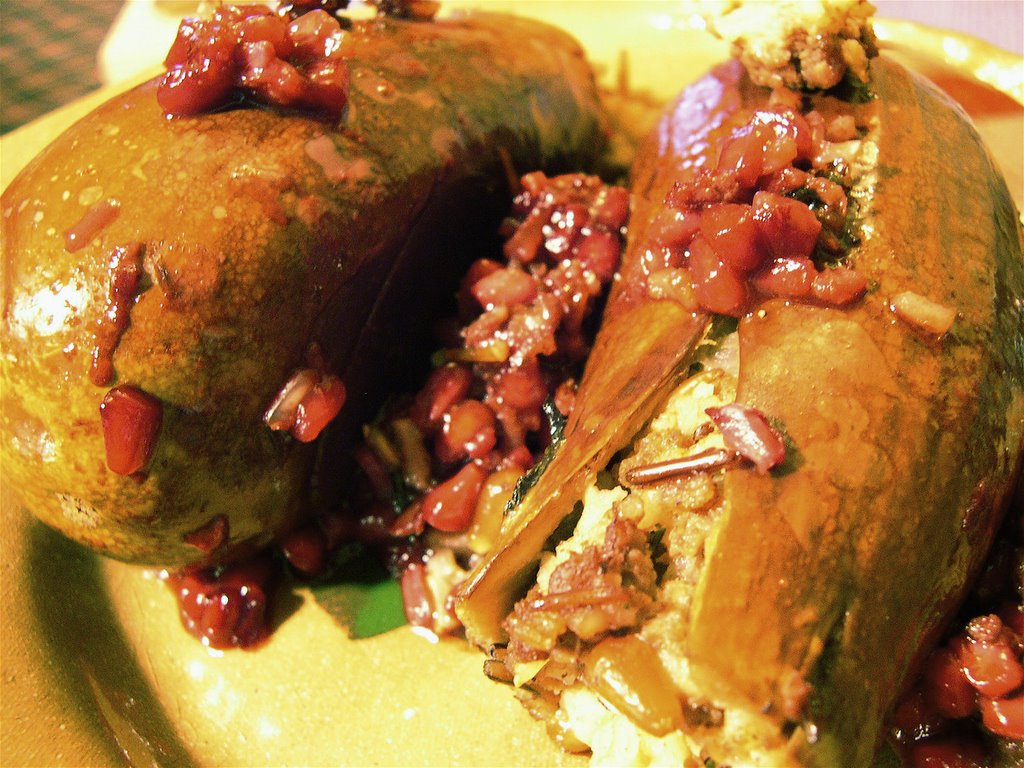
These eggplants are sweet, savory and delicious, but a poor imitation of perfection (they also look like a ruptured artery in the picture). If I could sweep D’s mother away from the beach to make these for me I gladly would. Even better, I prefer spending my days with her on the beaches of Sinai being stuffed to the gills with her home-cooked amusements.

STUFFED EGGPLANTS W/ POMEGRANATE & PINE NUTS
Serves 6. Prep time= 45 min. Cook time= 45 min.
8 small (4-5 inch in length) eggplants (if you can find smaller ones, by all means use them-- just purchase more. They are easier to clean and will be more flavorful.)
Filling
¾- 1 lb ground beef (or lamb)
1 cup wild rice
1 onion, chopped
4-5 garlic cloves, minced
5 Tbl pine nuts, toasted
5 Tbl pomegranate molasses (available at specialty, Asian and Middle Eastern stores)
8 fresh mint leaves, chopped
juice of ½ lemon
1 pomegranate, deseeded

1) In a saucepot, begin the rice according to the directions on the package
2) While rice is cooking, in a large saucepan, on medium heat, add meat, onion and garlic. Break apart meat and cook until meat is browned, stir occasionally.
3) While meat-onion-garlic is cooking, toast the pine nuts (in a toaster oven on medium or 5-10 min in the oven on broil) until lightly browned. Deseed the pomegranate.
4) Hollow out the eggplants: Clean and cut the tops off. Use a small knife to start the process then a spoon to scrape the remaining meat (and mostly seeds) out. Be careful not to puncture or tear the skin (eggplant skin is fairly tough pre-cooked so this should not be too much of a problem). Hollow out the eggplant as much as possible. It is okay to leave a small perimeter of meat along the edges. (To do this quickly takes a little practice so keep an eye on the meat and rice. If either are finished just turn the burners off).
5) At this point, the rice should have about 10-15 min cook time remaining. Preheat the oven to 350F. When meat is done, turn stovetop off, add pine nuts, pomegranate molasses, mint, lemon juice, and pomegranate seeds. When rice is complete, add rice to the meat mixture (or add the meat to the rice if the saucepan is not large enough). Stir until evenly blended.
6) Using a spoon, stuff the filling into the eggplants, packing it in well (as you see ice cream scoopers pack a fresh pint of ice cream). Once done, cover with aluminum foil and bake on middle rack for 35-45 min, until eggplants are soft.
7) Keep any remaining filling to stuff more eggplants, zucchini or bell peppers—or just eat it on the side.

Saturday, November 26, 2005

A Play on a Mediterranean Classic


In my younger days salads were a despicable nutrition source (if they could be called that). They usually composed of the basic food items I most loathed-- vegetables. Or even more usual, they were made in the same boring combination day in, day out: iceberg lettuce, tomatoes and cucumber. Can people have less imagination? And how can a restaurant dare push this off as a "house salad" making people believe there is actually nutrition value in this salad (iceberg lettuce and cucumber are essentially water-logged with few vitamins) and people are receiving their daily vegetable intake? I fail to remember, did people actually feel better about themselves after eating one of these poor excuses for a salad.

I am now older, and I like to think wiser. I have come to understand a few of the essential vitamins my body needs, and I have come to understand combinations that taste good-- who knew fruits, vegetables and nuts are delicious? And how many combinations can there be...??

This Thanksgiving, when I asked my brother to aid in the food production (did I mention I made everything this year?), I almost fell to the floor in convulsions when he turned to the iceberg lettuce, began reaching for tomatoes, and announcing he could not find the cucumbers. No, no, no! (No worries, I set him on the right path.)

Saturday I put myself in charge of the luncheon salad. It was delicious, crisp, crunchy, sweet, salty, with each item perfectly indecipherable from the next. I make these salads in various fruit-cheese-nut-greens combinations depending on my fridge's availability and you can do the same. This was today's:

EASY GOURMET SALAD
Serves 4. Prep time= 10min
2 heaping handfuls of mixed greens
1 ripe avacado, sliced
1 ripe pear, sliced
8 dried apricot pieces, chopped
small handful of pecans, whole or chopped, candied or not
top with crumbled feta (or goat or parmesan)
3 sprigs fresh thyme (optional) sprinkle on salad


I covered this with a simple dressing to enhance the flavors:
1/2 orange, juiced (or lemon)
4-5 dashes of hazelnut oil (or olive oil if not available)
dash salt
fresh pepper to taste

Either juice/ throw all over top or mix separately and put over salad when ready to eat.

Wednesday, November 23, 2005

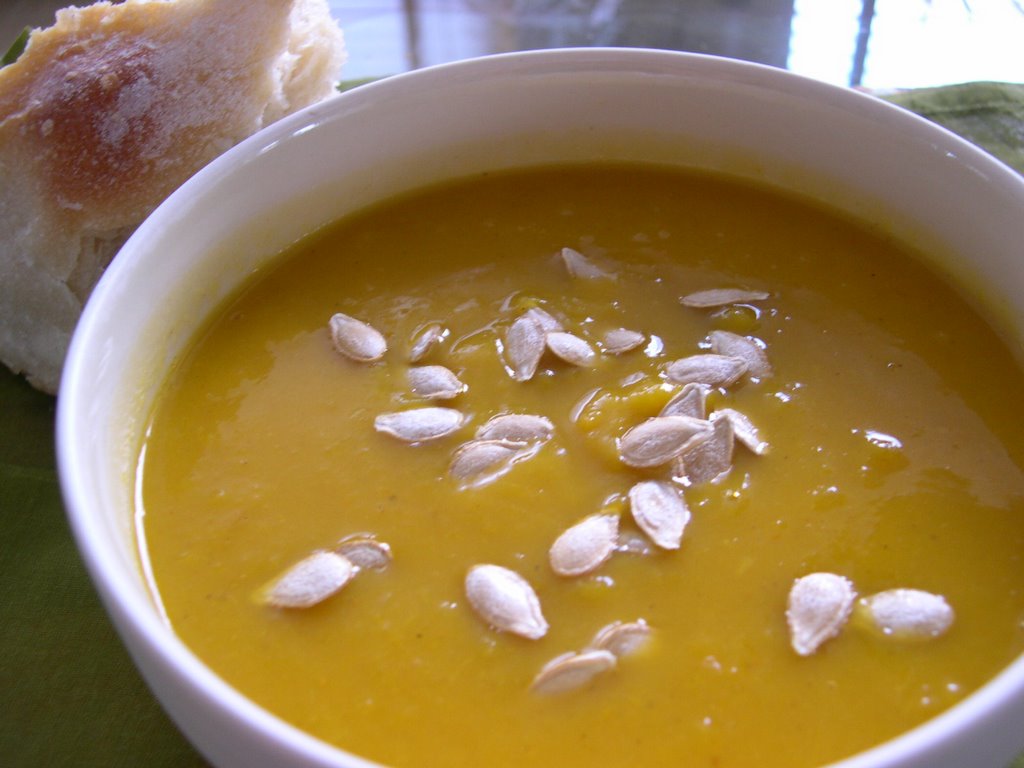
Curried Butternut Squash Soup


I have found that many of my friends love food: They love to talk about it, they love to cook, they love to swap recipes, but mostly, they love to eat it. When we have nothing better to discuss, or when tempers brew, we turn to food to cool the flames (which inevitably leaves us arguing about the best way to prepare such and such). The great thing about his though, is that many a cookbook, many a recipe, and many a fabulous meal is passed between us.

A few winters back in December, the weather was cold and biting. I was invited to an intimate dinner by my good friend, A, who had a roommate that was trying a new soup recipe. Not one to turn down an invitation, especially one that involved soup, I jumped the subway for the 45 min commute to the cozy Brooklyn apt (this was when A and her roommates were saving money and found a great deal where they could also score amazingly cheap produce). When I arrived, there was a blast of warmth and the intoxicating smell of curry. E spouted off her newfound recipe and how easy it was, "so simple! Only four ingredients." It was not much later that we were breaking crusty bread and digging into this savory soup. The night continued and I cannot remember what else we ate-- possibly one of A's infamous salads? Regardless, it was the soup bowls that were literally wiped clean to indulge in every last sweet drop.

But soon it grew late and I had to make the trek back to Queens. I bundled my layers on, wrapped my head tight and copied the precious recipe soon to be had countless times in the future. Most recently I made it for D when I first saw butternut squash available at the market. D's reaction was much the same as mine upon first tasting: The bowl was licked clean. I brought leftovers into work the next day only to be hovered around while I ate the soup and "X" smelled the goodness, drooling for a bite she would not receive (sorry).

I am making this soup now, for a pre-feast whet of the Thanksgiving appetite. I offer advice: Please get yourself a handheld blender(cordless is optional). Especially if you enjoy soups that are blended (as I do) it makes the process worlds easier. Today I used a Cuisinart (I am in at my mother's for T-giv). Yes, classic Cuisinart, I love you, but you are the devil when I need to ladle hot soup into your bowl and I am forced to puree in 3 rounds. When I am home, I stick my lovely cordless handheld blender into my large vat of soup and voila, minutes later I have the perfect consistency with little hassle (it's also a great instrument to use when making smoothies). But with no further ado:

CURRIED BUTTERNUT SQUASH SOUP
Makes 6 servings. Active time= 30min. Total= 1.5 hr
1 good size butternut squash
1 Granny Smith, or other tart apple, peeled and chopped into cubes
1 medium white onion, chopped
2 tsp curry
1 Qt, 4 cups, low-salt chicken or vegetable broth

1) Preheat oven to 425F. Cut the squash in half lengthwise, deseed (keep the seeds in a small bowl). Place facedown on a baking sheet and bake for 40min.
2) Rinse the seeds and lay out on another baking sheet, sprinkle with salt and bake 10-15 min (while the squash bakes). Remove and set aside.
3) While squash is baking, in a saucepot on medium heat, sauté the onion and apple, 10-15 min with a dab of butter or oil. Add the curry and stir. Turn the heat down to keep warm.
4) Remove the squash from the oven when done. Carefully (it is hot) peel the skin off the squash-- it should come off easily. Cut into cubes and add to the pot.
5) Turn the heat back up to medium, add the broth and let simmer 20min.
6) Puree the soup in a blender (or with a fabulous handheld one). Dish out, sprinkle with seeds, serve with crusty bread and enjoy the sweet nutty flavor.

Tuesday, November 22, 2005

Cranberry Macadamia White Choco Chip Cookie


A shorter name for this cookie might be, "The Perfect Holiday Treat". There is no long story behind them other than they are delicious. Also, that I made them for the upcoming Thanksgiving festivities (and the Pumpkin Cheesecake amongst other delicacies...). Come Autumn, these treats are perfect any time with their fabulous color combination.

If memory serves me properly, last time I whipped these up I used pecans, not Macadamia nuts, also excellent. I think this updated version adds to holiday cheer (and longings of Hawaii as snow is en route??)-- the colors just make one want to snuggle up next to a warm fire with a loved one. So share these freely and spread a sweet cheer.

These cookies are great warm with a cold glass of milk. They are not overly sweet, are soft, hold a burst of spice on the inside, and keep their form well when baked.

CRANBERRY MACADAMIA WHITE CHOCO CHIP COOKIES
"THE PERFECT HOLIDAY TREAT" or "A TASTY MORSEL"

Makes about 25 2-inch cookie drops
1 cup all purpose flour
1/2 tsp baking soda
1/4 tsp baking powder
1/2 tsp salt
1 tsp cinnamon
1/2 tsp nutmeg
1/2 tsp allspice
1 stick (1/2 cup) butter, softened
3/4 cup firmly packed light brown sugar
1 egg
1/2 tsp vanilla
1 cup oatmeal
1/2 cup dried cranberries
1/2 cup white chocolate chips
1/2 cup Macadamia nuts

1) Preheat oven to 350F
2) In a mixing bowl, whisk together flour, baking soda, baking powder, salt, cinnamon, nutmeg, allspice.
3) With electric mixer in another bowl, add butter and sugar, mixing until fluffy. Add the egg and vanilla, mix until well combined.
4) Beat in flour mixture until well combined.
5) Add remaining ingredients and stir until evenly combined.
6) With a spoon, drop dough about 1 inch apart (the cookies do not ooze out too much in baking). Bake in batches in middle of the oven 10-12 min (or lightly golden) for soft cookies. Cool on racks.

Thursday, November 10, 2005

Pumpkin Head


When I was younger, I remember the mathematical theorems discussed regarding when to put our dear pumpkins on display. Too early and rot would attack before Halloween. Too late, and few could enjoy the artistic alterations. Then, neighborhood bullies and animals had to be added to the equation-- who would eat and who would squash my squash? Now, I'm more likely to leave my "pompon" whole, stick it in a window, and subject it to the knife when I'm good and ready to get slimy up to my elbows.

Pumpkins can be prepared in countless variations. From ravioli to soup to cakes to bread and even toasting the seeds for a good pick-me-up (although I think I prefer butternut squash seeds which are a little smaller and nuttier). My pumpkin this year is magnificent. It is, I think, the perfect pumpkin. It is the classic depressed oval with crescent dips running vertical and a knotty tuff at the top. It is a true specimen and though I dare consider embalming and preserving for children to learn and future generations to be amazed, one day, when I'm a little down, the knife will be drawn.

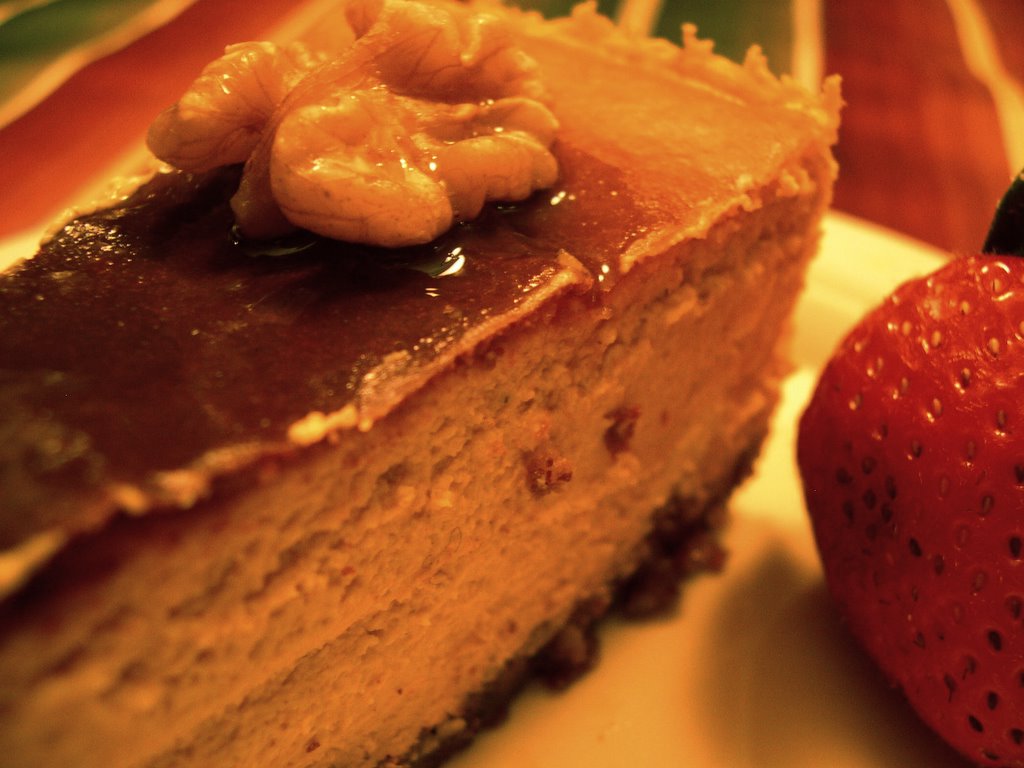
But now, Halloween has passed, and I still don't have the heart to put knife to beauty. Until then, my pumpkin recipes offered will consist of canned pumpkin. A poor, but easy substitute for the real thing. As per a recent request, a pumpkin bread recipe followed by pumpkin cheesecake-- pure Fall decadence. Make either of the two for your loved ones. It is appropriate with Thanksgiving and other assorted holidays up and coming. The bread makes a great breakfast with a cup of coffee, a mid-afternoon snack with some tea or milk, or a wholesome, comforting dessert. It also makes a great gift in place of those brick-like fruit cakes (I really hope no one actually still gifts those) and it keeps good and moist for days. The cheesecake on the other hand, is succulent. It is creamy, rich but fluffy and melts in the mouth.

PUMPKIN BREAD (c/o the Turner family w/ slight author alterations):
Makes 3 loaves (all the better for giving)
3- 8.5 x 4.5 x 3 loaf tins
--------------------
1) Preheat oven to 350 F, grease loaf tins.
2) In large mixing bowl, sift 3 cups flour, 3 cups sugar, 2 tsp baking soda, 1.5 tsp salt (or less), 3 tsp cinnamon, 3 tsp nutmeg
3) In a medium mixing bowl, beat together 4 eggs (at room temp), 1 can (15 oz/ 2 cups) pumpkin (NOT pumpkin pie filling just plain pumpkin), 2/3 cup water, 1 tsp. vanilla.
4) Add wet to dry, stir until well blended.
5) Add 2 cups walnuts or pecans, chopped
6) Add 1 cup Crisco (or veggie oil)
7) Bake 50 min on middle rack. Check with toothpick to see if done. If not, check every 5 min or so until toothpick comes out clean.
8) Pop from tin onto cooling rack and let cool 10 min.

PUMPKIN CHEESECAKE (c/o my dear friend Liana. Eaten before pictures could be taken)
Crust-
1 cup pecans
1 cup graham crackers
1/4 cup (1/2 stick) unsalted butter, melted

Filling-
4- 8oz packages cream cheese (low fat is fine) at room temperature
1- 15oz can pure pumpkin (again, NOT pumpkin pie filling)
1 cup sugar
1 tsp ground cinnamon
1/4 tsp ground ginger
1/2 tsp nutmeg
1/2 tsp allspice
3 eggs
1 Tbl vanilla
-----------
Prepare Crust
1) Preheat oven to 350 F. Wrap outside of springform pan with 2 layers aluminum foil. Process pecans and graham crackers until nuts are finely chopped. Add butter, pulse until crumbs hold lightly. Firmly press crumbs on bottom of pan. Bake 10 min, until lightly golden. Set aside and allow to cool.

Prepare Filling
1) Beat cream cheese and sugar in mixing bowl until smooth.
2) Add eggs, 1 at a time. Add remaining ingredients and beat until just blended.
3) Pour filling onto crust. Place springform pan in large roasting pan, add enough water to come halfway up sides of springform.
4) Bake about 1.5 hours, until cheesecake is slightly puffed and top is golden. Transfer to rack and cool. Cover, refrigerate overnight.


View Stats
Rankingblogs.com: Defining your blogs worth..