Showing posts with label sauces n' spreads. Show all posts

Sunday, July 30, 2006

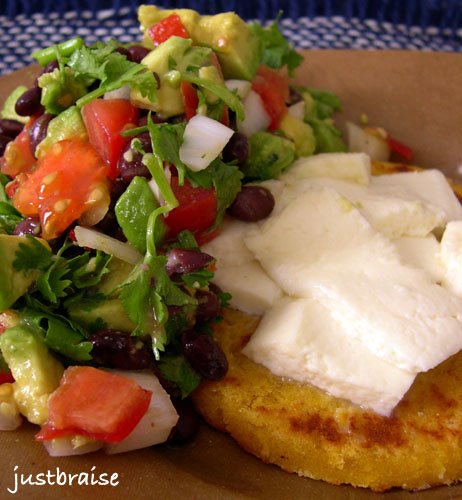
Arepa con Salsa


Continuing with the southern theme mentioned here and here, I will dip further south with this entry. As previously mentioned, I do not make much Mexican (or South American) food. I love its spice and freshness, but hold a few restaurants close to my heart that have mastered it better than I ever could (although I have a promised empanada recipe eventually making its way towards me from a family friend). About 1 year ago, one of those restaurants closed.

Pollos y Mas was an amazing family-run Columbian hole-in-the-wall. Serving up steak or whole chickens with ginormous sides of beans, rice, plantains and whole sliced avocado (my favorite) for astonishingly low prices (around $8). My roommates at the time ordered from the restaurant weekly and as I entered the apartment the sweet savory smell of rotisserie chicken would get me salivating in no time.

D and I found the scent overpowering as we walked by one night and were pulled in for dinner. We started the meal with an arepa con queso. Ordered without knowing what we would get-- I knew that D liked his corn and I liked my cheese. A thick, bright yellow corn pancake was brought to us covered with a snow white cheese. Upon tasting, the cheese’s light-saltiness complemented the sweet corn arepa perfectly. No sooner were D and I hooked than Pollos y Mas closed down, our arepa lost forever-- Or so we thought.

A few months back as D and I meandered slowly over the refrigerated section of our local grocery, we noticed what seemed to be a cousin of the arepa once had. By no means freshly made like the Pollos y Mas one, it would do for our purpose. Settled in nearby were various packets of queso fresco. Grabbing up a pack of each, we attempted to replicate our first tasting of the arepa at home. We started simple, as it was at Pollos y Mas, a thick corn patty covered in cheese, toasted warm until the cheese produced hints of melting. How could something so simple taste so decadent?

In the months to come, D and I expanded our arepa tastings. Sometimes with fresh tomato or avocado sliced on top, other times with salsa, and when we were really hungry, a poached egg, would cap it—always with the queso fresco. The recent heat wave has kept us out of the kitchen and yearning for quick food solutions. The arepa with queso fresco and other accoutrements has been our go-to to the delight of us and others.

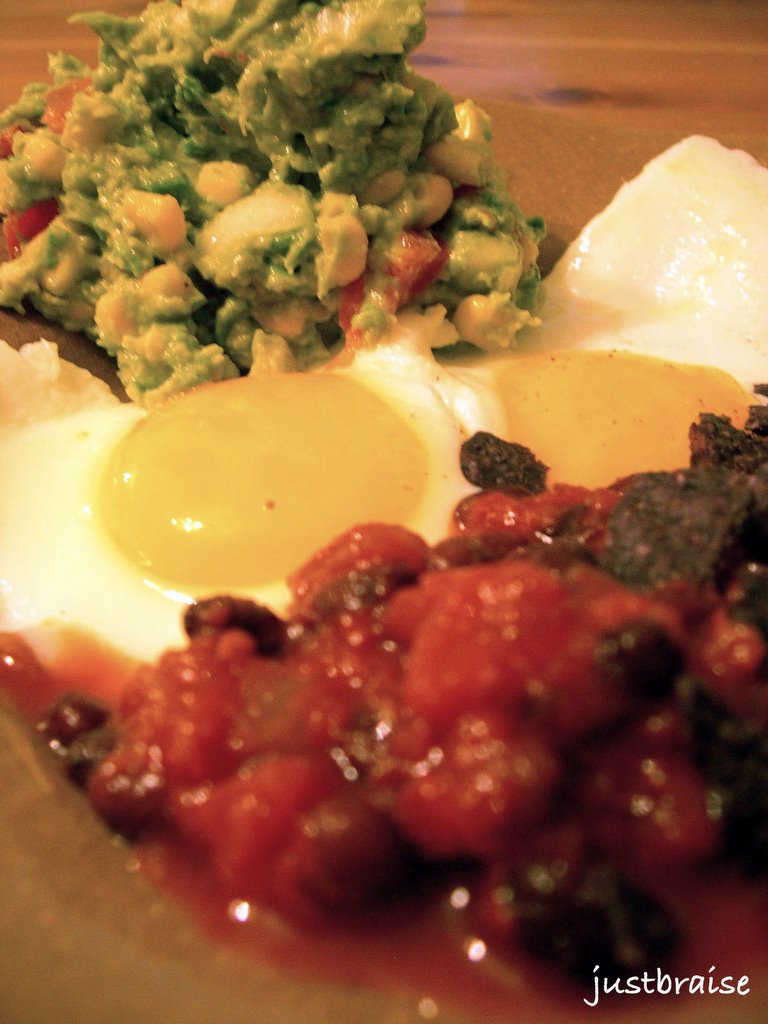
Today was no different as D attempted to hold back his excitement when he suggested the arepa for lunch. Because I knew we had a few other fresh ingredients to accompany the meal, I agreed. I must say, this was the best salsa accompaniment yet and why it was deserving of a picture.

Note: Arepa and queso fresco are available at many groceries where usual South American products are available. Look in the refrigerated section.

AREPA CON SALSA
Serving Size= 2 persons. Active time= 10 minutes.
* 2 corn Arepa
* ¼ cup queso fresco, sliced long to cover arepa
* 1 large vine-ripe tomato, diced
* 1 small Spanish onion, diced
* 1 ripe avocado, diced
* 1- 15oz can of black beans, rinsed and drained
* ¼ cup fresh cilantro, chopped
* 1 fresh red Serrano pepper, chopped
* juice of 1 lime

1) Arrange queso fresco over arepa and place in toaster oven on medium heat. (D likes to do 2 rounds of toasting on medium because the queso fresco just begins to lose form.)
2) While arepa toast, prepare the salsa. In a medium bowl place the tomato, onion, avocado, black beans, cilantro, pepper and lime juice. Mix and serve over arepa.
NOTE: A tasty addition to this is a poached egg.


Head on over to Sweetnick's for Tuesday's ARF roundup!

Thursday, June 29, 2006

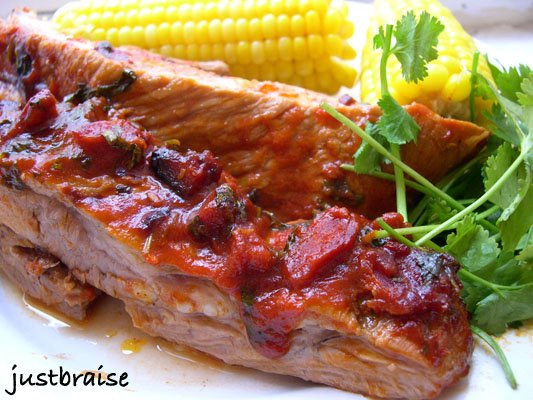
Chorizo-Lime BBQ Ribs


*Just Braise has moved. Please visit me at www.justbraise.com!*

Summer brings a new culture onto the streets of New York City. It lives and breathes the pavement and it waits out the humid days for the cooling nights, begging for a release with rain. People move from their cramped apartments onto stoops, lawn chairs, handball courts, public pools, beaches, parks— even an air conditioned store to roam aimlessly for a cool down.

I walked home the other day and witnessed my neighborhood in a new light. Every winter we tightly latch ourselves into our undersized apartments, bundled under blankets and layers of clothing. I begin to forget the people that live in my neighborhood-- that I pass everyday on the streets-- that I ride the train with into Manhattan while we forget where we are and where we are going. As summer’s heat finally hits hard, the close quarters are too much and private life blends into public.

My neighborhood is a multicultural whirlwind of ethnicities and personalities. A perfect microcosm of New York City, I can walk two blocks in one direction to restock my sheesha; two blocks in the other for the best gyro in the City (or the best frappe according to the New York Times). I can go to the Mexican bodega for $1 tamales on the weekends, the Bangladesh deli for a fresh mango smoothie, or the Indian bakery for fresh gulab jaman. The list continues into the night.

But what emerges in the summer holds more than the variety of stores I relish. It is a look into the lives of others. Purple-haired women drink orange soda as their granddaughters regale their waning days of the school year. A group of kids playing soccer in the streets knock their ball too close to a passerby. A mother sits on the stoop as her son practices handball against their brick building. Young girls seek out the icy man for fresh coconut ices. Neighbors rehash old ties, friendly waves cross intersections, the weight of clothing is reduced, it is summertime and the people are happy.

The heat draws people out of their home physically and mentally. Each day I pass the local bargain shop and spy the cheap charcoal grills, waiting for the perfect time to purchase the one-season specialties. Spending time in the kitchen is cut short as the heat of the oven is viewed as sin. Hamburgers, quick chickens, easy seafood and of course, ribs, are easy on the mind because they lend us the notion of lazy-weekend-outdoor-eating with friends and loved ones.

With that said, I justify yet another round of ribs (pork this time)—perfect for a 4th of July BBQ. This one is dripping tangy citrus flavors off the chin with every bite. It is a thick and chunky sauce, loaded with freshness that screams homemade. It is something to impress friends with and all too easy to make. D believes the sauce recipe is too heavy on tomatoes, but I think it sits perfectly on the ribs— with that said, do what you will with the quantity.

CHORIZO-LIME BBQ RIBS
Serving size= 4 people. Active time= 35 minutes. Inactive time= 1 hour 20 minutes
CHORIZO-LIME BBQ RIBS
* 5 pounds pork ribs, have the butcher crack the bone but do not separate the ribs
* Chorizo-Lime BBQ sauce (recipe below)

1) Preheat oven to 400F. While oven is warming, begin to prep sauce ingredients below. Place rack of ribs on a large oven-proof baking sheet with a rim, cover with tinfoil. When oven is ready, place ribs on center rack for 15 minutes.
2) As ribs are baking, finish up the sauce on the stovetop. The sauce should be ready around the same time as the ribs in the first part of the baking process.
3) Remove the sauce from the heat and the ribs from the oven (once the 15 minutes are up). Lower oven temperature to 350F. Remove tinfoil and generously coat the ribs with the sauce. Cover with tinfoil and return to the oven for 1 hour.


CHORIZO-LIME BBQ SAUCE
Serving size= 4 people. Active time= 30 minutes.
* 7 ounces, about 4 chorizo links, diced small
* ½ bunch cilantro, chopped
* 2- 6 ounce cans tomato paste, no salt added
* juice of 3 limes
* 1 cup cider vinegar
* 2 Tbl molasses
* 2 Tbl spicy mustard
* 1 Tbl favorite hot sauce
* ¼ cup water
salt/ pepper to taste

1) In a sauce pan on medium heat, warm the chorizo and cilantro until the cilantro wilts and aromas escape, about 3 minutes.
2) Add remaining ingredients. Bring to a boil then remove from heat. Coat ribs and bake or enjoy as extra dipping sauce on the side.


Head on over to Kalyn's Kitchen to catch this week's WHB roundup!

Sunday, April 30, 2006

Open-Faced FBS


The BLT [Bacon-Lettuce-Tomato if you dare not know], might just be the most underrated sandwich there is. It shares its lowly status with the sardine sandwich, liver sandwich, and tongue. There might even be an equation—or possibly just a graphable body of data-- that while young, it is the holy grail of grilled cheese that rates as favorite. As we age we teeter off for the more classic sliced meats, and as old age creeps in, we can return to the classics: sardine, liver and tongue.

But where is the BLT in the equation. And more importantly, am I old too young because I appreciate a good sardine sandwich on rye? A schmear of liver? A slab of tongue? Actually, scratch the tongue—I could never get over the bumpy texture.

Who orders a BLT? It is a perfect meat-to-vegetable-to-crisp-lettuce ratio in every bite and yet, it is too often overlooked for something “more hearty”. I am known to pass by it on a menu, even when that sweet-salty bacon is all I crave, unable to spend $5 for what I consider a $3 sandwich. To spruce the classic up, I have seen restaurants create the BALT (adding avocado), a BBLT (with brie), and even [gasp] TBLT (turkey bacon)! But nobody seems to understand it is no longer its simple and perfect self when this happens.

I awoke Sunday morning craving breakfast, but also a BLT. How to make a breakfast version without destroying the BLT's simplicity? I headed over to the butcher while I considered my options. I had him slice up fresh bacon, ¼ inch thick (thick bacon being the key to a BLT). As I passed the bakery to grab my bread I saw the solution: Sureki. Sureki is the Greek’s Challah-- a sweet braided egg bread. I picked up the loaf envisioning my goal: The FBS.

Still at a loss?

FBS, or French Toast-Bacon-Strawberry, is the perfect Sunday morning breakfast sandwich. Offering the best parts of the BLT: crisp bacon and fluffy bread, with a sweeter breakfast flare. Instead of your daily vegetable you receive your daily fruit. For an extra zing, lime and orange zest are used, fresh orange juice and basil as your greens (instead of lettuce).

OPEN-FACED FBS
Makes 2 servings. Active Time= 15 minutes.
* 4 thick-slices egg-based bread (challah works well)
* 4 eggs
* ½ orange, zested and juiced
* 1 tsp lime zest (about ½ a lime)
* 2 Tbl milk (preferred percentage)
* 4-¼ inch thick slices of bacon (ask your butcher to slice it thick)
* 10 strawberries
* 4-5 leaves fresh basil, chopped
* 1 Tbl butter
* cinnamon/ sugar

1) Place one skillet (for bacon) on medium-high heat. Place one skillet on medium heat (for the French toast) with butter.
2) In a wide-brimmed bowl, crack eggs, add milk, juice from ¼ of the orange and orange zest. Beat until well mixed. Drench bread slices in egg mixture until well-drenched. Once egg mixture is done, the two skillets should be warmed.
3) Place bacon on skillet to cook. Place bread on second skillet. Cook 3-4 minutes one side, flip, 3-4 minutes opposite side. Cook until golden brown. Depending on preferred doneness, bacon should receive 4-5 minutes each side. If bacon finishes before bread, place bread in oven to stay warm, set at 250F.
4) Keeping an eye on the bread, make the strawberry topping: Combine strawberries, lime zest, juice from ¼ orange and basil in a small bowl. Using a fork, mash the strawberries into a thick pulp. Serve at room temperature, set aside until ready to serve.
5) Once bread is done, sprinkle with cinnamon and sugar (*do not put this on while on the skillet as it will just burn. Putting this on after it is done cooking will allow the mixture to melt right into the bread).
6) Remove bacon when ready.
7) Sandwich can be open-faced or closed. Layer the sandwich: French Toast, Bacon, Strawberry mixture.


Head on over to Sweetnick's for today's ARF roundup!

Head on over to Kalyn's Kitchen for the WHB roundup!

Saturday, April 29, 2006

Chipotle-Mustard Glazed Chilean Sea Bass w/ Green Beans


*Just Braise has moved. Please visit me at www.justbraise.com!*


I first encountered the chipotle pepper a few years back. It was my birthday and a friend brought me an orange can of La Morena Chipotle Peppers in Adobo Sauce. He had passed a Mexican bodega on the way to the party, stopped in, and bought the cheapest bizarre food item he could find—the 50 cent-7 ounce can was perfect. It was not the only strange food-related gift I would receive that year: a small jar of mint chutney, a bag of stale cotton candy, a can of tuna fish and gunpowder tea were some others. All, much to my own surprise, were put to use—except the chipotle peppers—I just did not know what to do with them.

I cannot say I was afraid of the little shriveled smoked pepper. I just did not make much Mexican food at home (a friend of mine worked at a fabulous Mexican restaurant that offered me a good deal on my meals). I did not know what to do with it. As I said, this was a few years ago. My adventures in mixing world cuisines were not so daring, that can of peppers sat in my cupboard for at least 1 year.

After years of eating chicken mole at said establishment, I finally craved that bittersweet chocolate sauce one night at home. I called my friend for the recipe, attempted my own measurements (since they make it in large vats) and low and behold, I had all the ingredients-- chipotle chili peppers being one of them. I whipped up a batch and I might say, mine was just as delicious as the one I had been eating for years.

I no longer shy away from buying that little orange can of peppers. Their deep smoky flavor is unique and their subtle spice is superb. So when I was sent a bottle of Chipotle-Mustard, I knew it would be delicious. That mustard started popping up in my tuna fish sandwiches, replacing regular deli mustard. I used it on kielbasas, in dips, for dressings on salads.

Inspiration hit the other day as D and I purchased some Chilean Sea Bass from the fishmonger. The problem I often have with D: I want to experiment and he will say something in the realm of: “We purchased the most expensive fish in there, nothing should be added, it’s like drenching a filet mignon in sauce! Fish should be simple: butter, lemon juice, done.” I assured him that even though I had no idea what I was doing, I knew what I was doing. The more you cook, the more you understand flavors and how they might coexist. I was finally able to convince D that replacing plain mustard with chipotle mustard would taste good.

The result? The fish just melted in the mouth. It was a superb combination of smoky chili to sweet mustard to buttery fish. Served alongside green beans this meal will have to be made again—possibly with more chipotle oomph.

CHIPOTLE-MUSTARD GLAZED CHILEAN SEA BASS w/ GREEN BEANS
Makes 2 servings. Active Time= 8 minutes. Cook Time= 20 minutes.
* 1 pound Chilean Sea Bass
* 1 Tbl Silver Springs Chipotle-Mustard
* 2 tsp granulated sugar
* 1 Tbl butter
* about 20 green beans, washed and ends plucked clean

1) Preheat oven to 250F. Melt butter over stovetop on medium-high in an oven-safe pan. While the pan is warming, mix the chipotle-mustard and sugar in a small bowl. Wash and pat dry the Sea Bass.
2) When pan is hot, sear the Sea Bass, skin side up for 2-3 minutes. Flip and sear skin side down for 2-3 minutes. (The thickest part of the fish should still be raw).
3) Brush the chipotle mix over the Sea Bass, place the green beans around the fish and put in center shelf of oven, uncovered, for 20 minutes.


For non-food related activities we have WCB over at Eat Stuff. Below we have one very inactive post-op Whiskey drugged up and sleepy.

As well as one comatose self-drugged (cat nip) Kitty BoJangles (note the fluffy toy that is stuffed full of nip).

Friday, April 14, 2006

Coq Au Vin


When I was a girl, chicken came in two forms: lightly breaded and grilled. Lightly breaded chicken appeared as chicken Parmesan, chicken Marsala or simply plain. Grilled chicken sometimes joined forces with teriyaki, bread to form a sandwich, or cold on a salad. How quickly chicken can turn boring.

Somehow, I never grew sick of it. But these days I have added to my mother’s repertoire. D loves his fried chicken and we often dish it up this way. Roasted is excellent with a little basil, garlic and pomegranate molasses rubbed on top. But please, somebody bless the French for thinking to add wine to everything!

I must have understood I would come into a love of food. I took my first French class by the second grade—after school sessions taught me numbers, color, hello and goodbye. By sixth grade I was accompanying my family to Paris. While my father attempted to ask for directions in his broken Spanish reasoning, “it’s close enough,” I ran in to intersect and placate a developing brawl. With my basic direction skills I was able to ask, receive and even understand the compliment: “Little girl! How well your French is! Such a fine accent! Never listen to your father!” Well, thank you, I still try not to.

My love continued until some evil teachers in high school set me back. It has not stopped my love of the culture, especially the food. I was beyond ecstatic when a (dare I say reasonable) French bistro opened in my area. And even when I was snubbed by the waiter for requesting ketchup with my fries (is it my fault a steak au poîvre comes with no sauce?!) I returned for more. Each time the food got better, I had tried everything on the menu, and pretty soon I was having drinks with one of the chefs. So it made a perfect setting for an intimate birthday party.

It was my birthday and I ate my mussels with pleasure. But as I spied a guest enjoying his Coq au Vin with much gusto, I took to staring until a morsel was offered; pure decadence. The chicken fell right off the bone. The sauce was thick and rich and just calling for crusty bread to act as a sponge. That one little taste was etched in stone.

So with an organic chicken accompanying me home my mind wandered past my youth of lightly breaded chicken, grilled chicken, paused briefly at fried and then rounded the corner to my birthday memory. A bottle of cheap ($3.99) wine was purchased and miscellaneous vegetables were pulled from the refrigerator. Suppose I claim my Coq au Vin surpassed that of my beloved restaurant? With the chicken melting off the bone (while it appears to hold together quite well in the photo) and the sauce begging to be sopped up with great zeal, this is a meal that is calling out to be made.

While at my family’s Seder the other night I mentioned this dish. “Oh no,” my step-mother cringed, “coq au vin just takes too long!” Actually, prepping this dish is simple. Like all braised meat it is the slow cooking that takes patience. And with all braised food, the wait is well worth it.

Coq Au Vin
Makes: 4 servings. Active Time= 25 minutes. Cook Time= 1-½ hours.
* 1 whole chicken, cut into sections (you can ask your butcher to cut it for you)
* 2 carrots, cut into 1-2 inch pieces
* 1 celery stalk, cut into 1-2 inch pieces
* 1 apple (I used a Golden Delicious, but any sweet baking apple would work)
* 1 onion, chopped in ¼ inch discs
* 2 cups red wine
* 2 bay leaves
* 1-2 tsp fresh rosemary
* 1-2 tsp fresh basil (or any other herbs you like)
* fresh pepper/ salt
* 2 Tbl unsalted butter or olive oil

1) In a Dutch oven (or other pot with tight fitting lid) over medium heat, warm the pan and melt the butter. Add carrots, celery, apple and onion. Sautée until onions are limp, about 8 minutes.
2) Add chicken and brown on both sides; 8-10 minutes. Add wine, bay leaves and other herbs.
3) Reduce heat to medium-low, secure lid and allow to simmer for 1-½ hours; or until meat falls off bone.
4) When done, carefully remove chicken and any loose bones from pot; set aside (or place on serving plates). Using a hand-held blender, or in batches with an upright blender, purée the contents of the pot until thick and smooth. Return chicken to pot (or add purée on top of chicken). Garnish with fresh herbs and serve with fresh crusty bread.


In non-food related activities WCB at Eat Stuff brings us the world of cats.
Some cats understand good window manners. Here is Kitty BoJangles at her perch eyeing a few squirrels:

And then there is Whisky, the Terrible Tot. Thinking he can claw his way out of house and home to chase the birds and squirrels:

Tuesday, April 04, 2006

Roast Lamb w/ Mango-Mint Sauce, Moroccan Millet & Rum Pineapple w/ Baby Almonds


Spring is a fabulous time to slow down a little before the summer hustle. It is the time when we come out of doors with welcome arms. Everyone seems happier, more active and generally more excited to be alive. With this in mind, it is also a great time to celebrate. Be it any occasion: holiday, birthday, the weather itself, friends or engagements, now is the time to invite your loved ones into your home.

It was the combination of a traveling actor friend in town and two recent engagements of marriage that my friends would dine with me tonight. Their task was simple: a few bottles of wine. My task was to prepare an ideal spring feast. I believe we all accomplished our set duties.

While mulling over menu options I was torn between chicken, pork or lamb. Chicken seemed too average and easy, pork was, you know, the other white meat. Lamb seemed exotic. But while many people take great fear of lamb, I figured my friends were the adventurous types and I would forge ahead.

Sure enough when we sat to the table my friend DR voiced his concern: “You know Stacey, I’ve never eaten good lamb. I’m kind of afraid. It’s all been slightly… barnyardy?”

“That’s okay,” I reassured him, “I’ve never cooked lamb before, so we’re kind of even.” With that, he finished off his glass of wine. DR’s fiancé then voiced her concerns, “I’ve eaten lamb in kibe (Middle Eastern lamb balls with other spices) and on kebabs, but any roasted lamb I’ve ever had has been terrible.”

“Well, I’m glad you’re in for an adventure.” I returned.

No sooner was the lamb brought to the table that forks were rearing to stab at it. Across the board the meal was a success. DR and his fiancé were reassured the merits of good lamb, and I was reassured that I can cook lamb. The spices were a great compliment to the sauce, and with the millet side, everything was the colorful festive spring feast I sought.

DR mentioned his barnyardy objection to lamb. I would have to agree that lamb, like any meat is easily spoiled if a few rules are not met: freshness and cooking time. Freshness is key. If kept in the refrigerator (or meat department of your grocery store) too long the meat will begin to spoil (obviously). In the refrigerator, it will pick up the odors of food around it. Make sure to check dates and grade of meat to ensure freshness. Overcooked meat is depressing. This is easily done if a good meat thermometer is not utilized, or placed incorrectly. It is important to know what cut of meat you have, how it’s best to prepare that cut, and the ideal temperature for the outcome you desire.

With that, a fabulous spring meal, perfect for the upcoming holidays…

ROAST LAMB w/ MANGO-MINT SAUCE
Makes: 6 servings. Active Time= 30 minutes. Inactive time= 5 hours to 2 days. Cook Time= depends on size of meat; about 40 minutes.
ROAST LAMB
* 6 pound leg of lamb, ask your butcher to crack the bone and butterfly the cut**
* 3 Tbl fresh rosemary, chopped
* 3 Tbl fresh mint, chopped
* 3 Tbl fresh sage, chopped
* 2 head of garlic, 1 crushed, 1 whole
* 20 pearl onions, 10 crushed, 10 whole
* 1 Tbl ground cumin
* 1 Tbl ground cardamom
* ½ Tbl ground cinnamon
* salt/ pepper
* 4 Tbl olive oil

1) Bring the meat to room temperature before cooking. Mix the first 3 ingredients, 1 head of garlic and the ten crushed pearl onions with fresh ground pepper. Rub 2 Tbl olive oil over the lamb and rub the herb mixture over the leg of lamb; between the cuts, top and bottom. Wrap tightly in plastic wrap and refrigerate 5 hours up to 2 days.
2) Preheat the oven to 300F. Remove the lamb from the refrigerator, brushing off about half the rub. Sprinkle with cumin, cardamom, and cinnamon. Amply salt and pepper both sides and between the cuts. Tie securely with twin to hold the meat together.
3) On the stovetop in a large skillet on high heat, warm 2 Tbl olive oil. Sear the leg on all sides. Apply a fresh sprig of mint and rosemary under the twine. Chop the top off the second head of garlic, just to expose the tips and place it on the skillet. Add the onions around the lamb.
4) Place on rack, fatty side up. Insert a meat thermometer deeply, almost to the bone.
5) The meat is done when the thermometer reads 125 for medium-rare.
6) Remove from oven and allow meat to rest on cutting board for 15 minutes before slicing.


** To butterfly meat is to slice it so the meat looks like a book with the bone as the book spine.

MANGO-MINT SAUCE
* 1 fresh mango, peeled and pit discarded
* 1 cup fresh mint
* 1 tsp Serrano pepper seeds
* 1 Tbl lemon juice
* pinch of salt

1) Use a hand-held or electric blender to purée all ingredients until evenly blended. Serve at room temperature to slightly chilled.


MOROCCAN MILLET
Makes: 6 servings. Active Time= 10 minutes. Cook Time= 25 minutes
* 3 cups dried millet
* 6 cups water
* 1 bunch spinach, washed well
* ½ cup dried cranberries or apricots
* ½ cup roasted pine nuts
* salt/ pepper to taste

1) Cook the millet according to package instructions. While it is cooking, sauté the spinach. Once done, leave on heat. Add spinach, cook about three minutes to reheat spinach; stirring to ensure the millet does not stick to the bottom of the pot.
2) Add dried fruit, nuts and salt/ pepper. Stir and place in serving bowl.


RUM PINEAPPLE w/ BABY ALMONDS
Makes: 6 servings. Active Time= 10 minutes. Inactive Time= 1 hour.
* 1 fresh ripe pineapple
* 2 Tbl butter
* 1 cup dark rum
* 2 Tbl brown sugar
* ½ cup baby almonds **

1) Slice top and bottom off pineapple; slice off skin. Cut into quarters. Remove center rind. Cut each quarter into 4 pieces lengthwise. Place pineapple slices in shallow dish and cover with rum and brown sugar. Refrigerate 1 hour.
2) On a skillet on medium heat, warm the butter. Sauté pineapple slices until lightly browned.
3) While pineapple is browning, in a small skillet on medium heat pour the sugar-rum mixture. Let it warm while the pineapple cooks. Serve pineapple slices with ice cream, coated in rum-sugar syrup with baby almonds sprinkled on top.

** Baby almonds are found usually around late March. They are immature almonds, still in their fuzzy pods, plucked before the almond has the opportunity to harden into the nut we love to eat. To use, peel off the fuzzy outer shell. The inner snow-white nut is the non-ripe almond you want to use in this dish. They are crunchy and contain a clear jell inside (that eventually hardens to white with maturity)


*** Remember to save your bones for soup!!! ***

Head on over to Sweetnick's for today's ARF round up!

Over at Kalyn’s Kitchen, check out some WHB action. Today’s herb? Mint.

Monday, March 27, 2006

Orange-Pinenut Buckwheat Pancakes (ARF #13)


Breakfast for dinner? Come on, I’ve done dinner for breakfast so I'm practically expected to mix it up a little. Where in the book of life does it state we must keep our themes straight? As long as we get in our fruits and veggies for the day, what’s the harm? Plus, when the weather finally makes a turn for the better we crave a lighter fare. What is more suitable than to serve up a sweet and delicious breakfast for dinner?

The dear Sweetnick’s asked me to piggyback on an orange theme for this week’s ARF roundup. Being that Sweetnick’s was the first food blogger I befriended, the fact that I’ve been participating in the ARF roundup since its inception and the two of us are almost neighbors, I was more than happy to oblige.

I dared myself with a pancake. D and I have our pancake du jour pretty much settled and it was with a little trepidation that I picked up this recipe. But I will say, it was a success. Because really, what is better than the addition of fruits and nuts to a meal? [Thinking time…. ] Okay, maybe chocolate, caviar, wine…all three? But let us not be so decadent! Fruit is right up there with the natural nectars of the gods. So now, if any of you are those naughty breakfast-skippers you can have your breakfast, dinner and your dessert too-- all in one meal!

While the usual fruit addition to pancakes is usually banana or blueberry, the use of orange was quite an elegant one when presented. The result was that while our tried and true pancake will always win out, these were a nice break in the routine.

NOTES: As I am used to pancakes with a little more substance, I think this batter alone is a little bland. The orange zest really perked it up-- I even doubled the zest-- and believe this is a necessary addition. The nuts gave a much fuller flavor to the batter and were great crunchy surprises throughout, I would not go without these. I had no almonds and substituted pinenuts (walnuts would also be tasty). The result was a milky nutty flavor throughout. I found the nuts a little overwhelming and would lessen the amount; not only in the batter, but the syrup as well [especially if you are looking to cut the fat content]. Overall, the pancakes were nice and fluffy, as a pancake should be and a good change to my usual cornmeal-molasses pancakes.

This is the recipe as it appears on the Honeywell website. Note that the provided times for these pancakes were off for me. These took me about 50 minutes total active time (including prep work). You can find other orangey recipes there as well.

ORANGE-ALMOND BUCKWHEAT PANCAKES
Makes: 6 servings, 2 (4-inch) pancakes each. Prep time: 20 minutes
Cook time: 50 minutes.

PANCAKES:
* 1 cups sliced almonds*
* 1 whole orange
* 1 egg
* 2/3 cup 100% orange juice
* 1 cup 2% reduced fat milk
* 2 tablespoons grapeseed oil or canola oil
* ¾ cup buckwheat flour
* 1 cup all purpose flour
* 1 tablespoon baking powder
* ¼ teaspoon salt
* Non-stick cooking spray

1) Preheat oven to 375°F. Spread almonds over a cookie sheet and bake 5 to 7 minutes until nicely browned. Remove and cool at room temperature. Use grater to grate zest of the orange, while careful not to grate into the white pith. Peel remainder of skin and slice between membranes to separate each orange segment. Set aside for garnish.
2) Combine egg, orange juice, milk and oil in medium bowl and mix well. In large bowl, combine both flours, baking powder and salt with reserved orange zest.
3) Add liquid into the dry ingredients and mix thoroughly while being sure to leave some lumps. Set aside ¼ cup almonds for syrup, then gently mix remaining ¾ cup almonds into batter until ingredients are combined, but still lumpy. Do not over-beat or stir until smooth as this will make pancakes tough.
4) Ladle batter onto hot, non-stick skillet coated with cooking spray and cook until some bubbles begin to appear on top, about 3 minutes. Flip cake over and cook 2 minutes. Serve immediately with orange-almond syrup, and garnish with orange segments.

*Note: While almonds provide a healthy fat, this ingredient may be removed to reduce the recipe's fat content by 18 grams.


ORANGE-ALMOND SYRUP:
* 1 cup 100% orange juice
* 1 cinnamon stick
* ½ cup light maple syrup
* ¼ cup reserved roasted almonds

1) Simmer orange juice and cinnamon stick in small saucepot over medium heat until reduced to 1/2 cup, about 15 minutes.
2) Add maple syrup. Remove cinnamon stick, stir in reserved roasted almonds and serve warm.

Wednesday, March 22, 2006

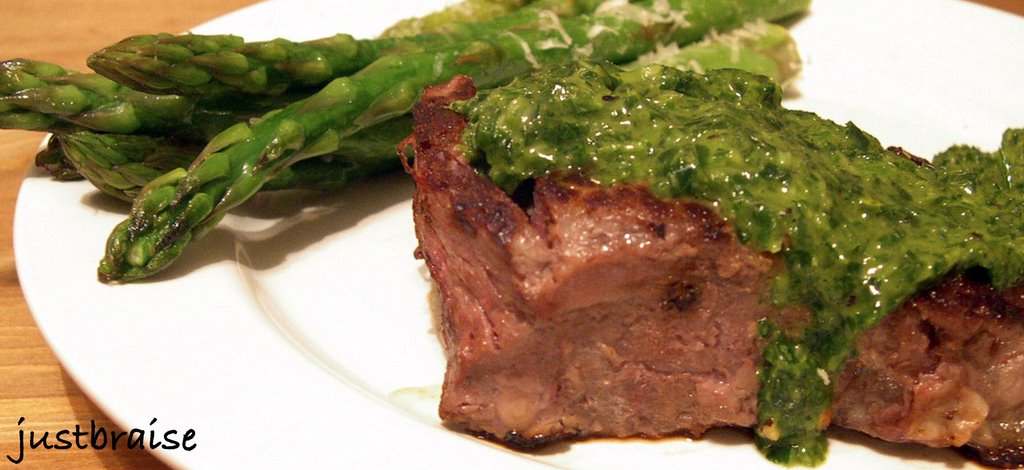
Steak au Poivre w/ Wasabi-Parsley Sauce


Add a little green to your palate. Does a better way exist to usher in spring? Okay, so I gaze longingly as I pass florists wishing on the first buds from the trees. I envy the recent talk regarding the planting of summer gardens. I occasionally under dress in the recent frosty spell, in hopes the weather forecast is wrong and spring is really here (not just on the calendar). Thoughts of lighter foods are on my mind, picnics, beaches, camping and farm visits (I love heading out of the city to seek out local grown produce). But why not a little steak before we finally say goodbye to winter?

On a recent Costco run, D and I nabbed a few steaks, hence the recent postings on steak. Costco is a tricky business. While I like to buy organic and from green markets as often as possible, I am still quite poor (the glories of fulfilling your dreams and living check to check) and cannot always afford quality organic pickings. And while I do not think everything is a bargain at Costco-- I can often beat the prices of fresh produce at my local markets-- I do think for a few essentials, if you have the room and do your comparative shopping magic, it can be worth a trip. Plus, I have found they have a fairly decent meat/ seafood department.

These steaks have been patient with us; quietly awaiting consumption in the freezer. As the fresh produce comes to an end and bellies are a’grumblin’ steak was the chosen one today. In honor of spring, the theme was green. Okay, I had some wilting parsley itching to be used.

Parsley is the underrated herb. Sadly, it often makes its appearance as a mere garnish, rarely taking center stage: A sprinkle here jazzes up soup; a bouquet there adds some color. Its crisp, salty wetness is rarely highlighted as main flavoring.

For me, parsley took center stage on my family’s Seder plate. Once a year it was my highlight of the service: dipping the leafy herb into salt water. Greedily (or perhaps to really remember the salty tears?) I often dipped two or three bunches, relishing the refreshment. I came to love parsley out of humoring myself. Later, there was a time when I always ate the garnish on my plate first—I defended this action declaring I was cleansing my palate. Sometimes it was a flower I would nibble gingerly at, more often than not, it was a large sprig of parsley.

Today this delicate herb will take a much deserved bow. Boldly it will rest atop my steak and declare itself victorious in the tango of taste. This is a sauce that is easy to prepare. It is light, refreshing and the perfect accompaniment to this steak, as I am sure it would be to other meat, poultry or fish dishes. I often think of sauces as thick, creamy and full of fat. And while I love dipping my food into them, I often avoid them. This is one that need not fall in with this bad rap. For a little kick I added some wasabi horseradish. Plain wasabi or horseradish would do the trick as well.

STEAK AU POIVRE w/ WASABI-PARSLEY SAUCE
Serving Size= 2. Active Time= 10 minutes.
* 2 steaks, preferred cut
* 1 cup parsley, tightly packed
* 2 Tbl Silver Springs wasabi horseradish; 2 tsp plain wasabi or 1-2 Tbl plain horseradish would also add a kick
* 1 Tbl olive oil
* salt/ pepper

1) Preheat a pan on medium-high heat. Wash the steaks; pat dry. Add salt and ample fresh ground pepper to both sides. When pan is hot, add steak.
2) While steaks are cooking, prepare the Wasabi-Parsley Sauce. Using a blender, add parsley, wasabi horseradish, olive oil and salt/ pepper to taste. Blend until smooth and set aside.
3) Finish cooking the steaks. I give mine about 5 minutes on either side, depending on thickness, for a nice medium-rare. Once ready, spoon on sauce and enjoy.

Monday, March 06, 2006

Chicken Masala (ARF5/#10)


What happens when a fresh coconut in the middle of the winter is too hard to resist at the grocery store? When you try to impress friends from out of town by using your drill to get at the sweet, rich water inside (other than learn there are easier ways)? What do you do once everyone has had their fill of sweet coconut meat? You spend a week in coconut bliss…

It all started with a Coconut Banana Bread with Lime Glaze. Now, fresh coconut is not needed for this bread, but it tastes amazing sprinkled on top. Once all that coconut meat is shredded, there are about 4 cups to put to use. Coconut Banana Bread used about ½ cup. Today it was Chicken Masala. I must admit this was my first time ever cooking a “legitimate” Indian meal. In the past, I have sprinkled some curry, tumeric and cumin together and called it Indian. Sad, because I absolutely love Indian food. And bad, especially since I have most of the spices in my cabinet!

I found a fairly simple recipe on Mahanandi. This recipe was chosen over others because, well, I had all the ingredients. This recipe also did not take too much time—as long as everything is in front of you at the start. It also helps to have an extra hand in the kitchen (so while one is roasting spices, the other can grind). The final result was excellent and filled the home with an amazing aromatic essence.

First, the benefits of coconut.

At a recent dinner party, I ordered coconut milk. I offered some to a friend who dissed it, “Oh, that stuff is really high in saturated fats. I won’t touch it.” Your loss, it was good. Coconut Oil is one of the best oils a person can consume. For centuries, South East Asian cultures have called the coconut palm the Tree of Life. Coconut oil is antiviral, antibacterial, antimicrobial, and antiprotozoal. Not all saturated fats are alike. While coconut oil is one of the highest in saturated fats it is also one of the highest sources of medium chain triglycerides, many of which are important in building and maintaining the immune system. Some medium chain fatty acids, like coconut oil, help to maintain the metabolism. It is also very good for the skin as a moisturizer.

Coconut Meat is high in fiber, vitamins and minerals (vitamin C, E, calcium, magnesium, potassium and iron). It is also low in cholesterol and sodium. Other forms of coconut include Coconut Water which is the liquid found upon initially cracking the coconut open. And Coconut Milk, made by steeping coconut meat pulp in boiling water and then pressing for the milk. All these forms of coconut share similar health benefits up to a point.

Below is the second installation on coconuts. More to come shortly on this tasty and long lasting fruit! This recipe is taken from Mahanandi’s site. It is followed step by step with the replacement of chicken instead of potatoes. Interesting, because my masala turned out orangey-brown instead of red! It also was not as sauce-based as Mahanandi’s picture! Maybe more water (or plain tomato sauce?) would fix this. Well, it was still delicious! I served this on a bed of basmati rice. Once again, it is recommended to have all ingredients out before starting. And again, a second hand helps-- While D was roasting all ingredients on the stovetop I was busy puréeing the ingredients together in steps and keeping an eye on the rice. In the end, there is enough masala leftover for two lunches tomorrow.

The below recipe is the original Aloo Dum (Potatoes in Masala Sauce). This recipe seems like a lot of ingredients but it is really mostly spices. So give it a try.

ALOO DUM
Serving Size= 4. Active Time= 30-45 minutes.
The preparation is three step. First boil the baby potatoes until they are just tender. Roast and grind the spices, the vegetables and the nuts for masala sauce. Combine and cook them together. The whole preparation takes about 30 to 45 minutes, if you have everything at hand.:) And the main chunk of it is of course to wait for the potatoes to boil.

* 12 tiny baby potatoes

Veggies
* 4 medium sized ripe tomatoes, each cut into four quarters
* 1 medium sized red onion or 4 shallots cut into big chunks
* ¼ cup finely chopped coriander
* 1×1 inch piece of fresh ginger
* 2 big garlic cloves


Nuts
* ½ cup cashews
* ½ cup fresh grated coconut

Dry Masala
* 6 dried red chillies
* 1 teaspoon coriander seeds & cumin
* ½ teaspoon peppercorns
* 3 small cinnamon sticks and cloves
* 1 star anise


Popu/Tadka
* 2 teaspoons of peanut oil
*1 teaspoon of mustard seeds, cumin and some curry leaves
* ½ tsp of turmeric
* Salt to taste

1) Preparation is boil, roast-sauté-grind and cook.
Boil the potatoes until they are just fork-tender. When they are cool enough to handle, peel the skin. Prick them with a fork in multiple sites and keep them aside.
2) Gather the listed ingredients for masala sauce, ready on hand on a big plate. Heat an iron skillet and proceed like this.
3) Roast dry masala ingredients, for few minutes, until they release their smell. Remove them from the skillet and keep aside.
4) Roast cashews, then fresh grated coconut for few minutes. Remove them from the skillet and keep aside.
5) Roast ginger and garlic for few minutes. Remove them from the skillet and keep aside.
6) Finally heat one teaspoon of oil and roast onion and tomatoes for few minutes.
Let them cool down little bit. When they are cool enough to touch, put them in a blender. Add half glass of water and half teaspoon of salt. Grind them into smooth paste.
7) Cook: Heat one teaspoon of peanut oil in a big wide pan or kadai. Toast the popu ingredients (mustard seeds, cumin and curry leaves) until they start to splutter. Add the grinded masala paste and another half glass of water. Stir in turmeric. Taste and add salt if needed. Add baby potatoes. Cover and cook on medium heat for about 15 to 20 minutes. Finally stir in finely chopped cilantro and serve.

My Kitchen Notes: 
Don’t forget to prick the potatoes, so that they can absorb the sauce.
 Onions - avoid yellow onion and go with shallots or red onions. 
If you want, you can also stir in cream/yogurt at the end.


Head on over to Sweetnicks for all your ARF/5 round up!

Tuesday, February 28, 2006

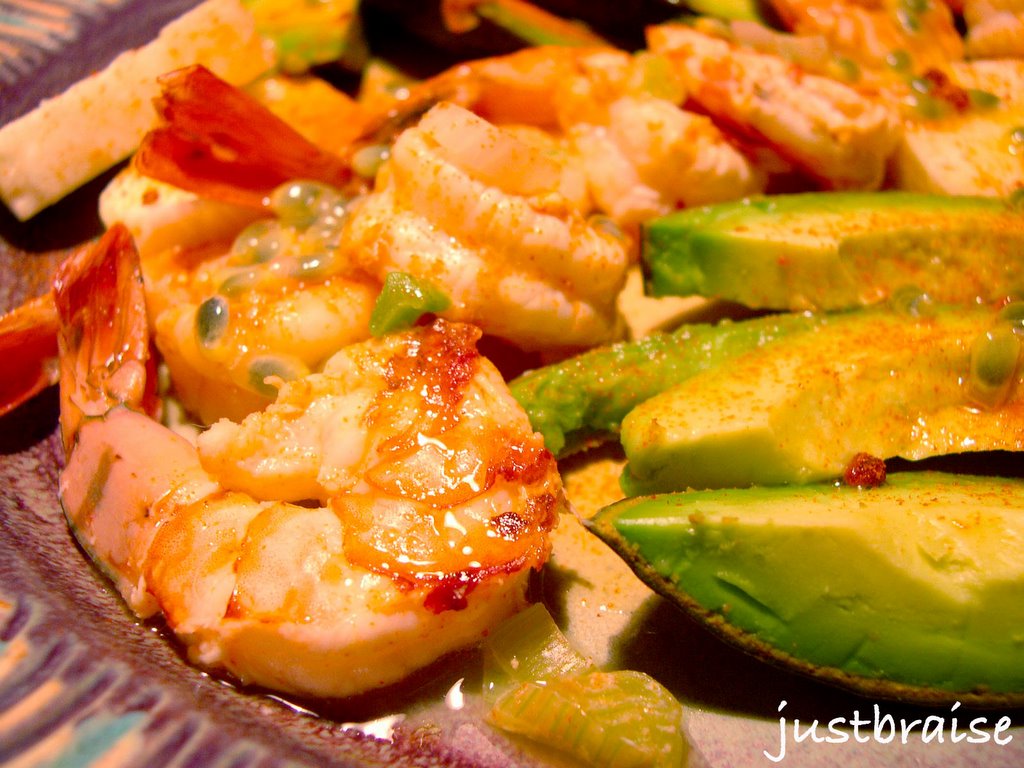
Jicama Passion Salad w/ Shrimp


I will admit there are many foods I have yet to try in my life. A semi-picky eater as a child, then vegetarian for six years, left me many missed opportunities. So it is only recently that I am opening my doors to the new. Last week it was skate, over the weekend it was pork belly, and today it is passion fruit.

It is true. I must sadly come to terms to the fact that I have never (knowingly) had passion fruit before today-- okay, two days before: At a recent brunch I discussed with friend, R, how I love Looza’s Tomato Juice because it is 100% pure tomato juice—the perfect base for an excellent Bloody Mary. He dared me to try the Passion Fruit, “truly amazing.” So the next time I saw it in stock I took the challenge and bought some. Once in my mouth I was brought to the Caribbean.

So as I went shopping one day my eyes fell upon a plum-looking fruit. The sign read “Passion Fruit.” A bit pricey at $1.50 a piece; I decided it needed trying, regardless.

Originally from Brazil, passion fruit got its name from Spanish missionaries who thought the fruit resembled religious symbols, like the crown of thorns. In Spanish, it is known as granadilla or “little pomegranate,” possibly because like the pomegranate, it is the pulpy seeds that are eaten.

Passion fruits are small with an overwhelmingly sweet pulp that is often strained for juice or sauces (though the seeds can be eaten). A good source of vitamins A, C and fiber (some claim it to be the highest fiber source of all fruits) and high in potassium, the flavor and health benefits of these little wonders go a long way.

Passion fruits are available in shades of purple or yellow (a more tart fruit) depending on the variety. When purchasing, pick the largest fruit available. It should be firm and as it ripens, the skin’s ridgidity should keep, while becoming slightly shriveled when ripe. When it is ready to eat, slice it in half, scoop out the seeds, and use them as-is or strain the pulp and just use the juice. Either way, this fruit is pure indulgence that should be tried.

The combination in this salad was pure tropic. The light, watery crispness of jicama (hick-e-ma) pairs perfectly with the buttery smoothness of avocado. A sprinkling of cayenne pepper gives this salad a great kick. When drizzled with passion fruit seeds and a smattering of shrimp, this salad is utterly delicious.

JICAMA PASSION SALAD w/ SHRIMP
Serves 2. Active Time= 15 minutes. Inactive time= 1 hour.
* 1 lb large shrimp, peeled and de-veined
* 1- 12oz can lager beer
* juice of 1 lime
* 2 scallions, chopped
* 1 avocado, sliced ¼-inch thick
* 1 jicama, peeled and sliced ¼-inch thick
* 1 passion fruit, pulp only
* 2 tsp cayenne pepper

1) Place the cleaned shrimp, beer, lime and scallion in a bowl. Mix and let marinate in the refrigerator for 1 hour.
2) When shrimp are done, using a grill pan (or real grill) set to medium cook the shrimp, 2-3 minutes each side, until they turn pink/ char slightly and curl. Place in a fresh bowl in the refrigerator to chill while prepping the rest.
3) Peel and slice the avocado and jicama, arranging them on 2 plates. Remove the shrimp from the refrigerator and arrange it on the plate. Sprinkle with cayenne pepper and passion fruit pulp. Drizzle with lime juice (optional).

Friday, January 27, 2006

Braised Oxtail w/ Baked Eggs & The Perfect Bloody Mary


*Just Braise has moved. Please visit me at www.justbraise.com!*

As stated earlier, on a recent B&N trip, I “picked up” a few recipes from the book I was perusing. This one struck my eye (even though the picture does it no justice) because it sounded exotic: oxtail and baked eggs. I never thought to bake an egg before, other than a frittata. D being a huge carnivore, I knew he would be down for oxtails. We invited two other meat-lovers over and planned our day.

First, I must admit that when eating certain foods that resemble animals a little too much, contain too many bones, or are a little too gamey, I regress back to my vegetarian days. For six years (much to my mother’s objections and sneaking meat into my food) I was essentially animal-less. I broke down when studying in the meatastic city of Prague and am now a mostly happy meat-eater. Like many others I have met, the word oxtail can give me the meat-willies, but this recipe sounded too good to pass up. So all ye who fear the tail I say go forth!

What is oxtail? And why? Back in the day when oxen actually pulled our wagons cross country and got all yoked up, the oxtail consumed actually was the meat from the tail of oxen. Being thrifty folk and not wanting any part of the animal go to waste, the oxtail was consumed, often in a soup or hearty stew. As oxen have gone out of style and the use of cattle has become widespread, we again refuse to let any meat go to waste. Oxtail as we know it today is the tail meat from cows (of both genders).

Like all things fashionable, there are highs and lows. It is only recently that oxtail has returned to fashion. I have read fewer than twenty years ago, oxtails were so unpopular the meat was practically given away. It was a secret joy for chefs to use oxtail because the cost was so low ($1-2 a pound). Today, though not outrageous, old fans of oxtail shutter in horror as they dish out up to $6 a pound for quality “unwanted” meat. Oxtail seems to be the new “it” meat, recently springing up in restaurants all over town.

The first time I took notice to oxtail I was with D at his favorite feel-good-food joint Soul Spot. Ran by two men from The Gambia, these boys have nailed the southern cooking New Yorkers crave. An easy-to-miss whole-in-the-wall favorite of bus drivers, police, and locals alike, the Spot serves up choice of meat and two sides for an easy $10. I would usually order the chicken: jerk or BBQ, while D would switch up between meatloaf and oxtail both dripping in savory sauces. With trepidation—come on, what’s in name?— I tried the oxtail. I was hooked.

Like short ribs the “oxtail” meat can be a little tough so slow cooking is advised. This is where the braise comes into play, allowing the meat to fall right off the bone and enter the succulence stage. Oxtail tastes like any other “less than ideal” cut of beef, most resembling brisket (although it depends how it is cooked), so it is not to be shied away from. It makes an interesting, exotic sounding, and delicious alternative to the usual purchases, and should definitely be tried.

As a brunch item, this dish reminds me of The Joy of Cooking’s “Hunter’s Breakfast” which consists of about 10 different courses, from quail to ostrich eggs. More closely, it is similar to D’s favorite menu item at Norma’s: The Hudson Valley Duck Confit Hash a Cheval, consisting of a full duck and 4 eggs. D orders this with a huge grin and sops up all the sauce with their fresh baked bread, dribbling juice and laughing at the rest of the patrons pick at their jazzed up eggs (I recommend the Zillion Dollar Lobster Frittata, with “we dare you to expense this” as the price—okay, I’ve never had it, but the Artychoke Benedict is darn good).

This recipe takes a little planning (I marinated the oxtail in wine overnight). If it is made for brunch, remember it needs 2-½ - 3 hours of cook time so prepare it well before guests arrive, or quench the appetite with the perfect Bloody Mary (recipe below). I planned ahead and bought double what I thought 4 people could consume so I would have plenty of leftovers (which is recommended since the cooking process is lengthy). Much to my surprise, the leftovers were few: enough for a smaller brunch the following day. This meal is well worth it and is so hearty it serves as the only necessary meal of the day (we were good and content until about 11pm when we had a small snack of fresh mozzarella and tomatoes).

I know the picture is not fantastic, but this meal is. Anyone that has had it can attest to it. When the egg’s sunshine breaks loose and the juices mix, this dish is divine—just have some good bread on hand for the sauce. A Bloody Mary is a perfect accompaniment to this dish: The tangy horseradish is an ideal palate cleanser. Be a man, enjoy this dish, call the dogs, sound the horns, and go hunting.

BRAISE OXTAIL W/ BAKED EGGS
Serves 5. Prep time= 20 minutes. Cook time= 2-½- 3 hours.
* 4 lbs oxtail
* 1 bottle red wine (I used the inexpensive, but quite tasty $5 Gato Negro)
* 2 celery stalks, cut into 1-inch pieces
* 2 carrots, cut into 1-inch pieces
* 1 small onion, cut into quarters
* 1-5 oz can tomato paste
* salt/ pepper
* 1 Tbl dry parsley
* 5 eggs

1) Place the oxtail in a wide bowl with 1 bottle red wine. Marinate at least overnight, up to 2 days. If the wine does not cover all the meat, rotate and flip pieces every so often.
2) Preheat the oven to 400F. Warm an oven-safe pot (dutch oven) over medium-high heat. Remove the oxtail from the wine (save the wine). Dry off the oxtail and rub well with salt and fresh ground pepper. Brown all sides of the meat in the (dry) pot. This can be done in 2 rounds, takes about 3 minutes on all sides. This locks the meat moisture in. Remove and set aside.
3) In the meat juices, sauté the celery, carrots and onion, about 8 minutes until onions begin to soften. Add the tomato paste, reserved wine and parsley; stir to blend evenly. Add the oxtail (liquid should come just to the top, but not covering the oxtail. Add a little water, about 1 cup, if this is not the case) and cover tightly. Bake in middle of the oven for 2-½- 3 hours. Meat is done when it falls off the bone with little effort. Check the braising process once every hour to ensure liquid is still present. Add a little water if too much liquid evaporates (some liquid will cook off, but you want some sauce for the meal).
4) When meat is ready, remove from the oven and de-bone (reserving the bones for a future soup or stew). Push the vegetables through a large sieve (or mash with a potato masher) to create a thick sauce. Return the meat to the pot. Using the back of a large ladle, create 5 divots and crack one egg in each divot. Bake 10 minutes so eggs are just white and still runny.
NOTE: To be served with a Perfect Bloody Mary, recipe below.


THE PERFECT BLOODY MARY
Serves 4. Prep time= 8 minutes. Inactive time= 1 hour.
* 1 liter quality tomato juice, with no additives (I think Looza makes an excellent line of juices and nectars and should definitely be purchased if available.)
* juice of 1 lemon
* juice of 1 lime
* 1 Tbl Worchester Sauce
* 1 Tbl hot sauce
* 5 Tbl quality fresh, plain white horseradish
* 1 Tbl celery seeds
* fresh pepper to taste
* 1 Tbl balsamic vinegar
* 8 ounces vodka
* celery stalk with leaves for garnish (olives or pickled green beans work well too)

1) In a pitcher, mix tomato juice, lemon juice, lime juice, Worcester sauce, hot sauce, horseradish, celery seeds and fresh pepper. Cover and place in refrigerator for 1 hour.
2) When ready to serve, remove from refrigerator and stir well. Pour 2 oz vodka into each glass (4), add tomato mixture (another tsp horseradish is optional). Add celery garnish. Gently pour the balsamic vinegar over the top of the tomato mixture so it floats. This provides an excellent visual and olfactory effect. Once served, mix and enjoy.

NOTE: A good Bloody Mary starts in the juice. If one uses a poor quality juice, the final product will taste off. I have had this happen. Do not attempt it at home. The taste of a dish depends on the quality of the products used.
ON HOT SAUCE: I am by no means a hot sauce expert, but I do like a little flame every once in a while. I have foodie friends from New Orleans that will add Tabasco to everything. I surprised them with some Dragon’s Fire Hot Sauce from Greene’s Gourmet in Vermont. (D and I picked some up during a camping trip.) This boutique sauce is made with ginger root which we were told makes the sauce extra hot because it opens the sinuses giving one full onslaught of the pepper—the Naw’lins boys were speechless.

Monday, January 23, 2006

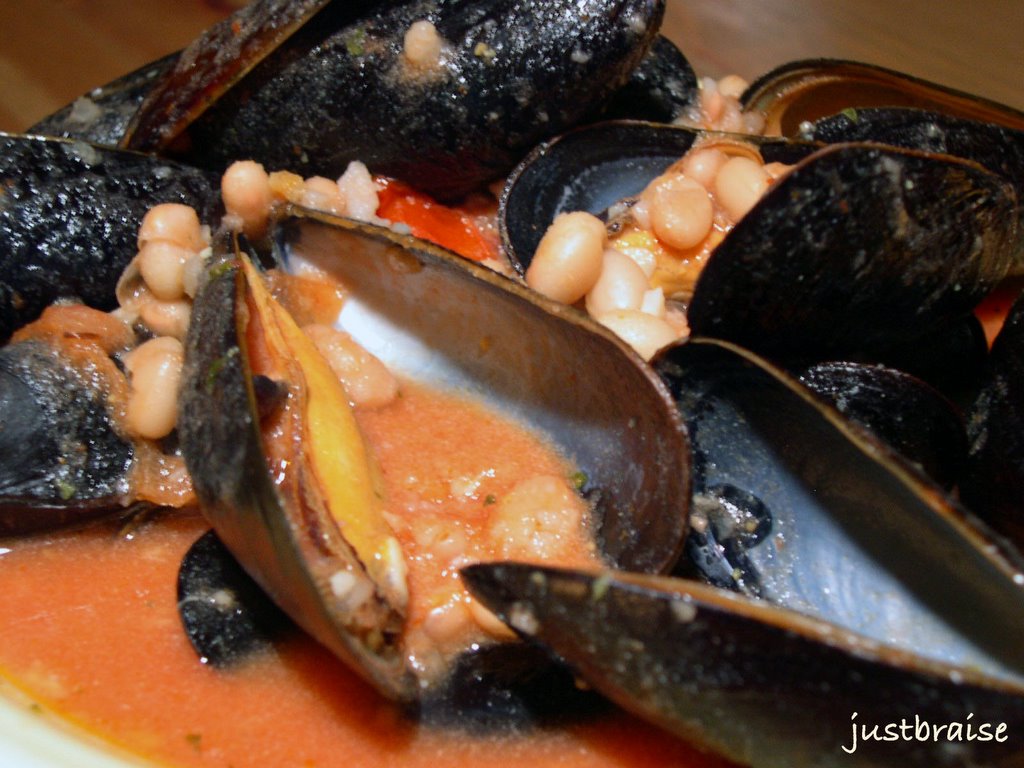
Mussels in Tomato-White Bean Sauce & Fried Calamari


On holiday in Italy, J and I broke off from the larger group. We ditched them in Rome with a bottle of Limoncello stuffed in our bag, and set off to explore the coast. Two girls ready for life with the locals, we were also two keen food snobs (a delight to be in Italy).

We began our journey heading south to Napoli. As we de-boarded the train, the energy and life of the city engulfed us. Two out-of-place New Yorkers, we felt at home amongst the bustle of locals. We found a cheap hotel near the train, threw our bags down, and headed to city central. We walked the narrow backstreets where young boys kicked soccer balls against the building walls. Laundry hung at haphazard angles overhead. Women teetered out the window, calling loudly to the children below. Men sat in small groups busily talking with their hands. We found the central piazza where the teenagers sat around the fountain. Surrounding the fountain were coffee shops where the twenty-somethingers flirted the afternoon away. We found a small stairway and sat down, taking in the spirit of the city.

Our stomachs growled as night came. We wandered into the commercial downtown and asked locals where to get some good seafood. In a winding backstreet full of street-hawkers, we were pointed into a restaurant. Led up to the second floor, we were seated on a balcony that overlooked the street. The smells overwhelmed us, and our stomachs deceived us—we ordered more than any two mortals could ever finish, daring ourselves to clear the plates.

For starters, I ordered grilled calamari: Perfect oval squid bodies, with a full bunch of tentacles. I slowly plucked each single tentacle and dropped it into my mouth. These little critters were the right ratio of chew to crispy grilled flavor, drizzled in olive oil and garlic. For my entrée I had mussels. The most perfect mussels I have ever had swimming in a red tomato sauce: salty-sweet and a model broth consistency for easy scooping. J and I passed our dishes back and forth, well aware we were nearing the bursting point. The third hour of the meal rolled around and we began giggling in disbelief of our good fortune and full bellies. Our gluttony had driven us too far: we had consumed everything. We rolled ourselves out of the restaurant and back to our hotel. We slept the most content night that trip with visions of the ocean dancing in our head: we were satisfied.

A few years later, my mother would take my little brother and me to an Italian restaurant in Chicago. Hoping to re-create my fading memory of the gluttonous Napoli feast, I happily ordered the mussels. As family tradition would dictate, my brother decided on the fried calamari appetizer for the table. Rings of crispy calamari arrived. It is a dish that is easily ruined if the batter is too thick or soggy. These critters were a delight. Soon a half-moon bowl arrived overflowing with blue shells and hidden orange treasures. The broth in this mussel batch was thick with tomatoes. Pearls of white beans accompanied the texture and flavor of the dish to perfection. Buttery, salty, and savory, I was brought back to my gluttony. I sopped the final drops up with a crispy crustini: pure heaven.

This meal was inspired by past and future memories of calamari and mussels, probably my two favorite seafood dishes (lobster is up there too). For the calamari, D and I used the batter we use for our fried chicken. Because we use farm-fresh cornmeal (ordered direct from an Indiana farm), the texture is a bit grainy. For something as delicate and chewy as calamari, I think this texture fought a little too much with the dish. If extra-fine cornmeal is used, I think it would be perfect since the taste of the corn is an excellent compliment to the dish. At first D pooh-poohed my cocktail sauce. Soon he was licking the dish exclaiming, “but I didn’t think it would be so good!” It is the most simple of condiments to make (a dollop of ketchup and a heaping spoonful of good fresh horseradish).

I created this mussel recipe from memory and combined what I believe to be good compliments to the dish. This meal is far to easy and inexpensive not to eat more often. The result was a succulent tomato-based sauce with a hint of cream to amplify the texture and flavor. I think with some white wine, this sauce would have been even better (we were too lazy to run down the street to get some), without wine, it is very fresh tasting. The best part of this dish was our vegetable side: a steamed artichoke. Once all mussels were consumed and we were left with a bowl of tomato broth, the spoon-like leaves of the artichoke was used to scoop up the sauce and enjoy with the meaty earthiness of the vegetable.

Pre-Cooking Note: Be careful when cooking with hot oil. The key to cooking with oil is that it must be extremely hot for a quick fry. The oil splatters easily so it is advisable to wear an oven mitt over the hand, long sleeves, or use long tongs to place the food into the skillet. Remember to gently place the food down to prevent unnecessary splatter.

FRIED CALAMARI
Serves 2. Prep + Cook time= 15 minutes.
* ½ pound fresh calamari rings
* ¾ cup cornmeal
* ¾ cup breadcrumbs (or flour)
* salt/ pepper to taste
* 1 tsp paprika
* 1 egg, beaten
* 3 cups vegetable oil

1) In a high-rimmed skillet, heat the oil over medium-high heat until hot. While oil is heating, beat egg in a small bowl. Place the calamari rings into the bowl and stir to coat. In another bowl, mix the dry ingredients (cornmeal, breadcrumbs, salt, pepper, paprika). Toss the calamari in the dry mixture to coat well.
2) To test heat of oil, place on calamari into the skillet. If calamari sizzles, the pan is ready. Fill skillet with calamari. Cook about 2 minutes, flip, cook 2 minutes more. You may want to cover the pan to prevent splatter.
3) Remove calamari onto a napkin to absorb some oil. Transfer to serving plate and enjoy with a sprinkle of fresh lemon juice or cocktail sauce.


Pre-Cooking Note: Mussels are in season October- April, so now is a perfect time to enjoy these bivalves. They can really be eaten all year round, but it should be noted that spawning season is late spring and try to avoid them at this time. When buying fresh mussels, make sure all shells are closed. Any open shells should close immediately when tapped lightly with your finger. If they do not close, throw them away. These dead mussels will contaminate the fresh ones. Also discard any mussels with cracked shells, feel heavy (full of sand), or feel loose when shaken (mussel is dead). Trust your nose: anything that smells overly fishy is probably no good. You can store mussels for up to 2 days in your refrigerator. Place them in a bowl, covered with a damp cloth. Do not place them in an airtight container or in fresh water, this will kill them. Before cooking, debeard and scrub the shells clean under cold running water.

MUSSELS IN TOMATO-WHITE BEAN SAUCE
Serves 2. Prep + Cook time= 20 minutes.
* 2 lbs fresh mussels, debearded
* 2 Tbl olive oil
* 4 cloves garlic, crushed
* 1 small vine ripe tomato, cubed
* 1-½ cups water (or white wine)
* 1- 5oz can tomato paste
* 1-½ cups white Northern beans, thoroughly rinsed
* 1 Tbl dry parsley
* Fresh pepper to taste
* ¼ cup cream (half and half or milk works too)

1) In a large saucepan or pot, warm the olive oil over medium heat. While warming, clean the mussels well under running water.
2) When oil is warm, add garlic and sauté about 2 minutes so aroma is let out and garlic begins to turn golden. Add water (or wine) and chopped tomato. Let simmer for about 2 minutes to break down the tomato. Add mussels, cover to steam about 4 minutes. Watch for mussels to open.
3) Add tomato paste, beans, parsley, pepper and stir to distribute evenly. Cover and allow to simmer 5-8 minutes. Turn heat off and add cream, stir. Serve with crustini or fresh bread.

Saturday, January 21, 2006

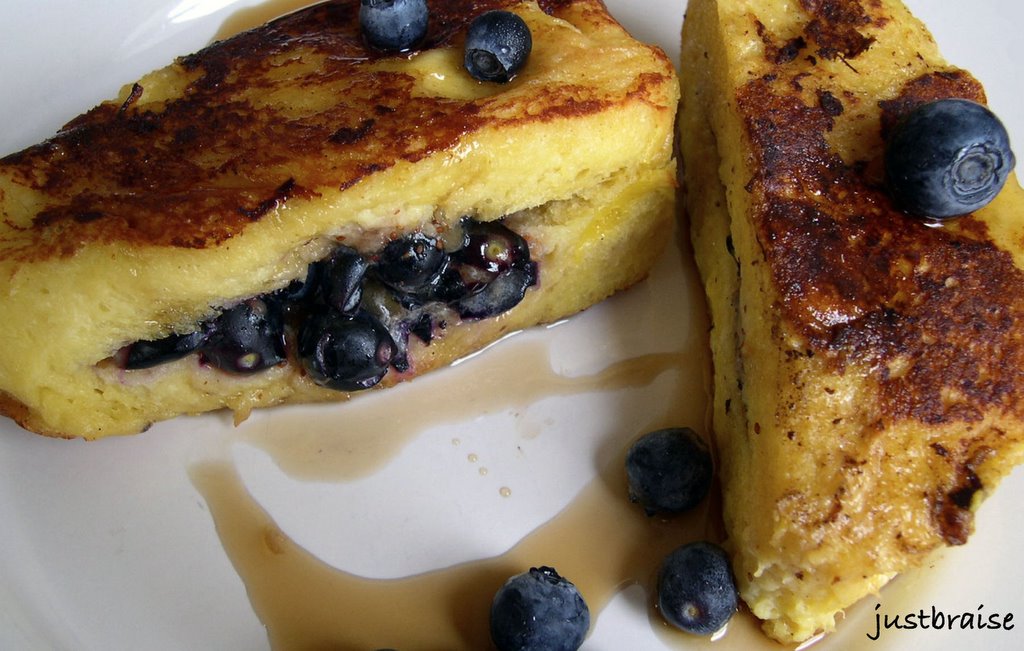
Stuffed Crème Anglaise French Toast


A good cookbook is a beautiful thing. One that is not a brick, that can easily be picked up and held close, with good crisp pages that are easy to turn, that is spectacular. One with a good table of recipes and an index of ingredients is a recipe-searchers dream. The best part about a cookbook, are the pictures.

The more pictures a book contains the more likely I am to purchase it. This is one reason I always post pictures about my recipes. I more often desire to try a recipe that is buddy to a picture than one that lacks a few good beauty shots. So it was upon a recent trip to the local B&N that I wandered to the food section and within seconds my eyes fell upon a very clean looking book with a delicious potato latke, smoked salmon egg benedict pictured, holding a simple title: Brunch .

Brunch is that fabulous meal everyone loves. It means one is at their leisure with the day and can rise late, mull about, then fix a casual and delicious spread. It reminds me of summer weekends when all of New York seems to be meeting up with friends and dining outside. My problem with brunch is I often feel at a loss for new ideas. How many ways can eggs, french toast or pancakes be glitzed up before we realize it really is just the same old meal with a different topping? So it was with hope that I cradled the book in my hands and retired to the second floor to find a good chair to park myself in.

Of course with the intent to eventually purchase, as I flipped through the pages I realized many of the recipes I was interested in were simple enough to memorize. Not the exact ratios, but many of these recipes called for some leeway in terms of personal taste, or were recipes common enough that I had already made them, with a little bit extra to create something truly special. I was hooked on the book (baked eggs?!) and flipped from page to page soaking up the pictures (which I think actually helps with remembering how to create the final product).

The recipe I saw that really drew my attention was french toast soaked in a crème anglaise batter. This sounded (and looked) fabulous because 1) I had some leftover crème angalise from the very decadent soufflé I made a few days back. And 2) because the secret (other than the rich, creamy, vanilla bean spiked batter to soak the bread in) is that this french toast is stuffed. The picture showed banana stuffed toast, but I had fresh package of blueberries calling my name in the fridge and they would be used instead. The last secret to this french toast is to buy an eggy bread (like challah) that you can slice yourself into thick 2-3 inch chunks.

STUFFED CRÈME ANGLAISE FRENCH TOAST
Serves 2. Prep + Cook time= 15 minutes.
* 4 thick (2-3 inches) slices of good egg-based bread, ends removed
* crème anglaise sauce (recipe below)
* ¼ cup fresh blueberries, slightly mashed with fork (or other fresh fruit like bananas, strawberries, etc)
* 1 Tbl butter

1) Cut the ends off the bread. Carefully with a knife, slice a small pocket in one end of the bread (keeping a few centimeters away from the edges).
2) Using a spoon or fork, carefully stuff the mashed blueberries into the bread. Dunk the bread into the crème anglaise making sure the bread readily absorbs the crème.
3) Place the soaked bread in a warm skillet on medium-low heat with the butter melted. Cook on both sides until golden brown, about 3 minutes.


CRÈME ANGLAISE
Makes about 4 servings. Prep time= 10 minutes. Inactive time= up to 2 hours.
* 2 cups half-and-half
* 1 vanilla bean, split lengthwise
* 5 large egg yolks
* 1/4 cup sugar
* 1 tablespoon dark rum, or to taste

1) In a small saucepan bring half-and-half just to a boil with vanilla bean and remove pan from heat. Scrape seeds from bean with a knife into half-and-half, reserving pod for another use if desired.
2) In a bowl, whisk together yolks, sugar, and a pinch of salt and whisk in hot half-and-half in a stream. Return custard to pan and cook over moderately low heat, stirring constantly with a wooden spoon, until thickened (170°F. on a candy or digital thermometer), do not let boil. Pour sauce through a fine sieve into a bowl and cool, stirring occasionally. Stir in rum. Chill sauce, covered, until very cold, at least 2 hours and up to 2 days.

Tuesday, January 17, 2006

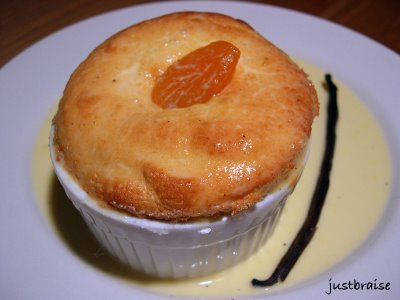
Apricot Soufflé w/ Vanilla Rum Crème Anglaise


(Otherwise known as Heaven: Part II)

For New Year’s D and I threw a Sweet Cookie New Year Party. I scoured cookbooks, the Internet, recipes handed down on greased up pieces of, and even invented a concoction or two. There was one cookie I thought sounded amazing. It included a fabulously decadent vanilla bean in the recipe.

As D and I stood in the spice section marveling at all the colors, our eyes finally fell onto the prized vanilla bean. D picked up the container, the same size as all the other spice jars, and made some snide comment about there being a single pod resting comfortably at an angle, while all the others spices were packed to capacity. What a holy bean. After checking the price tag, I decided not to make the purchase—that was one cookie recipe we could do without.

I returned home to delve into the mysteries of the vanilla bean. How can such an ugly little pod hold so much value? I asked my mother’s friend who regaled me with stories of cooking shows in the 70’s using vanilla beans in the recipes. Those were the days when vanilla beans were $400-600 for a single pod. Imagine a 70’s housewife purchasing ingredients for that dinner realizing the single bean was that month’s mortgage payment! I thanked my stars I could actually afford a bean these days, even if the price still made me do a double-take.

A few months ago, I read Pollan’s The Botany of Desire. I passed it along to my friend D, who subsequently did a great summary of the text. As I dug into the chapter about tulips, I could not but help wonder why the chapter was not actually about orchids (though they were mentioned). With orchids fetching prices upwards of $50 per plant, why were these prized beauties not considered? Uncovering more vanilla history only made me wonder more…
____________________
Vanilla, Birds and the Bees:
The vanilla bean originally hails from Central America. The bean is the only edible byproduct of about 20,000 orchid varieties. In order for this orchid to produce a vanilla pod, it must be fertilized by a Melipona bee which is only found in Central America. This bee cannot survive outside of Central America’s vanilla region. With the wiles of science, we are fortunate enough have developed a hand pollination technique (developed in 1836) still used by commercial growers today. Problems do not stop there.

The vanilla bean orchid only opens once a year for less than 24 hours. Today’s commercial growers must patiently, and often, check these precious orchids, ready to pollinate by hand. The vanilla pod is the fruit that grows off this orchid’s vine. In the wild, these vines will reach the canopy of the rainforest. Commercially, they are trimmed to ease the picking process. After pollination, orchid flowers eventually develop into long green beans (up to 12 inches long). These pods are handpicked before they are ripe. Now, growers may begin fermentation which lasts 2 to 6 months until the beans become dark brown and develop white crystalline coating, called vanillin. This vanillin is the scent and flavor that is valued throughout the world. Still, the beans must be aged for up to 2 years to fully dry the bean out to prevent rotting, packaged airtight, and shipped around the world.

Today, vanilla is produced in 3 main areas of the world. Each area’s vanilla bean produces a specific flavor and coloring that is unique to the region.

1) Madagascar is the largest producer of vanilla beans with about 80% of the industry. Their vanilla is known as Madagascar Bourbon Vanilla. This vanilla is considered to be the highest quality pure vanilla available, described as having a creamy, sweet, smooth, and rich flavor. They are the thinnest beans grown.

2) Mexican vanilla, where the orchid originated, now produces only a small percentage of the world’s crop. The bean is thicker and darker with a smooth, spicy, rich fragrance and flavor. Many vanilla aficionados believe this to be the best vanilla available. Be warned: some manufacturers add coumarin to their vanilla. This is banned by the FDA because it can cause liver and kidney damage. So be wary of fabulous deals on Mexican vanilla and always buy from a reputable source.

3) Tahitian vanilla is more flowery and fruity than the other varieties. It is also the thickest and darkest of the three pods. This vanilla bean is more popular for fragrances.
____________________
Extracts:
Extracts are the most popular way vanilla is used in baking. Extract is produced by steeping vanilla beans in a water-alcohol solution for a number of months (sometimes with added sugar). The FDA requires vanilla labeled “pure” to contain 13.35 ounces of vanilla bean and 35% alcohol per gallon of liquid. This is the pure vanilla most often found at the grocery.

When buying vanilla, make sure to purchase “pure” vanilla. “Imitation” vanilla extract is produced with synthetic vanilla. Items labeled vanilla “flavoring” are a combination of pure and imitation vanilla extracts.
____________________
A tasty way to extend the life of a vanilla bean after its use in your custards, milks, creams, syrups, and soufflés is to remove, rinse and dry the used pod. Place it into granulated white sugar to create vanilla sugar. Use this as regular sugar with a hint of vanilla.

Pre-Cooking Note:
I found this recipe on epicurious. Because I had a vanilla bean, I searched recipes for “vanilla bean” and sorted by “fork rating”. This recipe received 4 forks and 100% “would make this again”. I will make this everyday. Before I provide the recipe, let me mention this: D tasted this and all he could say was “this is really, really, really, really goooood.” He took another bite: “This is sooooo good. This is better than anything I have ever had in any restaurant anywhere.” (Let me also add that D is a chocolate dessert man—not a fruity dessert man.) After finishing the soufflé, we both drank the remaining crème and contemplate adding the leftover to coffee in the morning…

APRICOT SOUFFLÉ W/ VANILLA RUM CRÈME ANGLAISE
Makes 6, 7-oz servings. Prep time= 30 min. Cook time= 30 minutes. Inactive time= 2 hours.
* 6 ounces dried apricots (about 1 ½ cups), quartered
*1 ½ cups water
* ¾ cup sugar plus additional for coating ramekins
* 1 tablespoon fresh lemon juice
* 1 tablespoon dark rum if desired
* ½ teaspoon vanilla
* 5 large egg whites
* 1/4 teaspoon cream of tartar
Crème Anglaise:
* 2 cups half-and-half
* 1 vanilla bean, split lengthwise
* 5 large egg yolks
* 1/4 cup sugar
* 1 tablespoon dark rum, or to taste

APRICOT SOUFFLÉ
1) In a saucepan simmer apricots, water, and ½ cup sugar, covered, 20 minutes. Transfer hot mixture to a food processor and purée until very smooth. Force purée through a fine sieve into a bowl and stir in lemon juice, rum, vanilla, and a pinch of salt. Cool purée completely. Purée may be made 2 days ahead and chilled, covered. Bring to room temperature before proceeding. Transfer purée to a large bowl.

2) Preheat oven to 350°F. Generously butter 7-ounce (3½ by 1¾ inch) ramekins and coat with additional sugar, knocking out excess. In a large bowl, beat whites with pinch of salt until foamy. Beat in cream of tartar and beat whites until they hold soft peaks. Beat in remaining ¼ cup sugar, a little at a time, and beat meringue until it just holds stiff peaks. Whisk about one forth meringue into purée to lighten and fold in remaining meringue gently but thoroughly. Ladle batter into ramekins and bake soufflés on a baking sheet in middle of oven 20 to 25 minutes, or until puffed, golden brown, and just set in center.

3) Remove ramekins from oven. With 2 forks pull open center of each soufflé and pour some crème anglaise into each opening. Serve soufflés immediately.


VANILLA RUM CRÈME ANGALAISE
1) In a small saucepan bring half-and-half just to a boil with vanilla bean and remove pan from heat. Scrape seeds from bean with a knife into half-and-half, reserving pod for another use if desired.

2) In a bowl, whisk together yolks, sugar, and a pinch of salt and whisk in hot half-and-half in a stream. Return custard to pan and cook over moderately low heat, stirring constantly with a wooden spoon, until thickened (170°F. on a candy or digital thermometer), do not let boil. Pour sauce through a fine sieve into a bowl and cool, stirring occasionally. Stir in rum. Chill sauce, covered, until very cold, at least 2 hours and up to 2 days.

NOTE: The most time consuming part of this was sieving the apricot purée. I was having a hard time so actually ended up dumping an extra spoonful of apricot that would not sieve through. In the end, this left some satisfying apricot chunks in the soufflé. To save time, make the apricot purée and crème anglaise 1-2 days ahead of time. I halved this recipe and made two heaping soufflés. The soufflé was actually peaking twice as high when taken out, but once it is pierced with a fork and the crème is poured in, it deflates, absorbing the crème. For the crème anglaise, even after halving this recipe, I added about 4 Tbl of dark run to the crème. This gave the sauce a very punchy rum, full flavor. The extra rum is highly recommended.


Monday, January 16, 2006

Huevos Rancheros con Guacamole


An ode to Mexican food: You hold comfort in the bean, spice in the pepper, butter in the avocado, dipping in the salsa, and manly challenges in the tequila’s worm-- I believe that covers all necessary categories for fun eating. One can also dine out on superb Mexican food for relatively cheap, making this the college student or starving artists’ favorite food. Is there any other country brilliant enough to incorporate chocolate in a main dish?

My personal belief is that Mexican food is aided greatly by the avocado. That beautiful green butterball is pure decadence in dining. Originally known for its sexual powers (throw away the Viagra boys!), the avocado’s original name was ahuacati or “testicle”. But alas, the Spanish Conquistadores could not pronounce the Aztec name, dubbing this delight aguacate. This fruit eventually became popular to sea-faring Europeans, who called the avocado, midshipman’s butter, spreading it on their biscuits.

I personally keep an avocado on hand for any emergency situation that may arise: for a salad, in a sandwich, sliced with eggs, blanketed in proscuitto… I could go on. My favorite way to enjoy an avocado though is in guacamole.

I received this recipe from a good friend who manages a Mexican restaurant. The food is so good I rarely attempt to shame myself with any recreation of their dishes. But guacamole is a life-saver, so it was the one recipe I had to have. I once made this over Thanksgiving: I handed the bowl to my brother, ran downstairs to put my wet clothes into the dryer, and returned to find the bowl was (literally) licked clean. He slouched low on the couch, the empty bowl resting in the cradle of his arm, while he giggled in delight at his deft eating abilities. I made another batch and ate it in front of him, making sure to keep it just out of reach, just like a good sister should. Stupidly, I taught him the recipe so anytime I was on my way home craving guacamole I found the avocado stash cleaned out.

The key to an avocado (and therefore guacamole) is to ripen it properly. Purchase a seemingly soft one only to slice it open and find it bruised and unusable. Purchase a rock hard avocado and the time spent waiting for it to ripen is heart-wrenching. I assure you, ripening the avocado in your own home is the wiser choice (as is the Hass variety):

Hass avocadoes are rough-skinned and smaller. They have a nutty, buttery flavor. The thin-skinned large, lighter variety is not as flavorful and more watery. It is best to purchase avocadoes when they are hard. Allow the avocado to sit on your counter (or fruit bowl) to ripen (or in a paper bag with an apple for faster results). This process will probably take about 3-4 days and the avocado skin will darken as it matures. The avocado is ripe when the skin gives under a little pressure (the innards are soft). Once they are ready, they can remain for a few more days on the counter or be placed in the refrigerator for about 2 weeks. When ripe, the skin easily peels off (once started with a knife) and the seed is easy to remove. If you do not use an entire avocado, sprinkle it with lime or lemon juice and wrap it air-tight to prevent discoloration.

For this meal, the most time-consuming preparation is in the guacamole: 5 minutes. This makes today’s meal one of the fastest and most delicious breakfast dishes available. This was made a) because I had a ripe avocado itching to be used and b) I had the broken ends of un-dipable tortilla chips I could not make myself throw away. It is important to keep guacamole simple and more importantly, dairy-free. Many Mexican restaurants will bulk up their guacamole with sour cream or yogurt and ruin the natural buttery flavor of the avocado. As long as your avocado is good and ripe, your guacamole will be great.

HUEVOS RANCHEROS CON GUACAMOLE
Makes 2 servings. Prep + Cook time= 8 min.
THE GUACAMOLE
* 1 ripe Hass avocado
* 1 garlic clove, crushed (optional)
* 1 small vine-ripe tomato, chopped and deseeded
* ½ medium (or 1 small) white onion, chopped
* ¼ cup corn kernels (optional, but adds nice color and flavor)
* 2 Tbl fresh cilantro, chopped (optional)
* juice of ¼ lime (be careful not to overwhelm your guacamole with too much juice)
* splash of hot sauce, your preferred brand

1) Slice the avocado in half and remove the pit. (If your avocado is ripe it is easy to remove the pit by hitting it with a sharp knife—watch your fingers—and wedging it out from there.) Slice each half into another half and peel off the skin. Place in a bowl. Using a potato masher or fork, break down the avocado meat, leaving it slightly chunky. Do not use a food processor or blender. This will pulverize and thin out your guacamole.
2) Add remaining ingredients and mix until evenly blended.
NOTE: My friend told me the restaurant uses red tomatillos. I have searched gourmet and regular groceries, Mexican delis, and my local fruit stands, but have never seen red tomatillos. I would like to say this ingredient is a lie, but I do know they exist. Use them if you can find them.


THE HUEVOS
* 4 eggs
* 1 Tbl butter

1) Just before starting the guacamole, get the eggs going. In a fry pan, melt the butter over medium-low heat. Crack eggs, cover tightly and allow to cook for 3-4 minutes until a light film covers the eggs but they are still gooey. Remove.

NOTE: I served these huevos with guacamole and salsa on the side. I added ¼ cup black beans to whatever salsa I had in the house (I believe it was an organic roasted tomato variety). The crushed ends of tortilla chips were mixed in eventually. One can substitute soft tortillas for the chips. Delicious.

Sunday, January 15, 2006

Bourbon-Pomegranate Molasses Beef Short Ribs w/ Broccoli Rabe


*Just Braise has moved. Please visit me at www.justbraise.com!*

To braise, or not to braise, that is the question. Whether ‘tis nobler in the mind to purchase expensive meat and suffer the slings and arrows of outrageous fortune,-- or to fool your audience with inexpensive meat that melts in the mouth and is pure succulence.

I choose to fool, and with rave reviews.

Braising is the frugal gourmet’s trick on the audience: It turns tough meat tender. This is a process where one can throw everything-but-the-kitchen-sink into the pot, walk away, and return a few hours later to remove spectacular meat with little effort (I have discussed the process and various techniques more in depth in my first post of this New Year. I will also make the promise that more braising will be discussed this year, than last.) For tonight, it is beef short ribs.

As a child, I cannot remember ever eating authentic southern BBQ ribs. Steaks, BBQ chicken, hamburgers, hot dogs—those were all covered. I cannot recall once stepping foot into a BBQ joint until I was in high school. This moment was bliss and I often requested return trips.

My family did eat ribs though. There was only one location we ever consumed ribs: at New China Restaurant. We walked in, summoned by the larger-than-life giggling gilded Buddha that rested above the host stand, and soon sat at our regular table. I always thought we were so special sitting at this corner booth right near the bustling kitchen. Looking back, I am sure three young rowdy children are not a restaurant favorite. Regardless, their ribs were amazing, dripping with a soy-BBQ sauce that my family always had to order at least 2 plates of to satiate all.

But I have aged, and with age I have come to enjoy ribs beyond the comforts of the local Chinese restaurant. I still crave authentic southern BBQ. This is good since D is a southern boy: Tonight we summoned the southern kitchen.

On short ribs:
There are two kinds of beef short ribs. One is the shoulder (or chuck). These pieces are cut into individual rectangular slices, 2 to 3 inches long. They are thick, have layers of fat and connective tissue, and a thick bone running along them. The second kind of short rib is the short plate (underside of the chest). This is typically what you receive in a BBQ restaurant when you ask for “short ribs”. It usually consists of five connected ribs (numbers 6 to 10). This section is meaty but also contains a lot of connective tissue. Both cuts are tough and require long cooking (in this case braising) to soften them up.

When purchased in the supermarket, this cut of meat is a bargain. For tonight’s meal I purchased a package of chuck (loose) short ribs. They were large, meaty and marbled. They arrived in a package of 4, totaling just under $4. The rest of the ingredients are staples I generally have at home so with the broccoli rabe (about $2.50) this meal for two was about $7. I was happy with this math and returned home to braise. (Okay, the bourbon is not a staple, but leftover from a New Year party. This girl loves her hot toddies.)

Other notes on this recipe:
I combined and adapted this recipe from two I found online (one from starchefs, the other from epicurious). The pomegranate molasses can be substituted for regular molasses. I just happen to enjoy the sweeter pomegranate molasses. It is available in Middle Eastern markets (for about $1.50) or is now showing up in many general supermarkets (for about $3.00) in the Mediterranean food section. Whichever molasses you use, make sure to add it at the end of the cooking process. The pomegranate seeds in the braise process are also optional. I had some leftover seeds from a recent heavenly dessert and threw them in (as I said, everything-but-the-kitchen-sink.)

Bourbon-Molasses Beef Short Ribs w/ Broccoli Rabe
Makes 2 servings. Prep time= 20 min. Cook time= 2.5 hours
Bourbon-Molasses Beef Short Ribs
4 short ribs (Find ones with a good fat-meat ratio)
1 Tbl butter
4 cloves garlic, chopped
1 carrot, chopped
1 celery stalk, chopped
1 medium onion, chopped
1 jalepeño pepper, chopped (if a little spice is desired)
3 bay leaves
¼ tsp thyme
¼ cup bourbon
1 Tbl tomato paste
1-½ cups water
1 Tbl soy sauce
2 anchovy filets
seeds of ½ a pomegranate (optional)
1/3 cup pomegranate molasses (or regular molasses)
fresh ground pepper

1) Preheat oven to 350F. In an oven safe pot, or dutch oven, melt the butter over medium heat. Cover both sides of the short ribs with an ample amount of pepper and brown the ribs (about 3 minutes each side). In the braise process this initial quick heat process locks the juices inside the meat. Remove the ribs and place on a separate plate.
2) Add the garlic, carrot, celery, onion, jalepeño and anchovies. Sauté for 5 minutes.
3) Add bay leaves, thyme, bourbon, tomato paste, water, soy sauce and (optional) pomegranate seeds. Return ribs to pot, cover tightly and place in oven on center rack. Cook for 2.5 hours.
4) Once removed from the oven the sauce will have thickened and the aroma will be overwhelmingly delicious. Add pomegranate or regular molasses, stir and serve.


Broccoli Rabe
1 bunch broccoli rabe
2 Tbl butter

1) When there is 10 minutes left of the braising process above, warm a medium sized saucepot over medium heat with the butter. Add broccoli rabe, cover tightly and allow to sit for 5 minutes. Stir, cover again, and cook until leaves are wilted (about 4 more minutes). Remove and serve.


Check out this recipe featured on Chef Michele!

Head on over to Lindy Toast for the Something For Nothing wrap up!


View Stats
Rankingblogs.com: Defining your blogs worth..