


Monday, March 13, 2006

Golden Beet Salad


I cannot recall when I ate my first beet. I know my grandmother often served them at family meals. It sat cold and wiggley in between the sauerkraut and Jell-o; the beltway of the table I despised. Often times, when the plate got away from my small hands “grandma’s specialties” were loaded on. I sat there shifting the food around, building monuments in the likeness of Jabba the Hut, until all was an indistinguishable mess. It was many years before I willingly placed a beet in my mouth.

The first time must have been in New York City. It might even have been as late as my college years. I want to say that my first beet experience was in a sweet crimson borscht. Delicious and full of vegetables, I am sure I pondered how the soup acquired its rosy hue—that is until beer was in front of me and all was forgotten.

At some point I remember watching (or possibly reading?) a segment about food and how certain vegetables alter a person’s urine. Disgusting, I know, but I have two brothers so this was cool to me. What I take away from that program today: Asparagus= yellow and pungent. Beets= bright pink. To me this was fascinating. I tried consuming bowls of borscht, but that just filled me up. Eventually, I turned to the beet.

I remember again being at my grandmother’s home (post new scientific knowledge). Behold the plate of beets! My grandmother was the only one eating them. Being the dutiful, and only granddaughter, I plunged my fork into the platter and filled my plate with beets. I consumed them faster than I could taste them for fear of ruining my experiment with a bad tasting vegetable. It was halfway through my plate when I paused for breath, tasted, and realized the sweet joy that is the beet.

Today it seems my refrigerator is never without beets. They are the best of additions to any salad, powerful enough to stand on their own, and their leftover juice (the water they are boiled in) makes a superb addition to soup stock. I often cook up more than D or I can consume in one night then hide them in sandwiches, replacing the too common tomato (highly recommended!).

So it was with great joy that I spied the golden beet my supermarket. I bought a bunch, boiled them up and served them simply as pictured: with fresh peppercorn goat cheese, sage and a sprinkle of balsamic vinegar. This salad is pleasant and refreshing. The golden beet is a beautiful vegetable on its own, or paired with the more common red beet. It has a sweeter and more subtle flavor, making it an ideal “starter” beet. It is also a beautiful royal shade, reminiscent of the upcoming spring we all long for.

Oh, and my experiment worked. I called my grandmother into the bathroom to witness my feat. She was not impressed and thought I might be ill.

GOLDEN BEET SALAD
Serving Size= 2 persons. Active Time= 10 minutes. Inactive time= 45 minutes.
* 4 small golden beets
* 6 fresh sage leaves, pineapple sage is ideal if available
* 4 Tbl plain, herbed or peppercorn goat cheese

1) In a small pot over medium-high heat, bring water to a boil. Wash beets well and trim stalks, leaving about 1 inch in tact. Add beets to water, cover; reduce heat to medium. Cook beets about 45 minutes, until a fork can easily pierce the beets.
2) Remove beets from heat and run cold water over them until they can be handled. Push skin off (once cooked, beet skin easily falls off with a little nudge). Trim off stalk and slice as desired. Arrange on plate.
3) Sprinkle goat cheese over beets, or place on side. Shred sage and sprinkle over. Add a dash of balsamic to taste.
Saturday, March 11, 2006

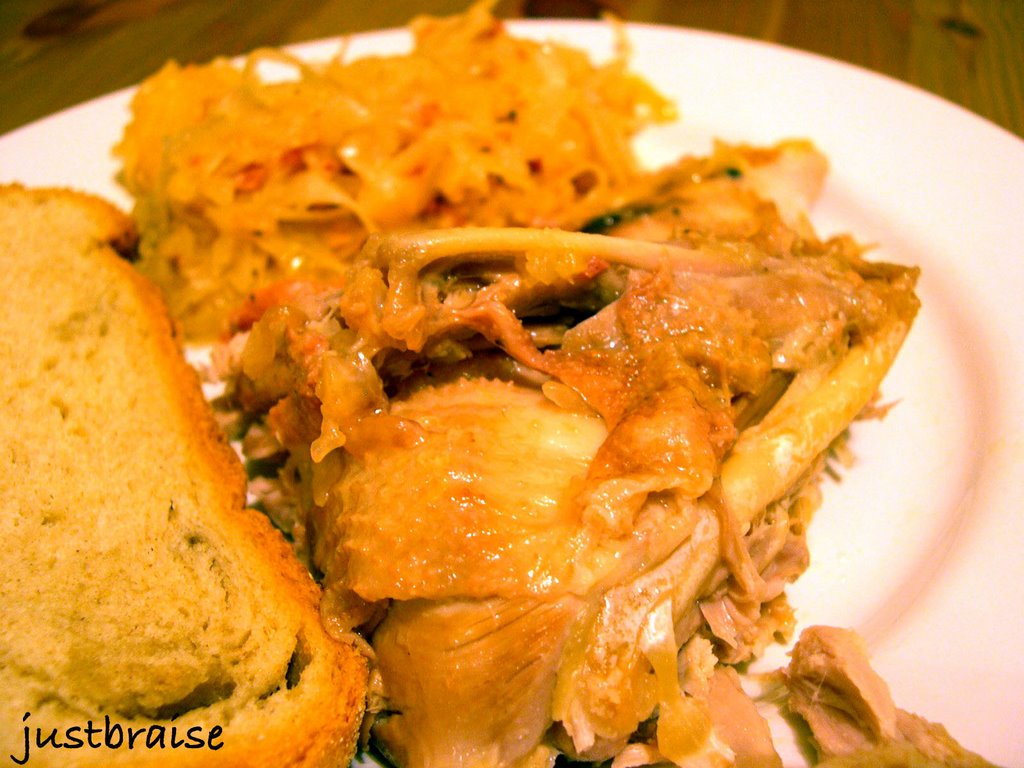
Braised Pheasant w/ Sauerkraut


A few years ago, I had an ideal roommate: she was an amazing baker while I was the meat and potatoes of the operation. Together we created some tantalizing meals that impressed all around us. We were an unstoppable duo, especially in the kitchen. She moved out, we move on, and now she lives half a continent away. On a recent visit, she imparted onto me the most precious gift of all: The Art of Eating by M.F.K. Fisher.

It is a hefty volume, almost 800 pages; a collection of Fisher’s best writings on food. But its cover was the most seductive image I had laid eyes on that I eventually cracked it, finishing it in one week’s time. Today I will not indulge the reader in a full review; that is for another time. I will say it is one of those books once picked up is impossible to put down. The writing is so voluptuous is calls to be read aloud to an audience.

With each sitting I grew hungry, not only for more of Fisher’s writing, but physically. Throughout the book, recipes wrapped in Fisher’s memories are found. Before I passed this book on to another friend, I copied a few of those recipes down to satiate my appetite another day. Many seem almost archaic today (in the United States at least)—roasted pigeon-- these are recipes that must be indulged at some point in one’s lifetime.

Today I unfurl one of those copied recipes with more to come. This one if found in the section “How to Cook A Wolf.” First published in 1937, this section is a guide for the housewife on how to scrimp and save in the bowels of wartime, as well as after. How does one continue to live a life of luxury when there is none to be found?

I must suppose pheasants were easier to come by in those days. A young boy could go on a hunt with his father and return with a sack of pheasant to feed the family for a week, nary a penny spent. Today, pheasant is a luxury (at least in New York City). I was determined to create this dish (and if I could not find pheasant, Cornish Hen or something of that sort would have to do). Low and behold today at the Green Market I found Game Dealers: Wild turkeys, chickens, geese, and of course, my dear pheasant! A little on the expensive side ($20 for a good sized bird!) but it was destiny to find and had to be bought. Add to that 1pound of fresh bacon (also from the Green Market) this meal is hardly a hungry wolf—it can now pass as a starving millionaire fare.

BRAISED PHEASANT (OR PARTRIDGE) IN SAUERKRAUT
Serving Size= 4 persons. Active Time= 45 minutes. Inactive time= 2½ - 3 hours.
This is the recipe as it appears in The Art of Eating.
* salt and pepper
* 2 small or 1 large bird (or 1 rabbit)
* bacon slices
* 3 tablespoons butter or good oil
* 1½ pounds sauerkraut
* 1 cup peeled and sliced apples
* 1 cup dry white wine (or half and half with water or vegetable stock)
* 1 tablespoon flour


Rub birds with cut lemon, and salt and pepper them. Wrap with the bacon and tie securely with twine. Heat the fat and brown the birds.
Wash the drained sauerkraut (unless it is very mild, [t]hen just drain it). Place a layer of it with the apple slices in the bottom of a casserole and imbed the birds. Cover with the rest of the kraut and apple, add the liquid, and cover closely. Let simmer very slowly for about 2 hours.
Put the birds on a hot plate, and thicken the kraut with the flour. Make nests in it, and replace the birds in them, ready to serve.


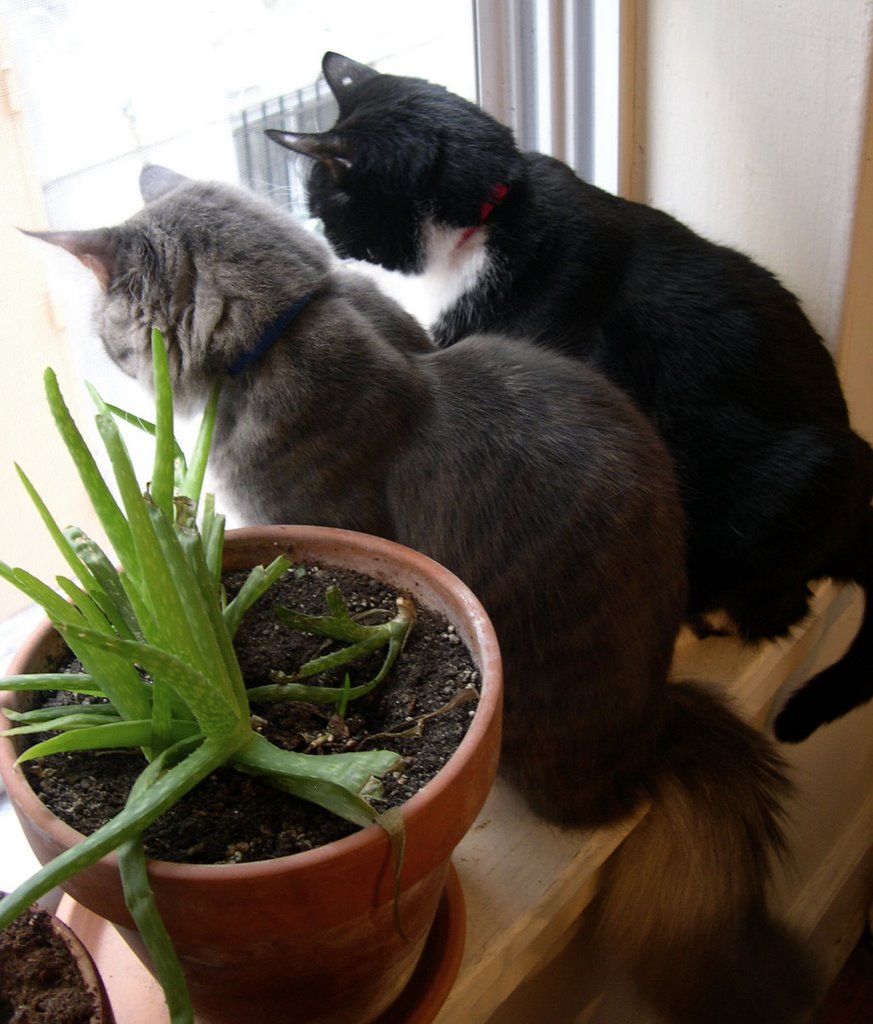
On non-food related musings, here is WCB # 40 over at Eat Stuff. Below we have Whiskey and Kitty BoJangles sitting at the first open window of the year...

Friday, March 10, 2006

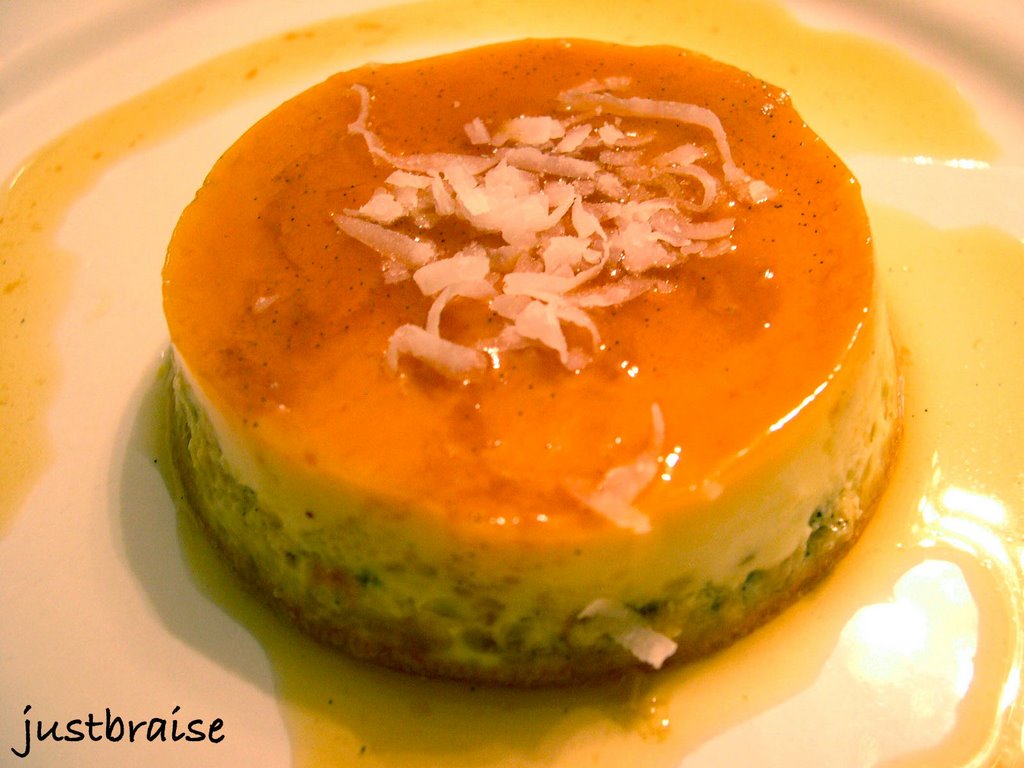
Coconut Vanilla Bean Flan


Some South Pacific Islanders used to call it Monkey Fruit. Some, like myself, use the fibers mixed in their potting soil, helping plants to retain their precious moisture. Some fancy cosmetic makers use the milk in their products to for anti-aging benefits. Some cultures like to cook with it. Some like the way it smells. It is the amazingly versatile coconut.

Whether it be entrée, snack, dessert or face cream, the coconut makes an amazing addition to most any dish. So first things first, how do you pick this prized item?

When shopping for coconuts, make sure the outer shell is nice and hard. It should not give when pressed. Check the one end with the 3 “eyes.” The eyes should be firm and carry no mold. Some companies cover the eyes with wax to prevent them from puncturing in their journey to your grocery. This is okay. The whole coconut should have some weight to it. You should also be able to hear juice sloshing around when you shake it. If the coconut feels too light, it may have lost it’s juice or be past its prime. Likewise if you cannot hear any sloshing around the shell may have a hairline crack that formed in shipping, you should continue searching until one with a nice dark brown coloring is found. Now, how to crack that shell…

1) With your handy machete, give the coconut a good whack… Oh, no machete?
2) Go outside and throw the coconut onto cement with all your force. Go around and pick up the bits. Note that this method you will lose most any coconut water that may have been inside.
3) Take out your drill bit and drill 2 holes into the coconut shell. Start with using a small hole and gradually get larger. Pour coconut water out into a bowl and enjoy. Now you can whack it with a hammer to get it into bits. (I kid you not because this is how I did it until I found this seemingly easy way to crack the nut, see number 4)
4) See thisvideo for a clean and easy way to crack that nut!

Once the pieces of the coconut fruit are available, use a fork or spoon to nudge the meat off the hard shell. This bulk meat can be pulsed into slivers for use plain, or steeped in boiling water to get coconut milk. One coconut produces about 4 cups of shredded meat.

COCONUT MILK
Serving Size= 2 cups. Active Time= 15 minutes.
* 2 cups shredded coconut meat (see above)
* 2 cups boiling water

1) Place shredded coconut meat in a glass container with a top. Add boiling water, cover and let steep for 10 minutes. Using cheese cloth, strain the liquid through. Wring the accumulated wet meat in the cheese cloth, removing all milk from the meat.
NOTE: This can be repeated once more using the same meat. The first pressing of coconut milk is the thickest and sweetest, most prized in cooking. Once refrigerated, a cream will settled to the top of the milk. This is very tasty when used in cooking. Coconut milk will last about 2 days in the refrigerator. To keep longer, fill an ice tray with the milk and freeze until ready to use.


Now that you know how to make fresh coconut milk, we can make coconut flan. This recipe was adapted from epicurious.com’s Vanilla Bean Flan recipe. It was light, sweet, had fabulous vanilla undertones and subtle coconut flavoring throughout. It was also extremely simple to make, required few ingredients and is quite easy to halve if necessary.

COCONUT VANILLA BEAN FLAN
Serving Size= 4 (in 4 5-6 oz ramekins). Active Time= 30 minutes. Inactive time= 3-½ hours
* 1-¼ + ¼ cups fresh coconut milk + cream
* 1 vanilla bean, split lengthwise
* ¼ cup sugar
* 1 large egg
* 1 large egg yolk

1) Preheat oven to 350°F.
2) Heat 1-¼ cups coconut milk and cream with vanilla bean halves in a small saucepan over moderate heat until hot. Remove from heat, cover; steep 20 minutes.
3) Over medium-low heat, cook sugar in small saucepan, swirling often to help sugar melt evenly, until melted and pale golden. Continue to cook, swirling skillet, until sugar becomes a deep caramel; about 5 minutes total. Pour immediately into ramekins, tilting cups to coat bottom—caramel will begin to cool and harden once removed from heat so act quickly.
4) Whisk together whole egg, yolk, and remaining ¼ cup coconut milk with a pinch of salt until smooth. Discard vanilla bean pod from steeped milk and gradually whisk milk into egg mixture.
5) Divide mixture among ramekins and bake in a water bath, loosely covered with a sheet of foil, in middle of oven until custard is set but still trembles slightly, 35 to 40 minutes.
6) Remove cups from water bath and cool on a rack. Chill, uncovered, at least 2 hours. Unmold flans by running a knife around edges to loosen and inverting onto plates.

Monday, March 06, 2006

Chicken Masala (ARF5/#10)


What happens when a fresh coconut in the middle of the winter is too hard to resist at the grocery store? When you try to impress friends from out of town by using your drill to get at the sweet, rich water inside (other than learn there are easier ways)? What do you do once everyone has had their fill of sweet coconut meat? You spend a week in coconut bliss…

It all started with a Coconut Banana Bread with Lime Glaze. Now, fresh coconut is not needed for this bread, but it tastes amazing sprinkled on top. Once all that coconut meat is shredded, there are about 4 cups to put to use. Coconut Banana Bread used about ½ cup. Today it was Chicken Masala. I must admit this was my first time ever cooking a “legitimate” Indian meal. In the past, I have sprinkled some curry, tumeric and cumin together and called it Indian. Sad, because I absolutely love Indian food. And bad, especially since I have most of the spices in my cabinet!

I found a fairly simple recipe on Mahanandi. This recipe was chosen over others because, well, I had all the ingredients. This recipe also did not take too much time—as long as everything is in front of you at the start. It also helps to have an extra hand in the kitchen (so while one is roasting spices, the other can grind). The final result was excellent and filled the home with an amazing aromatic essence.

First, the benefits of coconut.

At a recent dinner party, I ordered coconut milk. I offered some to a friend who dissed it, “Oh, that stuff is really high in saturated fats. I won’t touch it.” Your loss, it was good. Coconut Oil is one of the best oils a person can consume. For centuries, South East Asian cultures have called the coconut palm the Tree of Life. Coconut oil is antiviral, antibacterial, antimicrobial, and antiprotozoal. Not all saturated fats are alike. While coconut oil is one of the highest in saturated fats it is also one of the highest sources of medium chain triglycerides, many of which are important in building and maintaining the immune system. Some medium chain fatty acids, like coconut oil, help to maintain the metabolism. It is also very good for the skin as a moisturizer.

Coconut Meat is high in fiber, vitamins and minerals (vitamin C, E, calcium, magnesium, potassium and iron). It is also low in cholesterol and sodium. Other forms of coconut include Coconut Water which is the liquid found upon initially cracking the coconut open. And Coconut Milk, made by steeping coconut meat pulp in boiling water and then pressing for the milk. All these forms of coconut share similar health benefits up to a point.

Below is the second installation on coconuts. More to come shortly on this tasty and long lasting fruit! This recipe is taken from Mahanandi’s site. It is followed step by step with the replacement of chicken instead of potatoes. Interesting, because my masala turned out orangey-brown instead of red! It also was not as sauce-based as Mahanandi’s picture! Maybe more water (or plain tomato sauce?) would fix this. Well, it was still delicious! I served this on a bed of basmati rice. Once again, it is recommended to have all ingredients out before starting. And again, a second hand helps-- While D was roasting all ingredients on the stovetop I was busy puréeing the ingredients together in steps and keeping an eye on the rice. In the end, there is enough masala leftover for two lunches tomorrow.

The below recipe is the original Aloo Dum (Potatoes in Masala Sauce). This recipe seems like a lot of ingredients but it is really mostly spices. So give it a try.

ALOO DUM
Serving Size= 4. Active Time= 30-45 minutes.
The preparation is three step. First boil the baby potatoes until they are just tender. Roast and grind the spices, the vegetables and the nuts for masala sauce. Combine and cook them together. The whole preparation takes about 30 to 45 minutes, if you have everything at hand.:) And the main chunk of it is of course to wait for the potatoes to boil.

* 12 tiny baby potatoes

Veggies
* 4 medium sized ripe tomatoes, each cut into four quarters
* 1 medium sized red onion or 4 shallots cut into big chunks
* ¼ cup finely chopped coriander
* 1×1 inch piece of fresh ginger
* 2 big garlic cloves


Nuts
* ½ cup cashews
* ½ cup fresh grated coconut

Dry Masala
* 6 dried red chillies
* 1 teaspoon coriander seeds & cumin
* ½ teaspoon peppercorns
* 3 small cinnamon sticks and cloves
* 1 star anise


Popu/Tadka
* 2 teaspoons of peanut oil
*1 teaspoon of mustard seeds, cumin and some curry leaves
* ½ tsp of turmeric
* Salt to taste

1) Preparation is boil, roast-sauté-grind and cook.
Boil the potatoes until they are just fork-tender. When they are cool enough to handle, peel the skin. Prick them with a fork in multiple sites and keep them aside.
2) Gather the listed ingredients for masala sauce, ready on hand on a big plate. Heat an iron skillet and proceed like this.
3) Roast dry masala ingredients, for few minutes, until they release their smell. Remove them from the skillet and keep aside.
4) Roast cashews, then fresh grated coconut for few minutes. Remove them from the skillet and keep aside.
5) Roast ginger and garlic for few minutes. Remove them from the skillet and keep aside.
6) Finally heat one teaspoon of oil and roast onion and tomatoes for few minutes.
Let them cool down little bit. When they are cool enough to touch, put them in a blender. Add half glass of water and half teaspoon of salt. Grind them into smooth paste.
7) Cook: Heat one teaspoon of peanut oil in a big wide pan or kadai. Toast the popu ingredients (mustard seeds, cumin and curry leaves) until they start to splutter. Add the grinded masala paste and another half glass of water. Stir in turmeric. Taste and add salt if needed. Add baby potatoes. Cover and cook on medium heat for about 15 to 20 minutes. Finally stir in finely chopped cilantro and serve.

My Kitchen Notes: 
Don’t forget to prick the potatoes, so that they can absorb the sauce.
 Onions - avoid yellow onion and go with shallots or red onions. 
If you want, you can also stir in cream/yogurt at the end.


Head on over to Sweetnicks for all your ARF/5 round up!

Sunday, March 05, 2006

Coconut Banana Bread w/ Lime Glaze


I do not make my own bread. I have in the past, but now that I live less than 1 block away from my favorite neighborhood bakery (I assure you my habitat’s location is pure coincidence) I find no need to make my own. In the summer, when I leave my windows open in the bedroom, if I go to sleep late enough (around 2 am), the smell of fresh baking bread comes wafting down the shared alleyway. Every so often, I drag myself from bed, pull on clothes, and go to the bakery at this time. The front door is left open for ventilation and one is allowed to buy tomorrow’s bread, still warm—right off the racks. Why bake bread with a setup like this?

This is why: while my neighborhood bakery has succulent olive breads, ciabatta, sourdoughs, wheat and ryes, there are no sweet breads. No carrot bread or zucchini bread. More importantly, no banana bread! Which I feel should really be a staple in any bakery.

When I was younger, it was almost weekly that my mother would produce one of the above three mentioned sweet breads. While my favorite (surprise to myself) was the zucchini bread, banana to this day, takes a close second.

A few years ago while working in publishing, my mother used to ship (bribes for books) of fresh baked goods for my fellow workers and me. The best shipment we ever acquired was shortly after my mother received Cooking Light, September 2003. I went to the mailroom to retrieve my package—the entire room smelled like banana. A new screening process had recently been implemented for incoming packages and I am sure the mailroom staff had a good laugh when the pungent package of baked products came through. The package was released to me under one condition: it had to be opened right then, and all present were to receive a piece of whatever was inside.

Inside were three of Cooking Light’s seven best banana breads: Marbled Chocolate Banana Bread, Coconut Banana Bread with Lime Glaze and Classic Banana Bread. Needless to say Cooking Light completed all research to ensure that each recipe was pungent with banana and mouthwateringly delicious. They were even able to survive the two-day shipping process, keeping moist.

With three bananas awaiting me in the freezer and a fresh coconut in the refrigerator, re-creating the coconut with lime glaze was a natural choice (even though fresh coconut is not necessary. This bread is moist and delicious with the perfect blend of coconut and banana. It remains fresh days later and the coconut-lime combination is the perfect compliment to the banana. All seven Cooking Light recipes can be found here along with nutrition information for each. The Coconut Banana Bread with Lime Glaze is below.

COCONUT BANANA BREAD w/ LIME GLAZE
Serving Size= 12-16 slices. Active Time= 20 minutes. Inactive Time= 1 hour.
* 2 cups all-purpose flour
* ¾ teaspoon baking soda
* ½ teaspoon salt
* 1 cup granulated sugar
* ¼ cup butter, softened
* 2 large eggs
* 1-½ cups mashed ripe banana (about 3 bananas)
* ¼ cup plain low-fat yogurt
* 3 tablespoons dark rum
* ½ teaspoon vanilla extract
* ½ cup flaked sweetened coconut
* Cooking spray
* 1 tablespoon flaked sweetened coconut
* ½ cup powdered sugar
* 1-½ tablespoons fresh lime or lemon juice

1) Preheat oven to 350°.
2) Lightly spoon the flour into dry measuring cups, and level with a knife. Combine the flour, baking soda, and salt, stirring with a whisk to combine.
3) Place granulated sugar and butter in a large bowl; beat with a mixer at medium speed until well blended (about 1 minute).
4) Add the eggs, 1 at a time, beating well after each addition. Add banana, yogurt, rum, and vanilla; beat until blended. Add flour mixture; beat at low speed just until moist. Stir in ½ cup coconut.
5) Spoon batter into a 9 x 5-inch loaf pan coated with cooking spray; sprinkle with 1 tablespoon coconut. Bake at 350° for 1 hour or until a wooden pick inserted in center comes out clean.
6) Cool 10 minutes in pan on a wire rack; remove from pan. Combine powdered sugar and juice, stirring with a whisk; drizzle over warm bread. Cool bread completely on wire rack.


COOKING NOTES: 1) Although the rum smells excellent in the batter, I do not know if it is necessary in the final product. To really utilize the rum flavor I think mixing it in with the glaze for more of a kick. 2) In the final batter I added about ¾ cup coconut (an extra ¼ cup). The final bread is saturated in delicious coconut bits. 3) I used a 8 x 4-¼ inch bread pan coated in butter instead of cooking spray. The batter just fit the pan and really popped out during baking. 4) My bread baked for 1 hour and 20 minutes.

Saturday, March 04, 2006

Horseradish Encrusted Steak (WCB#39)


There are some mornings when a good hunter’s breakfast is in order. On those mornings the cold freezes the world and the air is crisp, harsh and blue. The days when you go out and everything is in slow motion and appears 2-dimensional. When even the winter birds seem to slug their pace and when you wish you too, like so many other creatures, could take to hibernation. It is when Mother Nature plays tricks with your immunities and confidence: one day you are so sure you can smell spring; the next day an Arctic blast finds comfort in your surrounds and takes an extended vacation. It is these mornings when a hearty breakfast is due.

On some days a solid meal may be Scottish Oats laced with fresh fruits. Some days it is braised oxtail or simple poached eggs. The Joy of Cooking lists a significant 10 course (depending on how you count it) meal that should be had before the hunt—from pheasant to quail eggs, rabbits and three liquors to warm you and send you on the way.

Today’s hunter’s breakfast was a simpler one. Enough to warm the soul on this bitter day, filling enough to stand on its own-- yet not so much that dinner is hopeless. Eggs may be served with it, forming steak and eggs, some citrus to act as cleanser, or a sufficient Bloody Mary.

Note: I was recently sent some samples of Silver Springs horseradish products. I was given plain, freshly ground horseradish, as well as flavored: Cranberry Horseradish, Pineapple-Apricot Horseradish, Wasabi Horseradish, as well as two mustard flavors: Deli and Chiptole. In attempts to dig through these products with a more refined nose (after all, horseradish is all in the nose), I thought a head-to-head taste off comparing the products should be in order. I then thought better and decided to prepare a meal specifically for each product, qualifying the merits of the taste paired with each. For some, I will use two products, others I will use three.

Today’s was a simple steak. Though I am sure the Wasabi or Cranberry would have been delicious on steak, I wanted the meat’s simple flavor to really shine through. For this reason, it was the plain horseradish that was used. I found this recipe off of foodreference.com. I chose this over others because it was quick and simple. It was one of the few that I found that used no mayonnaise or sour cream and a binder. Because of the few ingredients, both the horseradish and the steak were able to take the platform for their own tasty merits.

HORSERADISH ENCRUSTED STEAK
Serves 4. Active Time= 10 minutes.
* 4 2-3” thick New York strip steaks
* 2 cups fine breadcrumbs
* ½ cup melted butter
* ½ cup ground horseradish
* ¼ cup chopped fresh flat leaf parsley

1) Mix together everything but the steaks; season to taste with salt and pepper.
2) Season the steaks with salt and pepper on both sides. Grill to preferred degree of doneness.
3) When steaks are almost ready, remove from grill, press horseradish crust onto one side of each steak.
4) Place under a hot broiler until breadcrumbs start to toast, you will see the butter bubbling and sizzling.


NOTE: If cooking indoors, as I did, make sure your kitchen is properly ventilated. I cooked my steaks on a HOT griddle, 4 minutes on each side producing medium-rare meat. The steaks were in the broiler for maybe 4 minutes; I saw no butter bubble or sizzle, but the breadcrumbs did toast very nicely.

Please check out my piece on Paper Palate. Paper Palate is part of the WellFed Network.

And for the non-food related segment of this post... WCB #39 hosted by Eat Stuff. Last time I brought you Face Off, today I bring you Disgruntled Bedside Lovers:

Tuesday, February 28, 2006

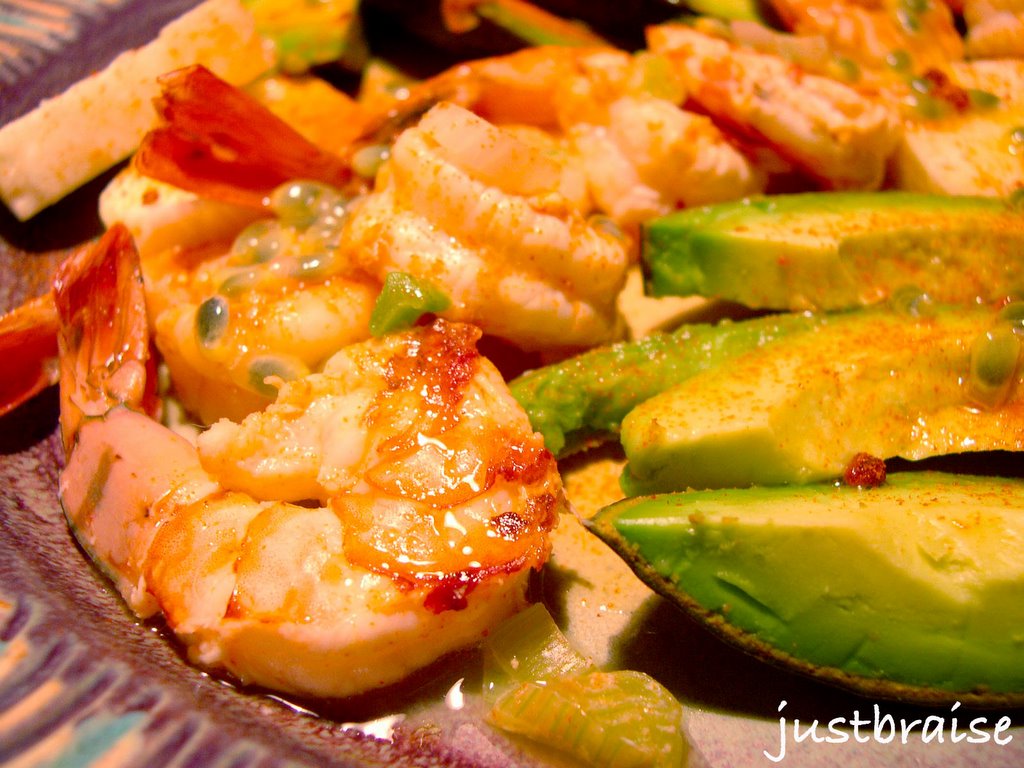
Jicama Passion Salad w/ Shrimp


I will admit there are many foods I have yet to try in my life. A semi-picky eater as a child, then vegetarian for six years, left me many missed opportunities. So it is only recently that I am opening my doors to the new. Last week it was skate, over the weekend it was pork belly, and today it is passion fruit.

It is true. I must sadly come to terms to the fact that I have never (knowingly) had passion fruit before today-- okay, two days before: At a recent brunch I discussed with friend, R, how I love Looza’s Tomato Juice because it is 100% pure tomato juice—the perfect base for an excellent Bloody Mary. He dared me to try the Passion Fruit, “truly amazing.” So the next time I saw it in stock I took the challenge and bought some. Once in my mouth I was brought to the Caribbean.

So as I went shopping one day my eyes fell upon a plum-looking fruit. The sign read “Passion Fruit.” A bit pricey at $1.50 a piece; I decided it needed trying, regardless.

Originally from Brazil, passion fruit got its name from Spanish missionaries who thought the fruit resembled religious symbols, like the crown of thorns. In Spanish, it is known as granadilla or “little pomegranate,” possibly because like the pomegranate, it is the pulpy seeds that are eaten.

Passion fruits are small with an overwhelmingly sweet pulp that is often strained for juice or sauces (though the seeds can be eaten). A good source of vitamins A, C and fiber (some claim it to be the highest fiber source of all fruits) and high in potassium, the flavor and health benefits of these little wonders go a long way.

Passion fruits are available in shades of purple or yellow (a more tart fruit) depending on the variety. When purchasing, pick the largest fruit available. It should be firm and as it ripens, the skin’s ridgidity should keep, while becoming slightly shriveled when ripe. When it is ready to eat, slice it in half, scoop out the seeds, and use them as-is or strain the pulp and just use the juice. Either way, this fruit is pure indulgence that should be tried.

The combination in this salad was pure tropic. The light, watery crispness of jicama (hick-e-ma) pairs perfectly with the buttery smoothness of avocado. A sprinkling of cayenne pepper gives this salad a great kick. When drizzled with passion fruit seeds and a smattering of shrimp, this salad is utterly delicious.

JICAMA PASSION SALAD w/ SHRIMP
Serves 2. Active Time= 15 minutes. Inactive time= 1 hour.
* 1 lb large shrimp, peeled and de-veined
* 1- 12oz can lager beer
* juice of 1 lime
* 2 scallions, chopped
* 1 avocado, sliced ¼-inch thick
* 1 jicama, peeled and sliced ¼-inch thick
* 1 passion fruit, pulp only
* 2 tsp cayenne pepper

1) Place the cleaned shrimp, beer, lime and scallion in a bowl. Mix and let marinate in the refrigerator for 1 hour.
2) When shrimp are done, using a grill pan (or real grill) set to medium cook the shrimp, 2-3 minutes each side, until they turn pink/ char slightly and curl. Place in a fresh bowl in the refrigerator to chill while prepping the rest.
3) Peel and slice the avocado and jicama, arranging them on 2 plates. Remove the shrimp from the refrigerator and arrange it on the plate. Sprinkle with cayenne pepper and passion fruit pulp. Drizzle with lime juice (optional).

Thursday, February 23, 2006

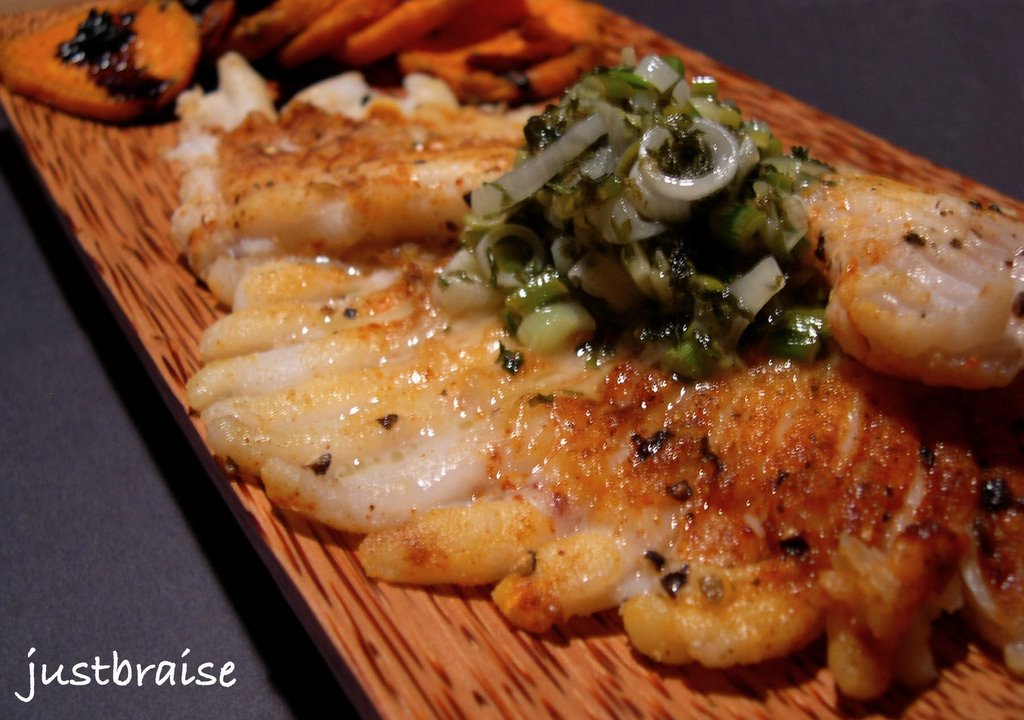
Skate au Buerre Noir & Sweet Potato Crisps w/ Balsamic Reduction (ARF/5#9)


*Please note on 2/28 this post was taken hostage for ARF/5#9 over at Sweetnicks. I've been overwhelmed lately, but will post more shortly*

Valued for centuries in Europe for its delicate scallop-like flavor and crab-like consistency, skate is the bottom dweller brought here to the spotlight.

Relative of the ray (as in sting ray), skates are oft admired for their smooth gliding ability. Their flattened diamond bodies barely skim the ocean floors, graceful and streamline, possibly the inspiration to many silver screen sci-fi futuristic machines—an interesting fact since these are some of the oldest underwater dwellers man knows.

Rumor has it that “faux” scallops are made from the meat of skate, but this is probably without merit. Though if the sweet scallop taste is desired, skate is an inexpensive and delicious alternative. It is also very healthy: low in calories and fat; loaded with protein and vitamin E. They are also without bones. Like sharks, the skate endoskeleton is made up of cartilage. This makes for easy cleaning and less hidden obstacles to choke down the throat.

Recently in the fish market I took notice to skates. Their fan-like “wings” create an appealing span visually. I probably bought this one because of the Olympics and so much skating (the sport) on television. I finally thought to give skate (the fish) a try.

In the New York area skates are at peak season April to June, and to a lesser extent now, October to February. For whatever reason, they have not gained much popularity in the United States and their cost reflects this (I found mine for $1.99 a pound). They are sometimes sold with their cartilage and skin in tact, though I found mine skinless and free of cartilage (often fish markets will de-“bone” them for you if asked).

Like most fish, the less put into it, the better it will taste, allowing its true delicate flavor to shine through. I did some rummaging and found most skate recipes called for a simple and quick pan fry, topped with a butter sauce. I followed this advice. The sweet potato chips with balsamic reduction were inspiration from a cooking show I saw on PBS over the weekend; balsamic reduction, placed over acorn squash. I did not have acorn squash, but thought sweet potato chips would do nicely.

This meal was filling, delicious, healthy and visually stunning. It is a semi-sweet, full of textures and flavors. For all the different elements, it is quick and easy to make and should be tried. Skate might just become your new favorite fish.

Note: All this may seem hectic and like a lot of steps to follow. It is really simple if you know what ingredients go to what and keep on top of things. Everything falls into place once you get started. Plus, so few ingredients are used it is difficult to really mess anything up.

Skate au Buerre Noir & Sweet Potato Crisps w/ Balsamic Reduction
Serves 2. Active Time= 30 minutes. Inactive time= 20 minutes.
The Sweet Potato Crisps w/ Balsamic Reduction
* 1 sweet potato, skinned
* 1 Tbl butter
* ½ cup balsamic vinegar
* 2 cloves garlic

1) In a small pot with water, over medium heat, add whole sweet potato (skinned). Bring to a boil and cook for 20 minutes.
2) Remove from boiling water and run under cold water to bring temperature down so you can handle the potato. Cut into ¼-inch discs.
3) On a skillet on medium heat, melt the butter. As butter is warming, in a separate saucepan on medium-high heat add the balsamic vinegar and garlic. (This will be brought to a boil, stirred occasionally for about 10 minutes; until thickened.)
4) In the skillet, fry the potato discs until lightly browned, about 8 minutes. The balsamic should be slightly thickened at this point. Remove the balsamic reduction from the heat, leaving in saucepan; it will continue to thicken. Place potatoes in the oven at 250F to keep warm while you prepare the skate (recipe below). When ready to serve, drizzle balsamic reduction over top.


The Skate au Buerre Noir
* 2 skate steaks
* salt/ pepper to taste
* 3 Tbl flour
* 2 tsp paprika
* 1 Tbl butter

1) Wash off and pat the skate dry. (If pan is large enough to fit both skates, leave whole; otherwise, cut into halves or quarters.) Cover with salt and pepper to taste; sprinkle one side with paprika. Sprinkle flour on both sides.
2) Melt 1 Tbl butter over medium heat. When warm, add skate. Cook 2-3 minutes each side until golden brown. Remove from heat and cover with buerre noir sauce (recipe follows)


Buerre Noir
* 3 Tbl butter
* 2 Tbl parsley
* 2 scallions, chopped

1) Begin sauce before prepping skate. Prep skate as butter is browning, keeping an eye so as not to burn. In a saucepan on medium heat, melt butter with scallions. Heat until butter begins to brown and emits a nutty aroma. Add parsley, stir and remove from heat.

Tuesday, February 21, 2006

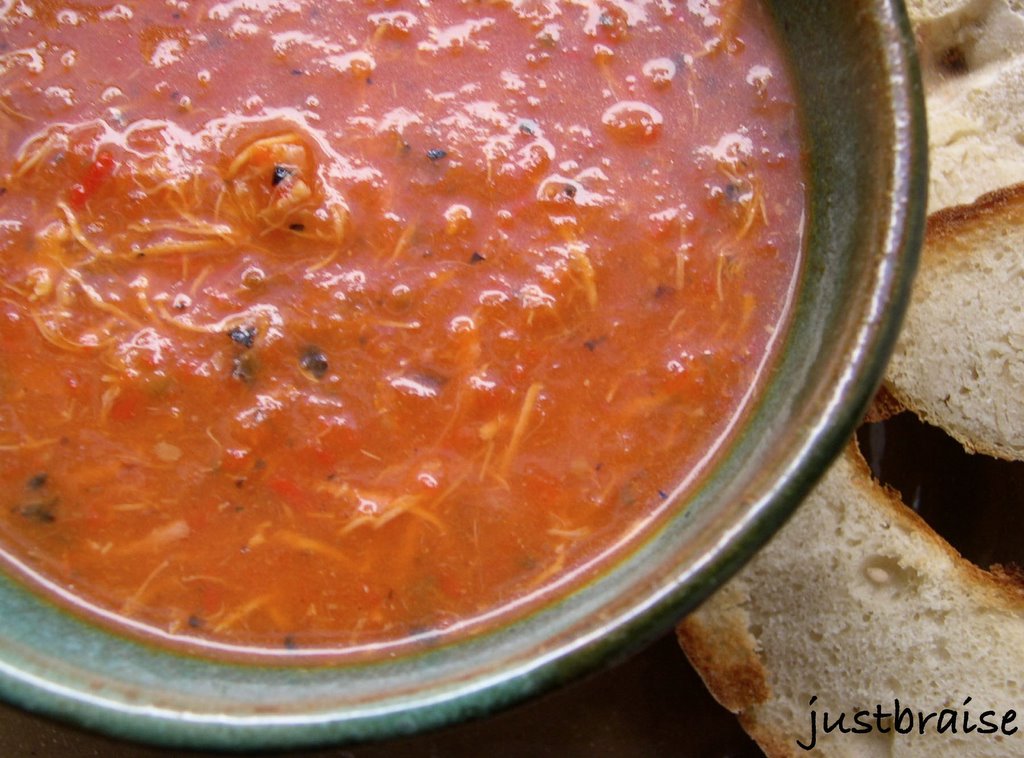
Roasted Red Pepper & Tomato Soup (ARF/5 #8)


When I visit friends and family in Chicago I am taken to an inviting Indian restaurant. Upon arrival, diners are promptly brought a sweet, buttery, roasted red pepper dipping sauce accompanied by a basket of steaming nan. I can sit there all night undecided on what to order, finish off a bowl of dipping sauce, and leave happy and fulfilled.

This soup is made with that dip in mind. With the removal of some butter and the addition of some hearty chicken stock, it provides the perfect meal. The natural sweetness of the red pepper is brought to its fullest potential in this dish, taking center stage. It is sweet and beautiful: the black burnt skin adds a stunning accent against the deep scarlet of the soup. It is a healthy dish in these cold winter months. In the height of summer, it is enjoyable cold. For those that crave zest, add a little hot sauce, providing a perfect companion. For something more comforting, an addition of cream or milk provides a thicker consistency.

Red peppers are high in vitamin C and antioxidants while remaining low in calories. In this soup, I made my own stock (bought stock may also be used). I left whole chunks of vegetables in the stock along with chicken. I separated the chicken from the vegetables, adding the vegetables to the roasted red peppers and tomatoes, puréed with everything else. Chicken was returned post-purée to make this extra hearty. The verdict is that this soup is sweet, savory and aesthetically pleasing in the bowl. Served along with a toasted bagel or crispy bread, this is the perfect meal.

ROASTED RED PEPPER & TOMATO SOUP
Serves about 8. Active Time= 15 minutes. Inactive time= 1 hour.
* 4 red peppers, halved
* 4 roma tomatoes, halved
* 1 head garlic, remove cloves from skin
* 1 medium onion, chopped
* 2 stalks celery, chopped
* 2 carrots, chopped
* 6 cups chicken or vegetable stock
* 1 5-oz can tomato paste
* 2 Tbl fresh parsley
* 2 Tbl butter
* 2 Tbl olive oil

1) In an oven-safe dish, arrange tomatoes and peppers skin up. Use a dish that is large enough to avoid overlapping too much. Add garlic cloves. Drizzle with olive oil and put under the boiler for 20-30 minutes. Remove when skin of vegetables is blackened. Using tongs, place red pepper, tomatoes and garlic in a paper bag (rest inside a bowl to catch liquids). Close and let rest 20 minutes to continue cooking. Retain any liquid left in the baking dish.
2) While red peppers, garlic and tomatoes are in the bag, over medium melt butter in a soup pot. Sauté onion, celery and carrots until onion is soft, 8-10 minutes. Add stock and tomato paste; let warm.
3) Add peppers, tomato, garlic and any remaining liquid to the soup pot. Add parsley and bring to a simmer. Carefully in batches using a blender, or with a hand-held cordless blender, purée the soup.
4) Garnish with fresh parsley. Add chicken, cream or milk if desired.

NOTE: If you desire the addition of chicken, and do not have it in the stock, simply cook some up on a pan and add it after the soup is puréed. To keep this vegetarian but add some heartiness, toss chopped mushrooms in with the onions, celery and carrots.


Head on over to Sweetnicks for more ARF/5-A-Day recipes!

Sunday, February 19, 2006

Citrus Salad


Vitamin C is vital to staying healthy in flu season. This simple powerhouse rears its head in numerous supplements. Today, one is able to uncover vitamin C enhanced dairy and cereal products. New beverages proclaim to be “C Monster” or “Ex-C-lent.” But like most things, it is always more satisfying in the natural state.

With Chinese New Year having just past, oranges are on the mind. Thought to have originated in the orient, it is no surprise that numerous Asian dishes contain oranges in some form. It is also no surprise then that citrus translates as “wealth” and “luck” from the Chinese, which is why it is eaten in the New Year—to bring us wealth and luck. I prefer this tradition to black-eyed peas and cabbage.

At a recent dinner party a New Orleans native claimed Louisiana oranges the best in the world. Having always thought Florida, perhaps Valencia, to be top pick, I did not even know Louisiana grew oranges. I took him up on the challenge. From the kitchen he withdrew a fresh-picked orange from a recent trip home. The result? It was excellent: sweet and juicy as an orange should be. Now if he will just bring a bushel back for me…

I recently read a short comparison on blood oranges. In sight and taste tests, the California blood won over the Valencia. So with blood oranges on my mind, I sojourned to the grocery store for the pickings. I returned with two blood oranges and broke into one on my walk home. Once that outer skin was cracked and peel discarded, memory assaulted me: I was sitting in my junior high school cafeteria eating blood orange wedges from my packed lunch. Kids made fun of me and my bloody fruit, saying it was disgusting. I simply ate my crimson fruit, happy that I did not have to share, happy with my gourmet mom, happy with all things good and sweet.

In an effort to curb a recent bout of gluttony, I am making more salads in the upcoming weeks. When I was single, salads were a staple. Not so much because they are healthy, but fast and easy. The most effort put into this one is peeling the fruit. (One could also just slice off the peel to save time.) It can even pass as a dessert. This salad is simple, delicious, refreshing, and a little bit different. A culinary amateur can easily prepare this with rave reviews. And do not pass up the salt-- it is a fabulous companion to the citrus.

CITRUS SALAD
Serves 2. Prep Time= 8 minutes.
* 1 grapefruit (white or pink)
* 1 orange
* 1 blood orange
* juice of 1 lime
* 4 slices fresh prociutto
* 8-10 fresh mint leaves, chopped
* sprinkle of coarse pink sea salt (Lot’s Wyfe pink Hawaiian sea salt is recommended)

1) Peel citrus, and slice into ¼-inch discs; arrange on 2 plates. Over each plate, drizzle the lime juice and sprinkle with mint. Lay 2 slices of prociutto on each plate. Sprinkle generously with sea salt and enjoy.


View Stats
Rankingblogs.com: Defining your blogs worth..