Friday, March 31, 2006

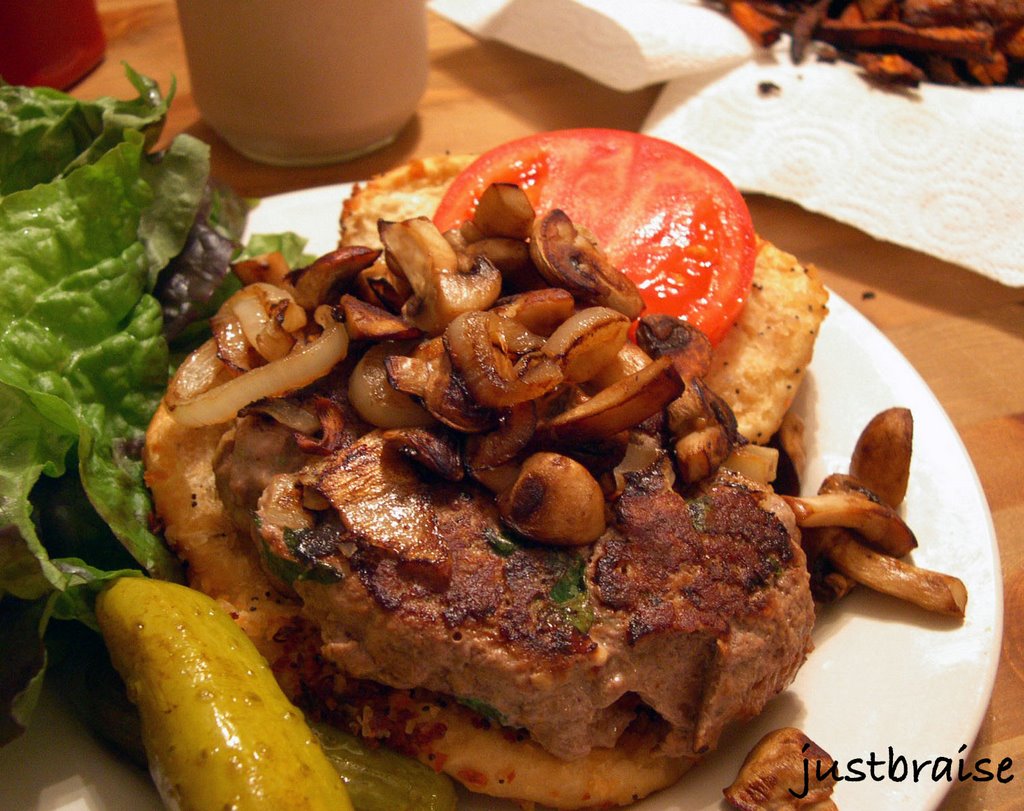
Burger w/ Sweet Potato Fries & Milkshake


Last night I took a little walk as I left one friend to meet up with D and his buddy uptown. I often find myself speedily walking the length of Manhattan island as it begins to warm, much more pleasant than the claustrophobic subway, watching as the people and their actions change with the neighborhood. On a weeknight, the walk is the best: the crowds have diminished, a few hardy souls stumble from bars attempting to make a last effort phone call, and tourists walk aimlessly, unaware of where they should be. In the spring, as night falls cool, a brisk walk is perfect to keep the blood flowing while appreciating time that can finally be spent comfortably outdoors.

My little walk turned into a 40 block trek and for one slight moment, a total of half a block, I smelled spring. It has officially arrived in New York City. It was a brief moment, just past a pile of garbage bags that the air lightened and suddenly Dogwood mingled with early purple violets. Blossoms are out; spring has arrived.

With the weather warming, D and I begin to think about our city escapes: camping. Just when the weather turns perfect, D plans our camping destination while I plan the (cheese) farms to hit up for produce along the way. Interspersed with our camping shenanigans are the precious city BBQs. Few and far between since outdoor space is a rarity, when they do come, they are perfect: on a rooftop, in a side alleyway, in a 5 foot plot of grass next to the front stoop, on the fire escape, and if you are lucky, on the coveted balcony.

So it is with these spring thoughts that D and I whip up our own little (indoor) BBQ. It is possibly the classic New York City diner meal (next to the corned beef sandwich): a burger with french fries and a black and white milkshake. The (best) black and white milkshakes, like the black and white cookie, are only found in the tri-state area [cough] -- New York City. On a trip home to Chicago one year I entered a diner and ordered one. I received a confused look and returned it with a smitten: “vanilla ice cream with chocolate sauce!?” Geesh, how can you not know?! But attempted (and tasted) in diners west and north, the best are found in the City. The black and white milkshake has the delicate pleasures of vanilla ice cream with that extra sweet richness of chocolate sauce. Like the classic hot fudge sundae or chocolate milk, you can make it as subtle or rich as desired. An even better play on this drink? The beershake-- really, it’s tasty. Or, the whiskyshake, which my New Orleans friend calls “milk punch.” The rest of the meal has received ink:

The Burger (made with caramelized onions and mushrooms; no cheese)
The Sweet Potato French Fries (made with salt, no cumin)

And without further ado…

BLACK & WHITE MILKSHAKE
Makes: 2 servings. Active Time= 5 minutes.
* 1-½ cups vanilla ice cream
* 1 Tbl chocolate sauce
* 2-½ cups milk

1) Blend all ingredients and serve immediately


THE BEERSHAKE
Makes: 2 servings. Active Time= 5 minutes.
* 1-½ cups chocolate ice cream
* 1 cup milk
* 1 pint good porter beer

1) Blend the ice cream with the milk.
2) Add beer, stir with spoon. (Do not attempt to blend the beer as it will produce a foamshake.


THE WHISKYSHAKE
Makes: 2 servings. Active Time= 5 minutes.
* 1-½ cups vanilla ice cream
* 1 Tbl chocolate sauce
* 2-½ cups milk
* 4 oz preferred whisky

1) Blend all ingredients and serve immediately

Monday, March 27, 2006

Orange-Pinenut Buckwheat Pancakes (ARF #13)


Breakfast for dinner? Come on, I’ve done dinner for breakfast so I'm practically expected to mix it up a little. Where in the book of life does it state we must keep our themes straight? As long as we get in our fruits and veggies for the day, what’s the harm? Plus, when the weather finally makes a turn for the better we crave a lighter fare. What is more suitable than to serve up a sweet and delicious breakfast for dinner?

The dear Sweetnick’s asked me to piggyback on an orange theme for this week’s ARF roundup. Being that Sweetnick’s was the first food blogger I befriended, the fact that I’ve been participating in the ARF roundup since its inception and the two of us are almost neighbors, I was more than happy to oblige.

I dared myself with a pancake. D and I have our pancake du jour pretty much settled and it was with a little trepidation that I picked up this recipe. But I will say, it was a success. Because really, what is better than the addition of fruits and nuts to a meal? [Thinking time…. ] Okay, maybe chocolate, caviar, wine…all three? But let us not be so decadent! Fruit is right up there with the natural nectars of the gods. So now, if any of you are those naughty breakfast-skippers you can have your breakfast, dinner and your dessert too-- all in one meal!

While the usual fruit addition to pancakes is usually banana or blueberry, the use of orange was quite an elegant one when presented. The result was that while our tried and true pancake will always win out, these were a nice break in the routine.

NOTES: As I am used to pancakes with a little more substance, I think this batter alone is a little bland. The orange zest really perked it up-- I even doubled the zest-- and believe this is a necessary addition. The nuts gave a much fuller flavor to the batter and were great crunchy surprises throughout, I would not go without these. I had no almonds and substituted pinenuts (walnuts would also be tasty). The result was a milky nutty flavor throughout. I found the nuts a little overwhelming and would lessen the amount; not only in the batter, but the syrup as well [especially if you are looking to cut the fat content]. Overall, the pancakes were nice and fluffy, as a pancake should be and a good change to my usual cornmeal-molasses pancakes.

This is the recipe as it appears on the Honeywell website. Note that the provided times for these pancakes were off for me. These took me about 50 minutes total active time (including prep work). You can find other orangey recipes there as well.

ORANGE-ALMOND BUCKWHEAT PANCAKES
Makes: 6 servings, 2 (4-inch) pancakes each. Prep time: 20 minutes
Cook time: 50 minutes.

PANCAKES:
* 1 cups sliced almonds*
* 1 whole orange
* 1 egg
* 2/3 cup 100% orange juice
* 1 cup 2% reduced fat milk
* 2 tablespoons grapeseed oil or canola oil
* ¾ cup buckwheat flour
* 1 cup all purpose flour
* 1 tablespoon baking powder
* ¼ teaspoon salt
* Non-stick cooking spray

1) Preheat oven to 375°F. Spread almonds over a cookie sheet and bake 5 to 7 minutes until nicely browned. Remove and cool at room temperature. Use grater to grate zest of the orange, while careful not to grate into the white pith. Peel remainder of skin and slice between membranes to separate each orange segment. Set aside for garnish.
2) Combine egg, orange juice, milk and oil in medium bowl and mix well. In large bowl, combine both flours, baking powder and salt with reserved orange zest.
3) Add liquid into the dry ingredients and mix thoroughly while being sure to leave some lumps. Set aside ¼ cup almonds for syrup, then gently mix remaining ¾ cup almonds into batter until ingredients are combined, but still lumpy. Do not over-beat or stir until smooth as this will make pancakes tough.
4) Ladle batter onto hot, non-stick skillet coated with cooking spray and cook until some bubbles begin to appear on top, about 3 minutes. Flip cake over and cook 2 minutes. Serve immediately with orange-almond syrup, and garnish with orange segments.

*Note: While almonds provide a healthy fat, this ingredient may be removed to reduce the recipe's fat content by 18 grams.


ORANGE-ALMOND SYRUP:
* 1 cup 100% orange juice
* 1 cinnamon stick
* ½ cup light maple syrup
* ¼ cup reserved roasted almonds

1) Simmer orange juice and cinnamon stick in small saucepot over medium heat until reduced to 1/2 cup, about 15 minutes.
2) Add maple syrup. Remove cinnamon stick, stir in reserved roasted almonds and serve warm.

Saturday, March 25, 2006

Sunchoke (Jerusalem Artichoke) Soup + WCB #42


For some reason, Sunchokes, otherwise known as Jerusalem Artichokes, were all the rage this season. They popped up on menus throughout the New York City area, from soups to sides to salads. I cannot remember how I came to know of them. Once I did, it was an impossibility to find them. I searched everywhere: green markets, my local produce stands, Whole Foods and other organic stores. It seemed that every restaurant had nabbed them up before I could touch them.

I went weekly into certain groceries, asking for sunchokes, more often than not, I was pointed to artichokes. “No! They look like potatoes crossed with gingerroot,” I would lament. But everyone just shrugged. Once I received: “we’ll be getting those in next week.” The next week, I was again pointed to artichokes.

With the sunchoke season quickly coming to a close (the best time to get fresh sunchokes is October through March) I came to accept that I would go through another season without my own bounty. Having stopped my search, low and behold, I finally found them! Doesn’t it always seem true that your desire is fulfilled when you stop searching for it?

I packed them up and brought them home, ready to make a soup as creamy and delicious as a potato soup. So why not use potatoes already? Well, simply put, sunchokes contain more health benefits than potatoes; diabetics often substitute sunchokes for potatoes.

Sunchokes are the root of a plant that resembles a sunflower and the name is derived from the Italian word sunflower: girasole. Sunchokes have a nutty and slightly sweet flavor, allowing them to pair nicely with almost everything from bacon to nutmeg.

Sunchokes store carbohydrates in a form of inulin, a starch that our bodies do not use. Because of this, they are filling, but are not absorbed by our bodies, and show indications of assisting in blood sugar control. Sunchoke flour is also available in some specialty stores, making a good substitute for people allergic to wheat. They are high in iron and potassium and low in fats. Sunchokes also contain a healthy bacteria, lactobacilli , which provide balance in the intestinal track and aid in digestion.

Don’t shy away next time you see this tasty tuber. It is delicious and good for you. If you make it in this soup recipe below, as D will tell you, it is the best soup yet, sweet, creamy and extremely filling on its own-- just don’t tell D you made it unless you want a dinner guest!

SUNCHOKE SOUP
Serving Size= about 12. Active Time= 25 minutes. Inactive Time= 45 minutes.
* 3 ham hocks, have your butcher cut them up
* 8-10 slabs of bacon
* 1-½ lbs sunchokes, scrubbed and cut into 1-inch chunks (no need to peel)
* 1 medium white onion, chopped
* 2 carrots, chopped
* 2 stalks celery + leaves, chopped + extra leaves if you have them
* 10 cups water or leftover vegetable juices
* 2 cups buttermilk

1) Turn the oven to 400F. Place the ham hocks on a roasting pan and place them in the oven while you prepare the soup. In a soup pot on medium-high heat, brown the bacon, about 8 minutes. Once complete, carefully using a paper towel, absorb about half of the bacon fat, leave the rest for the soup.
2) Add onions, carrots and celery. Sauté 8 minutes with the bacon and bacon fat.
3) Remove ham hocks and add them to the pot (turn the oven off). Add sunchokes and water (or vegetable juices). Bring to a boil then cover and reduce heat to medium-low. Cook until sunchokes are soft when pierced with a fork; 30-45 minutes.
4) Remove ham hocks and bacon, set aside to cool. While ham is cooling, carefully in batches, or with a handheld blender, purée the contents of the pot. Add buttermilk; stir.
5) Pick through the ham hocks and remove any meat, throw it back into the soup. Chop the bacon into bite size pieces, return to pot.
6) Garnish with parsley or 1 Tbl buttermilk.


In the non-food world of WCB, Eat Stuff is with us again. Last week Whiskey terrorized the nation. Today, we find sister Kitty BoJangles, avoiding the chaos in her favorite sunny window… caught red-handed eating my Aloe plant!

Wednesday, March 22, 2006

Steak au Poivre w/ Wasabi-Parsley Sauce


Add a little green to your palate. Does a better way exist to usher in spring? Okay, so I gaze longingly as I pass florists wishing on the first buds from the trees. I envy the recent talk regarding the planting of summer gardens. I occasionally under dress in the recent frosty spell, in hopes the weather forecast is wrong and spring is really here (not just on the calendar). Thoughts of lighter foods are on my mind, picnics, beaches, camping and farm visits (I love heading out of the city to seek out local grown produce). But why not a little steak before we finally say goodbye to winter?

On a recent Costco run, D and I nabbed a few steaks, hence the recent postings on steak. Costco is a tricky business. While I like to buy organic and from green markets as often as possible, I am still quite poor (the glories of fulfilling your dreams and living check to check) and cannot always afford quality organic pickings. And while I do not think everything is a bargain at Costco-- I can often beat the prices of fresh produce at my local markets-- I do think for a few essentials, if you have the room and do your comparative shopping magic, it can be worth a trip. Plus, I have found they have a fairly decent meat/ seafood department.

These steaks have been patient with us; quietly awaiting consumption in the freezer. As the fresh produce comes to an end and bellies are a’grumblin’ steak was the chosen one today. In honor of spring, the theme was green. Okay, I had some wilting parsley itching to be used.

Parsley is the underrated herb. Sadly, it often makes its appearance as a mere garnish, rarely taking center stage: A sprinkle here jazzes up soup; a bouquet there adds some color. Its crisp, salty wetness is rarely highlighted as main flavoring.

For me, parsley took center stage on my family’s Seder plate. Once a year it was my highlight of the service: dipping the leafy herb into salt water. Greedily (or perhaps to really remember the salty tears?) I often dipped two or three bunches, relishing the refreshment. I came to love parsley out of humoring myself. Later, there was a time when I always ate the garnish on my plate first—I defended this action declaring I was cleansing my palate. Sometimes it was a flower I would nibble gingerly at, more often than not, it was a large sprig of parsley.

Today this delicate herb will take a much deserved bow. Boldly it will rest atop my steak and declare itself victorious in the tango of taste. This is a sauce that is easy to prepare. It is light, refreshing and the perfect accompaniment to this steak, as I am sure it would be to other meat, poultry or fish dishes. I often think of sauces as thick, creamy and full of fat. And while I love dipping my food into them, I often avoid them. This is one that need not fall in with this bad rap. For a little kick I added some wasabi horseradish. Plain wasabi or horseradish would do the trick as well.

STEAK AU POIVRE w/ WASABI-PARSLEY SAUCE
Serving Size= 2. Active Time= 10 minutes.
* 2 steaks, preferred cut
* 1 cup parsley, tightly packed
* 2 Tbl Silver Springs wasabi horseradish; 2 tsp plain wasabi or 1-2 Tbl plain horseradish would also add a kick
* 1 Tbl olive oil
* salt/ pepper

1) Preheat a pan on medium-high heat. Wash the steaks; pat dry. Add salt and ample fresh ground pepper to both sides. When pan is hot, add steak.
2) While steaks are cooking, prepare the Wasabi-Parsley Sauce. Using a blender, add parsley, wasabi horseradish, olive oil and salt/ pepper to taste. Blend until smooth and set aside.
3) Finish cooking the steaks. I give mine about 5 minutes on either side, depending on thickness, for a nice medium-rare. Once ready, spoon on sauce and enjoy.

Saturday, March 18, 2006

Braised Swiss Chard Wrapped in Filet of Sole (WCB #41)


As a child I was surprisingly tolerant of vegetables. This is probably what eventually drew me to become a vegetarian for a good six years: Carrots, spinach, radishes, mushrooms, and asparagus, it all tasted so good and earthy. My mother would often have me create the salads, calling me “rabbit” and promptly banishing me from the kitchen because I would start devouring the crisp vegetation before dinner was ready. This vegetable love eventually led me to my own tomato garden (which the deer and squirrels in our backyard ate) and drew me weekly to the farmer’s market and any grocery excursion.

Today I am still fascinated by farmer’s markets and grocery stores. If I have nothing better to do I will wonder over just to walk through, hypnotized by the produce, laid out in beautiful pyramids, or tucked into bins. I only wish I could take it all home. I often will purchase a fruit or vegetable just because it looks beautiful, strange, unloved, or overly loved. Often I have never tasted the item before. I bring it home, behold the power of the internet, and research different ways to eat whatever it is I acquired.

This quasi sense of adventure when it comes to buying produce led me to Swiss chard the other day. The bright red stalks initially drew me in. The veins and deep emerald bushel of leaves won me over. D has this same sense, though he does not like to admit it. It is not for produce, it is for the meats and fish. While I spend my time fondling over the fruits and vegetables, D heads over to the meat and seafood sections spying out whatever looks fresh. Surprisingly, more often than not, our tastes meet midway and we are able to concoct a meal that blends quite nicely.

This was one of those days. While I joined up with D he was having 6 filet of soles wrapped up. We returned home, me with the intent to braise my chard, even with D complaining he has never had it and would not enjoy it, and D still undecided on how to prepare his filets. After some research, on which sites I do not know, D announced we would wrap the chard up in the filet. He had found similar recipes for spinach, and I ensured him it would be easy enough to treat the chard with the same respects.

I braised away, D complained of hunger. Soon enough he was wrapping the chard in blankets of sole, pinning, baking, and we were both enjoying a very succulent meal. The flavors in this dish completed each other perfectly. Chard, with its slightly bitter taste, paired with the milk and bacon of the braise perfectly; a stunning platform for the sole. D announced he felt like we were eating in a 4-star restaurant. With all objectives met, we rubbed our bellies satisfied.

BRAISED SWISS CHARD WRAPPED IN FILET OF SOLE
Serving Size= 2. Active Time= 20 minutes. Inactive time= 30 minutes
* 1 bunch swiss chard (about 6 stalks); slice stems bite-size; tear leaf into more manageable sections
* 2 strips bacon, slice bite-size
* 2 scallions, whites and greens, chopped (one small onion would work too)
* 1 garlic clove, crushed
* 1-½ cups chicken broth
* ½ cup milk or cream
* 4-6 filets of sole (sole is quite thin; depending on hunger prepare more or less)
* juice of 1 lemon
* 2 tsp paprika
* 2 tsp mustard powder
* 2 tsp parsley
* salt/ pepper

1) Preheat the oven to 350F. In a skillet with a cover, over medium heat cook the bacon, scallions, garlic and chopped swiss chard stems until bacon browns, about 8 minutes.
2) Add swiss chard leaves, broth and milk. Cover, turn heat to medium-low; let simmer about 10 minutes, until leaves are limp.
3) While the chard braises, prepare the filets. On a large skillet or baking pan lay out the sole. Pour ½ the lemon juice over the filets, add salt, pepper and 1 tsp of paprika, mustard powder and parsley.
4) Once chard is complete, using tongs or a fork, place a thin layer of chard on top of the sole filets. Wrap tightly, being careful not to tear the fish; pin closed with one or two toothpicks. Arrange rolled up fish in a tight pack on baking dish. Top with remaining lemon juice, paprika, mustard powder, parsley, salt and pepper. Pour any remaining chard or sauce into the pan. Place in middle rack of oven for 20 minutes.


** Please check out my article regarding Umami over on Blog Critics. Soon enough the same piece will be posted to Paper Palate in the WellFed Network (and might make an appearance here as well).

In the non-food world of WCB, Eat Stuff serves up another winner. Below we have the spotlight on the young terror Whiskey. Yes, he may look cute and innocent now, but try moving your toes or rolling over when you are trying to sleep.

Here, we have Whiskey moments before on top of a rug, resting verticle, in the corner (about 6 feet high, you can see the doorframe of a closet). The young Whiskey whisked his way to the top, declared himself king of the world, and then awaited his sister to walk by below and attacked.


Head on over to Lindy Toast for the Something For Nothing wrap up!

Thursday, March 16, 2006

Irish Soda Bread


I am not Irish. I never claim to be Irish or wear a “Kiss me I’m Irish” pin on Saint Patrick’s Day. My mother occasionally dyed things green: toast, eggs, mashed potatoes, and Chicago, where I grew up, still dyes the River green for the occasion. Once, in junior high school, for a bake sale on St. Patrick’s Day, I made Rice Krispie Treats. I had perfected the recipe, adding extra marshmallows, creating extremely gooey, delightful snacks and as a special Saint Patrick’s Day festive spike, I dyed the marshmallows green. My fellow students selling them during the lunch period tried one, loved them, and proceeded to tell everyone they had molded, hording them for themselves-- unpaid, I might add.

I do have many Irish friends: Lisa thrives on Saint Patrick’s Day. She celebrates it with more gusto than her own birthday, getting well scuttered, snogging anything that moves. Some attempt to dismiss their Irish-ness, even on their day of celebration. The others I know actually live in Ireland. They are Irish through and through and the three months I lived with them in Scotland they never let me (or any of the Scots) forget it. And I didn’t—in the end I was speaking with more Irish slang than even I could understand.

I do love Irish food. Bangers and rashers are a perfect start to yer mornin’—easy enough even when good and knackered and you can hardly be bothered to lift a finger. I love spuds and cabbage and an Irish cheddar melted over toast is delicious. Guinness is godly, especially if the barkeep has enough dexterity to “paint” a shamrock in the foam. More than anything, I love tea accompanied by a tasty teacake. And soda bread, a Saint Patrick’s Day "tradition", cannot be beat.

One interesting item to note is that the tradition of Soda Bread is not that old. Baking soda made its way to Ireland in the early 1800’s (it wasn’t produced in the United States until the mid-1800’s). Baking soda was found to be a great leavening agent when used in baking and quickly replaced yeast. Traditional Irish Soda Bread is a dry, unsweetened bread made with only four ingredients. Today, many prefer a sweetened Soda “Cake,” adding raisins or even chocolate chips, making it disappear even faster. Any way you cut it, a good Irish treat should be had on this Saint Patrick’s Day.

These recipes come from The Boston Globe’s Andrea Pyenson. I desired a sweeter cake version of the soda bread and made Mary Burke’s recipe. It is full of raisins and includes a little more sugar than Helen Mahoney’s recipe. (I also bulked up the raisins, adding 1-½ cups, soaked in orange juice overnight.) The two recipes are below to satiate two tastes. Chose one, have it with some tea (or a pint) and slainte!

MARY BURKE’S IRISH SODA BREAD
Serving Size= 2 loaves. Active Time= 10 minutes. Inactive time= 40 minutes.
This fine-crumbed bread has a beautifully crunchy crust and just a hint of sweetness.
* 8 Tbl (1 stick) unsalted butter, at room temperature
* 4 cups flour
* 1 cup sugar, plus 1 Tbl for sprinkling
* 4 tsp baking powder
* ¾ tsp baking soda
* pinch of salt
* 1 egg
* 1-½ cups buttermilk
* 1 cup raisins

1) Set the oven at 350 degrees. Butter and flour two 9-by-5-inch loaf pans.
2) In a large bowl, cream the butter with a pastry blender or fork. Add the flour, 1 cup of sugar, baking powder, baking soda, and salt. Mix well with the blender or fork.
3) In another bowl, stir together the egg and buttermilk.
4) Make a well in the flour-butter mixture. Pour in the egg mixture. Mix gently but thoroughly. Stir in raisins.
5) Transfer the dough to the pans, dividing it evenly. Sprinkle the tops with the remaining 1 tablespoon of sugar.
6) Bake for 40 minutes or until the tops are golden and a skewer inserted into the center of the loaves comes out clean.
7) Cool the loaves in the pans on a wire rack for 10 minutes. Turn out of the pans and leave to cool completely.


HELEN MAHONEY’S IRISH SODA BREAD
Serving Size= 1 10-inch loaf. Active Time= 15 minutes. Inactive time= 1 hour
This loaf is slightly drier than Mary Burke's, and not quite as sweet.
* 2 Tbl vinegar
* 2 cups milk
* 4 cups flour
* ½ cup sugar, plus 1 Tbl for sprinkling
* 2 tsp baking powder
* ½ tsp salt
* 2 Tbl unsalted butter, at room temperature
* 1 cup raisins
* 2 tsp caraway seeds (optional)
* 2 Tbl butter, melted

1) Set the oven at 375 degrees. Butter a 10-inch round cake or springform pan.
2) In a small bowl, stir the vinegar into the milk and set aside.
3) In a large bowl, combine the flour, 1/2 cup of sugar, baking powder, baking soda, and salt. Using a pastry blender, cut in the softened butter. Stir in the raisins and caraway seeds, if using.
4) Stir in the milk with a fork just until combined.
5) Transfer the dough to the pan. Using a sharp knife, cut a cross in the middle of the bread. Brush melted butter over the top and sprinkle with the remaining 1 tablespoon sugar.
6) Bake the bread for 10 minutes. Lower the oven temperature to 350 and continue baking for 45 to 50 minutes, or until the top is golden and a skewer inserted in the center of the bread comes out clean.
7) Cool the bread in the pan on a wire rack for 10 minutes. Turn the bread out of the pan and leave to cool completely.

Monday, March 13, 2006

Berry Oatmeal (ARF/5 #11)


Today real Scottish Oatmeal has taken a backseat to the quick and easy approach of instant oats. It is all too common to hear that there is no time, even for a simple breakfast; cereal, granola bars or nothing at all have taken the place of a hearty, healthy meal. In the wanning days of cold, Scottish Oatmeal is a comforting treat.

My first taste of oatmeal was when I was a child. Like most kids, I had to add plenty of brown sugar to make it a palatable dish. This made it delicious and I happily devoured every bite. My mother bought plain oats and everyone spruced them up as he pleased.

Now I appreciate real oats. The aroma, texture and earthy, grainy flavor is comforting, especially on cold mornings, or when ill. I prefer to add little sugar, allowing true flavor to really shine through. My weakness is fruit though; I cannot go without its addition. When the oats are nearly done, I remove them from the stove, sprinkle with sugar and fruit, and place them in the broiler. The result is a dish with exceptional natural sweet flavors that is a compliment, not a competition, to the oats.

To truly experience oatmeal means using old fashion oats that must be prepared on the stovetop. It is simple, fast and the flavor and texture are far superior to quick oats. Further, quick oats often add flavorings and sugars, something you want to avoid, especially if you are eating oats as a health benefit!

If bananas are used, when placed under the broiler, they caramelize and form a crust with the brown sugar on top of the dish. It is a true joy to crack through. Berries, especially blueberries, melt down and the juices cover the oats. The result is an earthy, delicious dish with a fabulous fruit syrup. Any way you cut it: adding small amounts of sugar, fresh fruit, or nothing at all, fresh oatmeal is a fabulous fast treat.

SCOTTISH OATS w/ BLUEBERRIES
Serving Size= 2 persons. Active Time= 12 minutes.
* 3 cups water
* 1-½ cups Scottish Oats
* 15-20 blueberries
* 1 Tbl brown sugar

1) Bring the water to boil over medium heat. Add the oats, mix to break down then cover tightly; let cook 9 minutes
2) Turn on broiler. Divide oats into two oven-safe bowls, sprinkle brown sugar on top, add blueberries (or bananas or any other fruit)
3) Place under the broiler for 2-3 minutes until berries wilt and brown sugar carmelizes.


Head on over to Sweetnicks for the ARF/5 roundup!

Golden Beet Salad


I cannot recall when I ate my first beet. I know my grandmother often served them at family meals. It sat cold and wiggley in between the sauerkraut and Jell-o; the beltway of the table I despised. Often times, when the plate got away from my small hands “grandma’s specialties” were loaded on. I sat there shifting the food around, building monuments in the likeness of Jabba the Hut, until all was an indistinguishable mess. It was many years before I willingly placed a beet in my mouth.

The first time must have been in New York City. It might even have been as late as my college years. I want to say that my first beet experience was in a sweet crimson borscht. Delicious and full of vegetables, I am sure I pondered how the soup acquired its rosy hue—that is until beer was in front of me and all was forgotten.

At some point I remember watching (or possibly reading?) a segment about food and how certain vegetables alter a person’s urine. Disgusting, I know, but I have two brothers so this was cool to me. What I take away from that program today: Asparagus= yellow and pungent. Beets= bright pink. To me this was fascinating. I tried consuming bowls of borscht, but that just filled me up. Eventually, I turned to the beet.

I remember again being at my grandmother’s home (post new scientific knowledge). Behold the plate of beets! My grandmother was the only one eating them. Being the dutiful, and only granddaughter, I plunged my fork into the platter and filled my plate with beets. I consumed them faster than I could taste them for fear of ruining my experiment with a bad tasting vegetable. It was halfway through my plate when I paused for breath, tasted, and realized the sweet joy that is the beet.

Today it seems my refrigerator is never without beets. They are the best of additions to any salad, powerful enough to stand on their own, and their leftover juice (the water they are boiled in) makes a superb addition to soup stock. I often cook up more than D or I can consume in one night then hide them in sandwiches, replacing the too common tomato (highly recommended!).

So it was with great joy that I spied the golden beet my supermarket. I bought a bunch, boiled them up and served them simply as pictured: with fresh peppercorn goat cheese, sage and a sprinkle of balsamic vinegar. This salad is pleasant and refreshing. The golden beet is a beautiful vegetable on its own, or paired with the more common red beet. It has a sweeter and more subtle flavor, making it an ideal “starter” beet. It is also a beautiful royal shade, reminiscent of the upcoming spring we all long for.

Oh, and my experiment worked. I called my grandmother into the bathroom to witness my feat. She was not impressed and thought I might be ill.

GOLDEN BEET SALAD
Serving Size= 2 persons. Active Time= 10 minutes. Inactive time= 45 minutes.
* 4 small golden beets
* 6 fresh sage leaves, pineapple sage is ideal if available
* 4 Tbl plain, herbed or peppercorn goat cheese

1) In a small pot over medium-high heat, bring water to a boil. Wash beets well and trim stalks, leaving about 1 inch in tact. Add beets to water, cover; reduce heat to medium. Cook beets about 45 minutes, until a fork can easily pierce the beets.
2) Remove beets from heat and run cold water over them until they can be handled. Push skin off (once cooked, beet skin easily falls off with a little nudge). Trim off stalk and slice as desired. Arrange on plate.
3) Sprinkle goat cheese over beets, or place on side. Shred sage and sprinkle over. Add a dash of balsamic to taste.

Saturday, March 11, 2006

Braised Pheasant w/ Sauerkraut


A few years ago, I had an ideal roommate: she was an amazing baker while I was the meat and potatoes of the operation. Together we created some tantalizing meals that impressed all around us. We were an unstoppable duo, especially in the kitchen. She moved out, we move on, and now she lives half a continent away. On a recent visit, she imparted onto me the most precious gift of all: The Art of Eating by M.F.K. Fisher.

It is a hefty volume, almost 800 pages; a collection of Fisher’s best writings on food. But its cover was the most seductive image I had laid eyes on that I eventually cracked it, finishing it in one week’s time. Today I will not indulge the reader in a full review; that is for another time. I will say it is one of those books once picked up is impossible to put down. The writing is so voluptuous is calls to be read aloud to an audience.

With each sitting I grew hungry, not only for more of Fisher’s writing, but physically. Throughout the book, recipes wrapped in Fisher’s memories are found. Before I passed this book on to another friend, I copied a few of those recipes down to satiate my appetite another day. Many seem almost archaic today (in the United States at least)—roasted pigeon-- these are recipes that must be indulged at some point in one’s lifetime.

Today I unfurl one of those copied recipes with more to come. This one if found in the section “How to Cook A Wolf.” First published in 1937, this section is a guide for the housewife on how to scrimp and save in the bowels of wartime, as well as after. How does one continue to live a life of luxury when there is none to be found?

I must suppose pheasants were easier to come by in those days. A young boy could go on a hunt with his father and return with a sack of pheasant to feed the family for a week, nary a penny spent. Today, pheasant is a luxury (at least in New York City). I was determined to create this dish (and if I could not find pheasant, Cornish Hen or something of that sort would have to do). Low and behold today at the Green Market I found Game Dealers: Wild turkeys, chickens, geese, and of course, my dear pheasant! A little on the expensive side ($20 for a good sized bird!) but it was destiny to find and had to be bought. Add to that 1pound of fresh bacon (also from the Green Market) this meal is hardly a hungry wolf—it can now pass as a starving millionaire fare.

BRAISED PHEASANT (OR PARTRIDGE) IN SAUERKRAUT
Serving Size= 4 persons. Active Time= 45 minutes. Inactive time= 2½ - 3 hours.
This is the recipe as it appears in The Art of Eating.
* salt and pepper
* 2 small or 1 large bird (or 1 rabbit)
* bacon slices
* 3 tablespoons butter or good oil
* 1½ pounds sauerkraut
* 1 cup peeled and sliced apples
* 1 cup dry white wine (or half and half with water or vegetable stock)
* 1 tablespoon flour


Rub birds with cut lemon, and salt and pepper them. Wrap with the bacon and tie securely with twine. Heat the fat and brown the birds.
Wash the drained sauerkraut (unless it is very mild, [t]hen just drain it). Place a layer of it with the apple slices in the bottom of a casserole and imbed the birds. Cover with the rest of the kraut and apple, add the liquid, and cover closely. Let simmer very slowly for about 2 hours.
Put the birds on a hot plate, and thicken the kraut with the flour. Make nests in it, and replace the birds in them, ready to serve.


On non-food related musings, here is WCB # 40 over at Eat Stuff. Below we have Whiskey and Kitty BoJangles sitting at the first open window of the year...

Friday, March 10, 2006

Coconut Vanilla Bean Flan


Some South Pacific Islanders used to call it Monkey Fruit. Some, like myself, use the fibers mixed in their potting soil, helping plants to retain their precious moisture. Some fancy cosmetic makers use the milk in their products to for anti-aging benefits. Some cultures like to cook with it. Some like the way it smells. It is the amazingly versatile coconut.

Whether it be entrée, snack, dessert or face cream, the coconut makes an amazing addition to most any dish. So first things first, how do you pick this prized item?

When shopping for coconuts, make sure the outer shell is nice and hard. It should not give when pressed. Check the one end with the 3 “eyes.” The eyes should be firm and carry no mold. Some companies cover the eyes with wax to prevent them from puncturing in their journey to your grocery. This is okay. The whole coconut should have some weight to it. You should also be able to hear juice sloshing around when you shake it. If the coconut feels too light, it may have lost it’s juice or be past its prime. Likewise if you cannot hear any sloshing around the shell may have a hairline crack that formed in shipping, you should continue searching until one with a nice dark brown coloring is found. Now, how to crack that shell…

1) With your handy machete, give the coconut a good whack… Oh, no machete?
2) Go outside and throw the coconut onto cement with all your force. Go around and pick up the bits. Note that this method you will lose most any coconut water that may have been inside.
3) Take out your drill bit and drill 2 holes into the coconut shell. Start with using a small hole and gradually get larger. Pour coconut water out into a bowl and enjoy. Now you can whack it with a hammer to get it into bits. (I kid you not because this is how I did it until I found this seemingly easy way to crack the nut, see number 4)
4) See thisvideo for a clean and easy way to crack that nut!

Once the pieces of the coconut fruit are available, use a fork or spoon to nudge the meat off the hard shell. This bulk meat can be pulsed into slivers for use plain, or steeped in boiling water to get coconut milk. One coconut produces about 4 cups of shredded meat.

COCONUT MILK
Serving Size= 2 cups. Active Time= 15 minutes.
* 2 cups shredded coconut meat (see above)
* 2 cups boiling water

1) Place shredded coconut meat in a glass container with a top. Add boiling water, cover and let steep for 10 minutes. Using cheese cloth, strain the liquid through. Wring the accumulated wet meat in the cheese cloth, removing all milk from the meat.
NOTE: This can be repeated once more using the same meat. The first pressing of coconut milk is the thickest and sweetest, most prized in cooking. Once refrigerated, a cream will settled to the top of the milk. This is very tasty when used in cooking. Coconut milk will last about 2 days in the refrigerator. To keep longer, fill an ice tray with the milk and freeze until ready to use.


Now that you know how to make fresh coconut milk, we can make coconut flan. This recipe was adapted from epicurious.com’s Vanilla Bean Flan recipe. It was light, sweet, had fabulous vanilla undertones and subtle coconut flavoring throughout. It was also extremely simple to make, required few ingredients and is quite easy to halve if necessary.

COCONUT VANILLA BEAN FLAN
Serving Size= 4 (in 4 5-6 oz ramekins). Active Time= 30 minutes. Inactive time= 3-½ hours
* 1-¼ + ¼ cups fresh coconut milk + cream
* 1 vanilla bean, split lengthwise
* ¼ cup sugar
* 1 large egg
* 1 large egg yolk

1) Preheat oven to 350°F.
2) Heat 1-¼ cups coconut milk and cream with vanilla bean halves in a small saucepan over moderate heat until hot. Remove from heat, cover; steep 20 minutes.
3) Over medium-low heat, cook sugar in small saucepan, swirling often to help sugar melt evenly, until melted and pale golden. Continue to cook, swirling skillet, until sugar becomes a deep caramel; about 5 minutes total. Pour immediately into ramekins, tilting cups to coat bottom—caramel will begin to cool and harden once removed from heat so act quickly.
4) Whisk together whole egg, yolk, and remaining ¼ cup coconut milk with a pinch of salt until smooth. Discard vanilla bean pod from steeped milk and gradually whisk milk into egg mixture.
5) Divide mixture among ramekins and bake in a water bath, loosely covered with a sheet of foil, in middle of oven until custard is set but still trembles slightly, 35 to 40 minutes.
6) Remove cups from water bath and cool on a rack. Chill, uncovered, at least 2 hours. Unmold flans by running a knife around edges to loosen and inverting onto plates.

Monday, March 06, 2006

Chicken Masala (ARF5/#10)


What happens when a fresh coconut in the middle of the winter is too hard to resist at the grocery store? When you try to impress friends from out of town by using your drill to get at the sweet, rich water inside (other than learn there are easier ways)? What do you do once everyone has had their fill of sweet coconut meat? You spend a week in coconut bliss…

It all started with a Coconut Banana Bread with Lime Glaze. Now, fresh coconut is not needed for this bread, but it tastes amazing sprinkled on top. Once all that coconut meat is shredded, there are about 4 cups to put to use. Coconut Banana Bread used about ½ cup. Today it was Chicken Masala. I must admit this was my first time ever cooking a “legitimate” Indian meal. In the past, I have sprinkled some curry, tumeric and cumin together and called it Indian. Sad, because I absolutely love Indian food. And bad, especially since I have most of the spices in my cabinet!

I found a fairly simple recipe on Mahanandi. This recipe was chosen over others because, well, I had all the ingredients. This recipe also did not take too much time—as long as everything is in front of you at the start. It also helps to have an extra hand in the kitchen (so while one is roasting spices, the other can grind). The final result was excellent and filled the home with an amazing aromatic essence.

First, the benefits of coconut.

At a recent dinner party, I ordered coconut milk. I offered some to a friend who dissed it, “Oh, that stuff is really high in saturated fats. I won’t touch it.” Your loss, it was good. Coconut Oil is one of the best oils a person can consume. For centuries, South East Asian cultures have called the coconut palm the Tree of Life. Coconut oil is antiviral, antibacterial, antimicrobial, and antiprotozoal. Not all saturated fats are alike. While coconut oil is one of the highest in saturated fats it is also one of the highest sources of medium chain triglycerides, many of which are important in building and maintaining the immune system. Some medium chain fatty acids, like coconut oil, help to maintain the metabolism. It is also very good for the skin as a moisturizer.

Coconut Meat is high in fiber, vitamins and minerals (vitamin C, E, calcium, magnesium, potassium and iron). It is also low in cholesterol and sodium. Other forms of coconut include Coconut Water which is the liquid found upon initially cracking the coconut open. And Coconut Milk, made by steeping coconut meat pulp in boiling water and then pressing for the milk. All these forms of coconut share similar health benefits up to a point.

Below is the second installation on coconuts. More to come shortly on this tasty and long lasting fruit! This recipe is taken from Mahanandi’s site. It is followed step by step with the replacement of chicken instead of potatoes. Interesting, because my masala turned out orangey-brown instead of red! It also was not as sauce-based as Mahanandi’s picture! Maybe more water (or plain tomato sauce?) would fix this. Well, it was still delicious! I served this on a bed of basmati rice. Once again, it is recommended to have all ingredients out before starting. And again, a second hand helps-- While D was roasting all ingredients on the stovetop I was busy puréeing the ingredients together in steps and keeping an eye on the rice. In the end, there is enough masala leftover for two lunches tomorrow.

The below recipe is the original Aloo Dum (Potatoes in Masala Sauce). This recipe seems like a lot of ingredients but it is really mostly spices. So give it a try.

ALOO DUM
Serving Size= 4. Active Time= 30-45 minutes.
The preparation is three step. First boil the baby potatoes until they are just tender. Roast and grind the spices, the vegetables and the nuts for masala sauce. Combine and cook them together. The whole preparation takes about 30 to 45 minutes, if you have everything at hand.:) And the main chunk of it is of course to wait for the potatoes to boil.

* 12 tiny baby potatoes

Veggies
* 4 medium sized ripe tomatoes, each cut into four quarters
* 1 medium sized red onion or 4 shallots cut into big chunks
* ¼ cup finely chopped coriander
* 1×1 inch piece of fresh ginger
* 2 big garlic cloves


Nuts
* ½ cup cashews
* ½ cup fresh grated coconut

Dry Masala
* 6 dried red chillies
* 1 teaspoon coriander seeds & cumin
* ½ teaspoon peppercorns
* 3 small cinnamon sticks and cloves
* 1 star anise


Popu/Tadka
* 2 teaspoons of peanut oil
*1 teaspoon of mustard seeds, cumin and some curry leaves
* ½ tsp of turmeric
* Salt to taste

1) Preparation is boil, roast-sauté-grind and cook.
Boil the potatoes until they are just fork-tender. When they are cool enough to handle, peel the skin. Prick them with a fork in multiple sites and keep them aside.
2) Gather the listed ingredients for masala sauce, ready on hand on a big plate. Heat an iron skillet and proceed like this.
3) Roast dry masala ingredients, for few minutes, until they release their smell. Remove them from the skillet and keep aside.
4) Roast cashews, then fresh grated coconut for few minutes. Remove them from the skillet and keep aside.
5) Roast ginger and garlic for few minutes. Remove them from the skillet and keep aside.
6) Finally heat one teaspoon of oil and roast onion and tomatoes for few minutes.
Let them cool down little bit. When they are cool enough to touch, put them in a blender. Add half glass of water and half teaspoon of salt. Grind them into smooth paste.
7) Cook: Heat one teaspoon of peanut oil in a big wide pan or kadai. Toast the popu ingredients (mustard seeds, cumin and curry leaves) until they start to splutter. Add the grinded masala paste and another half glass of water. Stir in turmeric. Taste and add salt if needed. Add baby potatoes. Cover and cook on medium heat for about 15 to 20 minutes. Finally stir in finely chopped cilantro and serve.

My Kitchen Notes: 
Don’t forget to prick the potatoes, so that they can absorb the sauce.
 Onions - avoid yellow onion and go with shallots or red onions. 
If you want, you can also stir in cream/yogurt at the end.


Head on over to Sweetnicks for all your ARF/5 round up!

Sunday, March 05, 2006

Coconut Banana Bread w/ Lime Glaze


I do not make my own bread. I have in the past, but now that I live less than 1 block away from my favorite neighborhood bakery (I assure you my habitat’s location is pure coincidence) I find no need to make my own. In the summer, when I leave my windows open in the bedroom, if I go to sleep late enough (around 2 am), the smell of fresh baking bread comes wafting down the shared alleyway. Every so often, I drag myself from bed, pull on clothes, and go to the bakery at this time. The front door is left open for ventilation and one is allowed to buy tomorrow’s bread, still warm—right off the racks. Why bake bread with a setup like this?

This is why: while my neighborhood bakery has succulent olive breads, ciabatta, sourdoughs, wheat and ryes, there are no sweet breads. No carrot bread or zucchini bread. More importantly, no banana bread! Which I feel should really be a staple in any bakery.

When I was younger, it was almost weekly that my mother would produce one of the above three mentioned sweet breads. While my favorite (surprise to myself) was the zucchini bread, banana to this day, takes a close second.

A few years ago while working in publishing, my mother used to ship (bribes for books) of fresh baked goods for my fellow workers and me. The best shipment we ever acquired was shortly after my mother received Cooking Light, September 2003. I went to the mailroom to retrieve my package—the entire room smelled like banana. A new screening process had recently been implemented for incoming packages and I am sure the mailroom staff had a good laugh when the pungent package of baked products came through. The package was released to me under one condition: it had to be opened right then, and all present were to receive a piece of whatever was inside.

Inside were three of Cooking Light’s seven best banana breads: Marbled Chocolate Banana Bread, Coconut Banana Bread with Lime Glaze and Classic Banana Bread. Needless to say Cooking Light completed all research to ensure that each recipe was pungent with banana and mouthwateringly delicious. They were even able to survive the two-day shipping process, keeping moist.

With three bananas awaiting me in the freezer and a fresh coconut in the refrigerator, re-creating the coconut with lime glaze was a natural choice (even though fresh coconut is not necessary. This bread is moist and delicious with the perfect blend of coconut and banana. It remains fresh days later and the coconut-lime combination is the perfect compliment to the banana. All seven Cooking Light recipes can be found here along with nutrition information for each. The Coconut Banana Bread with Lime Glaze is below.

COCONUT BANANA BREAD w/ LIME GLAZE
Serving Size= 12-16 slices. Active Time= 20 minutes. Inactive Time= 1 hour.
* 2 cups all-purpose flour
* ¾ teaspoon baking soda
* ½ teaspoon salt
* 1 cup granulated sugar
* ¼ cup butter, softened
* 2 large eggs
* 1-½ cups mashed ripe banana (about 3 bananas)
* ¼ cup plain low-fat yogurt
* 3 tablespoons dark rum
* ½ teaspoon vanilla extract
* ½ cup flaked sweetened coconut
* Cooking spray
* 1 tablespoon flaked sweetened coconut
* ½ cup powdered sugar
* 1-½ tablespoons fresh lime or lemon juice

1) Preheat oven to 350°.
2) Lightly spoon the flour into dry measuring cups, and level with a knife. Combine the flour, baking soda, and salt, stirring with a whisk to combine.
3) Place granulated sugar and butter in a large bowl; beat with a mixer at medium speed until well blended (about 1 minute).
4) Add the eggs, 1 at a time, beating well after each addition. Add banana, yogurt, rum, and vanilla; beat until blended. Add flour mixture; beat at low speed just until moist. Stir in ½ cup coconut.
5) Spoon batter into a 9 x 5-inch loaf pan coated with cooking spray; sprinkle with 1 tablespoon coconut. Bake at 350° for 1 hour or until a wooden pick inserted in center comes out clean.
6) Cool 10 minutes in pan on a wire rack; remove from pan. Combine powdered sugar and juice, stirring with a whisk; drizzle over warm bread. Cool bread completely on wire rack.


COOKING NOTES: 1) Although the rum smells excellent in the batter, I do not know if it is necessary in the final product. To really utilize the rum flavor I think mixing it in with the glaze for more of a kick. 2) In the final batter I added about ¾ cup coconut (an extra ¼ cup). The final bread is saturated in delicious coconut bits. 3) I used a 8 x 4-¼ inch bread pan coated in butter instead of cooking spray. The batter just fit the pan and really popped out during baking. 4) My bread baked for 1 hour and 20 minutes.

Saturday, March 04, 2006

Horseradish Encrusted Steak (WCB#39)


There are some mornings when a good hunter’s breakfast is in order. On those mornings the cold freezes the world and the air is crisp, harsh and blue. The days when you go out and everything is in slow motion and appears 2-dimensional. When even the winter birds seem to slug their pace and when you wish you too, like so many other creatures, could take to hibernation. It is when Mother Nature plays tricks with your immunities and confidence: one day you are so sure you can smell spring; the next day an Arctic blast finds comfort in your surrounds and takes an extended vacation. It is these mornings when a hearty breakfast is due.

On some days a solid meal may be Scottish Oats laced with fresh fruits. Some days it is braised oxtail or simple poached eggs. The Joy of Cooking lists a significant 10 course (depending on how you count it) meal that should be had before the hunt—from pheasant to quail eggs, rabbits and three liquors to warm you and send you on the way.

Today’s hunter’s breakfast was a simpler one. Enough to warm the soul on this bitter day, filling enough to stand on its own-- yet not so much that dinner is hopeless. Eggs may be served with it, forming steak and eggs, some citrus to act as cleanser, or a sufficient Bloody Mary.

Note: I was recently sent some samples of Silver Springs horseradish products. I was given plain, freshly ground horseradish, as well as flavored: Cranberry Horseradish, Pineapple-Apricot Horseradish, Wasabi Horseradish, as well as two mustard flavors: Deli and Chiptole. In attempts to dig through these products with a more refined nose (after all, horseradish is all in the nose), I thought a head-to-head taste off comparing the products should be in order. I then thought better and decided to prepare a meal specifically for each product, qualifying the merits of the taste paired with each. For some, I will use two products, others I will use three.

Today’s was a simple steak. Though I am sure the Wasabi or Cranberry would have been delicious on steak, I wanted the meat’s simple flavor to really shine through. For this reason, it was the plain horseradish that was used. I found this recipe off of foodreference.com. I chose this over others because it was quick and simple. It was one of the few that I found that used no mayonnaise or sour cream and a binder. Because of the few ingredients, both the horseradish and the steak were able to take the platform for their own tasty merits.

HORSERADISH ENCRUSTED STEAK
Serves 4. Active Time= 10 minutes.
* 4 2-3” thick New York strip steaks
* 2 cups fine breadcrumbs
* ½ cup melted butter
* ½ cup ground horseradish
* ¼ cup chopped fresh flat leaf parsley

1) Mix together everything but the steaks; season to taste with salt and pepper.
2) Season the steaks with salt and pepper on both sides. Grill to preferred degree of doneness.
3) When steaks are almost ready, remove from grill, press horseradish crust onto one side of each steak.
4) Place under a hot broiler until breadcrumbs start to toast, you will see the butter bubbling and sizzling.


NOTE: If cooking indoors, as I did, make sure your kitchen is properly ventilated. I cooked my steaks on a HOT griddle, 4 minutes on each side producing medium-rare meat. The steaks were in the broiler for maybe 4 minutes; I saw no butter bubble or sizzle, but the breadcrumbs did toast very nicely.

Please check out my piece on Paper Palate. Paper Palate is part of the WellFed Network.

And for the non-food related segment of this post... WCB #39 hosted by Eat Stuff. Last time I brought you Face Off, today I bring you Disgruntled Bedside Lovers:


View Stats
Rankingblogs.com: Defining your blogs worth..