Monday, January 30, 2006

Loose Ends Lentil Soup


Soups are an all too easy favorite of mine: they are inexpensive; require little prep; are hearty and healthy; involve few ingredients to make delicious; are easy to alter with a little cream or blender; and are a fabulous way to clean out the refrigerator/ cabinets before a grocery spree. They are a leftover-lover’s dream: make them in large batches and freeze in single-size servings easily to transport to work for a no-think lunch your co-workers will drool over; perfect with some fresh bread.

Once the basics of making a soup stock are understood, whether it is meat or vegetable, there is no limit to one’s soup making abilities: A little less of that here, more of this there, and voilà, a new creation with little effort.

Growing up, a favorite household food was turkey. A golden-roasted turkey my mother would prepare in the late afternoon and have ready for us kids upon our arrival home from school. Friends would join us and we would pass through the door attempting to guess what mom had made. The favorite of mine was always turkey because it meant a whole week of fresh turkey sandwiches. It meant warm turkey with smooth, buttery mashed potatoes. It eventually meant my all-time favorite: soup.

It is from my mother (and of course my grandmother) that I have come to understand the importance of a flavorful soup base. I rarely order soup at a restaurant because I am always terrified of soup stock low in flavor (not enough bones or vegetables as a base) or too salty (covering up for the tastelessness of low flavor).

The Stock:
Although it may seem overly thrifty at the time, you will be delighted with yourself (and your soup creations) if you keep leftover “broth” from vegetables: Boil some beats or potatoes, steam some artichokes, but whatever you do don’t throw that leftover water down the drain—freeze it! That water, no longer clear, but deep crimson, pale green or white, serves as a flavorful addition to your soups (and is full of vitamins). Instead of water, use this as the liquid addition to your soups and you will no longer need bouillon to flavor your base. If you desire a vegetable stock, sauté some onions, leeks, celery, carrots, potatoes, etc. then add the leftover vegetable juice. (A friend of mine has said she cannot stand onion in her soup, a shame because I think this is one of the best stock basics. If you fall into this dilemma I have found extra celery can add a lot of flavor.)

The Meat & Bones of the Situation:
Much of the flavor received in soup broth is derived from bones, more precisely, the marrow-- not the meat (though the meat is a tasty treat). Whether it is chicken, beef, pork or fish stock you seek, the bones are where it’s at. The essence received from marrow that comes into soup is full of flavor, protein and mono-saturated fats (the good stuff that decreases bad cholesterol levels and is thought to lower the chances of certain cancers). Using bones in your soup also produces a rich, thick broth. (Bonus: The butcher or fish market often sells miscellaneous soup stock for cheap.) The great part about using bones with meat on it is that it makes for easy cleaning: the soup is done when the meat falls right off the bone.

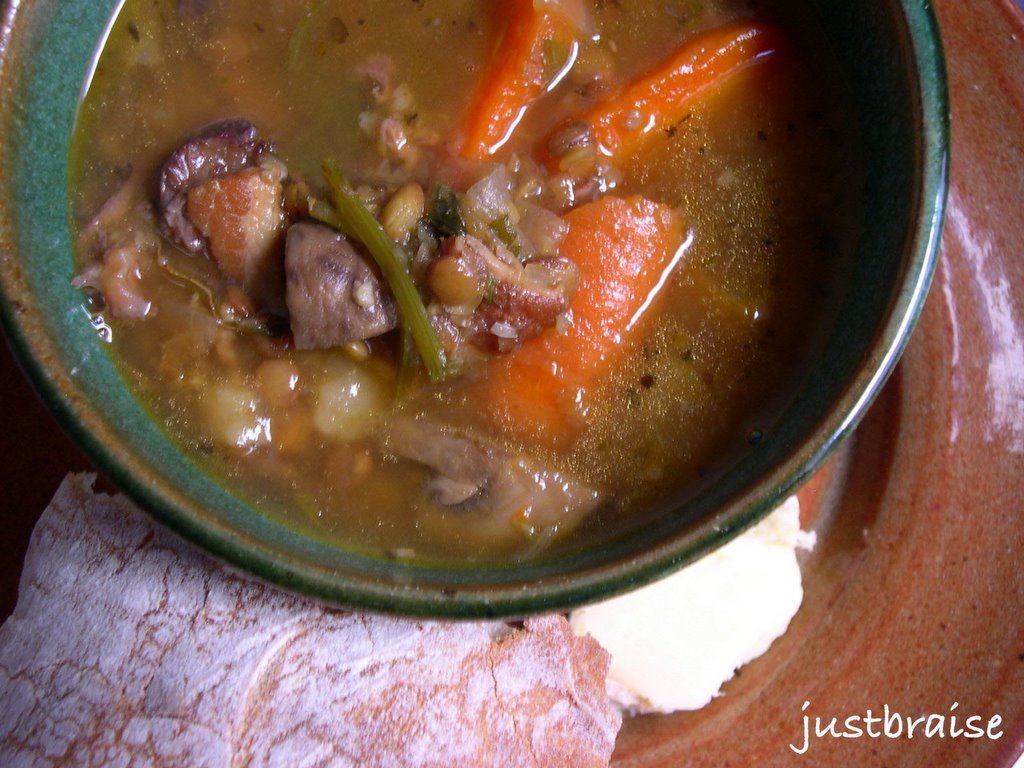
For this lentil soup, I cleared out everything that was left in my refrigerator and freezer: leftover oxtail bones, a few strips of bacon, some crimini mushrooms, ½ an onion, a few celery stalks, some carrots, 1 potato, dried lentils, 6 cups of frozen beet juice, 4 cups frozen artichoke-potato juice. The final result was excellent: Super hearty and loaded with flavor. You do not have to clear out your refrigerator, but do make this soup.

The picture is taken after about 1 hour on the stovetop (dried lentils were used, canned lentils will cut down cook time). Another hour later and this soup became thick and delightful: the lentils broke down into a light paste. This soup makes a fabulous meal with a fresh chunk of bread and a bite of sharp cheddar. The chunks of vegetables are full of flavor and the broth is so rich it is a taste from the fountain of youth. Dip your ladle, savor the goodness….

LOOSE ENDS LENTIL SOUP
Makes 8 servings. Prep time= 20 minutes. Cook time= 30 minutes- 2 hours (depending on canned or dried lentils)
* left over beef bones (or beef stock) (about 2 lbs, but whatever you have left is good)
* 5-8 strips of bacon (optional)
* ½- 1 lb crimini mushrooms, quartered
* 1 yellow onion, chopped
* 4 cloves garlic
* 3 stalks of celery, cut into 1-inch pieces. Retain leaves and add to the soup
* 3 carrots, cut into 1-inch pieces. Retain leaves and add to soup
* 2 russet potatoes, cut into 1-inch chunks
* 8-10 cups leftover vegetable “broth” or water
* 1- 5oz can tomato paste
* 2 cups lentils, washed and bad ones discarded
* 3 bay leaves
* 1 Tbl dried oregano
* 1 Tbl dried tarragon
* 5 Tbl hot sauce (optional for an extra kick)

1) In a large soup pot on medium-high heat, brown the bacon. Using a paper towel, pick up some of the fat (retail about 1 Tbl in the pot). Remove the bacon and set aside. Turn heat to medium. Add mushrooms, onion, garlic, celery (plus leaves), carrots (plus leaves), and potato into the pot with the bacon fat. Saute until onion begins to soften, 8-10 minutes. While the vegetables are cooking, slice the bacon into bite-size pieces. Return to pot.
2) Add bones, tomato paste, and vegetable broth (or water), bring to a boil. Add lentils, oregano, tarragon and hot sauce. Cover and allow to simmer (turn heat down if the soup continues to boil). If using canned lentils, cook time is about 30 minutes. If using dried lentils, cook time will be about 45 minutes- 1 hour. The longer the soup is left cooking the more the lentils will break down—cook this longer if a thicker soup is desired.


An interesting bone bite: Archeologists can determine how wealthy a civilization was (relatively) by looking at the bone byproducts. If bones were used as a source of food (cracking bones open and eating the marrow), it is likely meat was not plentiful or a famine occurred. Civilizations rich with food would discard animal byproducts (or use them as weapons or tools).

PS- Happy Birthday to me!.... and Jennifer.

Saturday, January 28, 2006

The "It's my birthday & I'll bake if I want to!" Chocolate Fudge Coconut Cupcake (& wcb 34)


Actually, it is not yet my birthday- 3 more days. But still, I’ll bake if I want to. In honor of me, and the fact that I had nothing in the fridge but carrots and eggs, I decided to bake a little treat to celebrate all days leading up to my birthday: The most decadent of cupcakes. After all, what is better than filling an empty stomach with sweet chocolate for lunch? Let me think… nothing. (Okay, maybe lobster, or smoked salmon-- caviar or champagne. But hey, I’m a simple girl.)

For me, baking is a real pleasure when there is little food (of sustenance) in the home. Yes, one could make biscuits, perhaps scones, but I prefer the sweeter things in life. As long as I have one egg handy, I rummage through my “baking” cabinet (which contains the sugar, cocoa, flour, etc) to check the quantities at hand, and while my sweet tooth glimmers in the morning sun, I gleefully search for the recipe of my desire.

Every year as my birthday approaches I remember grade school days. It was tradition at my school, as I am sure many others across the nation, maybe the world, that when one’s birthday came to pass cupcakes would be brought to share with the class. I always felt bad for those summer birthday kids who had to celebrate half birthdays. There was also one boy in my class that was born on a leap year. I felt even worse for him—celebrating his true birthday once every four years. Shame onto his parents, children can be cruel.

Every year as the last day of January approached my mother, older brother, and I would plan what kind of cupcake we would make (my older brother is 1 year, 11 months and 30 days older than me, just shy of 2 years). I would help with the baking and older brother and I would complete the decorating. I was not to be one of those sorry kids who carried store-bought cupcakes to my peers. I would uncover the delicacies, sit slightly uncomfortable as Happy Birthday was sung and then stuff the cupcake into my face: chocolate with vanilla frosting, always. When the cupcake was safely in my belly, I was sure to savor the last bit and threw the wrapping in my mouth, chewing on it until I could no longer taste the sweetness, then spit it into my napkin.

I can now resist chewing on the cupcake wrapper, though I will usually pick up any crumbs large enough to taste. This year I decided to make the most luxurious, richest, decadent cupcakes I could produce. I wanted fudge cupcakes. But I glanced at the counter at a pearly bag of coconut and decided I now wanted coconut fudge cupcakes.

Searching through my cookbooks I was at a loss. None of the recipes sounded rich enough. My mind was pooh-poohing cocoa powder, I wanted a recipe that would require a double boiler. I went to the internet to compare recipes. I found a fudge cupcake recipe that sounded almost right at 52 Cupcakes. I modified the recipe to create my own most decadent of birthday delights.

The final creation was perfect: Rich enough to be a meal; dense enough to act as cake; light enough to still be considered a cupcake; full of fragrant aromas; and just downright too swanky to be photographed in a group. These little fellas need their own 5 star accommodations.

COCONUT FUDGE CUPCAKES
Makes 12 cupcakes. Prep times= 20 minutes. Bake time= 15 minutes.
THE CUPCAKE
* 2 large egg yolks, at room temperature
* 1 ounce unsweetened chocolate
* 1 ounce semi-sweet chocolate
* ½ cup water
* ½ cup (1 stick) butter, bring to room temperature
* 1 cup firmly packed brown sugar
* 1 cup flour
* 1 tsp baking powder
* ½ tsp salt
* ¼ cup milk
* 1 tsp pure vanilla extract
* ½ vanilla bean, slit up the middle.

1) Set the oven rack to the middle setting. Preheat the oven to 400F. Amply butter a standard-size cupcake tin (12 slots). In a double boiler, place water, ½ cup milk (¼ cup is for the frosting) and vanilla bean. As milk is warming, scrape black seeds from the vanilla pod. Bring milk to a simmer, careful not to boil. Remove vanilla pod (dry it and place in sugar bin for vanilla sugar). Remove ¼ cup of the milk from heat and set aside for frosting. Add the unsweetened and semi-sweet chocolate to the double boiler. Stir until chocolate is melted and mixture is smooth.
2) In a mixing bowl, cream butter and sugar. Add yolks, chocolate mixture, and vanilla extract, stir until well combined.
3) In a small bowl, sift together flour, baking powder, and salt. Add the flour mixture gradually to the chocolate-sugar mixture until well combined.
4) Pour into cupcake tins, filling ½ - ¾ of each slot. Sprinkle a light coating of coconut on top of the batter. Push down lightly so coconut sticks to the batter. Bake 15-18 minutes, until a toothpick comes out clean. Remove from oven, extrude from tin, and set aside to cool on cooling rack. While cooling, make the frosting (below).


THE FROSTING
* 1 ounce unsweetened chocolate
* 1 ounce semi-sweet chocolate
* 1 Tbl butter
* 1 cup confectioner’s sugar (powdered sugar)
* ¼ cup milk
* 1 tsp pure vanilla extract

1) Return the set aside milk with vanilla to the double boiler. Add the chocolate and butter. Warm slowly, stirring, until the chocolate is evenly melted. Remove from heat. Stir in the confectioner’s sugar and vanilla extract, mix until smooth. You can make the frosting thicker by adding more confectioner’s sugar or thinner by adding more milk.
2) Allow the frosting to cool for about 5 minutes. Pour 1-2 Tbl frosting over the tops of the cupcakes. Top with coconut.


And here, WCB # 34
Big sister Kitty BoJangles found her sun spot on the bed this morning hiding from the torment of her little brother:


The little Whiskey monster, exhausted from beating up his sister, hid from the camera this afternoon:


Thanks to Masak-Masak for hosting this week.

Friday, January 27, 2006

Braised Oxtail w/ Baked Eggs & The Perfect Bloody Mary


*Just Braise has moved. Please visit me at www.justbraise.com!*

As stated earlier, on a recent B&N trip, I “picked up” a few recipes from the book I was perusing. This one struck my eye (even though the picture does it no justice) because it sounded exotic: oxtail and baked eggs. I never thought to bake an egg before, other than a frittata. D being a huge carnivore, I knew he would be down for oxtails. We invited two other meat-lovers over and planned our day.

First, I must admit that when eating certain foods that resemble animals a little too much, contain too many bones, or are a little too gamey, I regress back to my vegetarian days. For six years (much to my mother’s objections and sneaking meat into my food) I was essentially animal-less. I broke down when studying in the meatastic city of Prague and am now a mostly happy meat-eater. Like many others I have met, the word oxtail can give me the meat-willies, but this recipe sounded too good to pass up. So all ye who fear the tail I say go forth!

What is oxtail? And why? Back in the day when oxen actually pulled our wagons cross country and got all yoked up, the oxtail consumed actually was the meat from the tail of oxen. Being thrifty folk and not wanting any part of the animal go to waste, the oxtail was consumed, often in a soup or hearty stew. As oxen have gone out of style and the use of cattle has become widespread, we again refuse to let any meat go to waste. Oxtail as we know it today is the tail meat from cows (of both genders).

Like all things fashionable, there are highs and lows. It is only recently that oxtail has returned to fashion. I have read fewer than twenty years ago, oxtails were so unpopular the meat was practically given away. It was a secret joy for chefs to use oxtail because the cost was so low ($1-2 a pound). Today, though not outrageous, old fans of oxtail shutter in horror as they dish out up to $6 a pound for quality “unwanted” meat. Oxtail seems to be the new “it” meat, recently springing up in restaurants all over town.

The first time I took notice to oxtail I was with D at his favorite feel-good-food joint Soul Spot. Ran by two men from The Gambia, these boys have nailed the southern cooking New Yorkers crave. An easy-to-miss whole-in-the-wall favorite of bus drivers, police, and locals alike, the Spot serves up choice of meat and two sides for an easy $10. I would usually order the chicken: jerk or BBQ, while D would switch up between meatloaf and oxtail both dripping in savory sauces. With trepidation—come on, what’s in name?— I tried the oxtail. I was hooked.

Like short ribs the “oxtail” meat can be a little tough so slow cooking is advised. This is where the braise comes into play, allowing the meat to fall right off the bone and enter the succulence stage. Oxtail tastes like any other “less than ideal” cut of beef, most resembling brisket (although it depends how it is cooked), so it is not to be shied away from. It makes an interesting, exotic sounding, and delicious alternative to the usual purchases, and should definitely be tried.

As a brunch item, this dish reminds me of The Joy of Cooking’s “Hunter’s Breakfast” which consists of about 10 different courses, from quail to ostrich eggs. More closely, it is similar to D’s favorite menu item at Norma’s: The Hudson Valley Duck Confit Hash a Cheval, consisting of a full duck and 4 eggs. D orders this with a huge grin and sops up all the sauce with their fresh baked bread, dribbling juice and laughing at the rest of the patrons pick at their jazzed up eggs (I recommend the Zillion Dollar Lobster Frittata, with “we dare you to expense this” as the price—okay, I’ve never had it, but the Artychoke Benedict is darn good).

This recipe takes a little planning (I marinated the oxtail in wine overnight). If it is made for brunch, remember it needs 2-½ - 3 hours of cook time so prepare it well before guests arrive, or quench the appetite with the perfect Bloody Mary (recipe below). I planned ahead and bought double what I thought 4 people could consume so I would have plenty of leftovers (which is recommended since the cooking process is lengthy). Much to my surprise, the leftovers were few: enough for a smaller brunch the following day. This meal is well worth it and is so hearty it serves as the only necessary meal of the day (we were good and content until about 11pm when we had a small snack of fresh mozzarella and tomatoes).

I know the picture is not fantastic, but this meal is. Anyone that has had it can attest to it. When the egg’s sunshine breaks loose and the juices mix, this dish is divine—just have some good bread on hand for the sauce. A Bloody Mary is a perfect accompaniment to this dish: The tangy horseradish is an ideal palate cleanser. Be a man, enjoy this dish, call the dogs, sound the horns, and go hunting.

BRAISE OXTAIL W/ BAKED EGGS
Serves 5. Prep time= 20 minutes. Cook time= 2-½- 3 hours.
* 4 lbs oxtail
* 1 bottle red wine (I used the inexpensive, but quite tasty $5 Gato Negro)
* 2 celery stalks, cut into 1-inch pieces
* 2 carrots, cut into 1-inch pieces
* 1 small onion, cut into quarters
* 1-5 oz can tomato paste
* salt/ pepper
* 1 Tbl dry parsley
* 5 eggs

1) Place the oxtail in a wide bowl with 1 bottle red wine. Marinate at least overnight, up to 2 days. If the wine does not cover all the meat, rotate and flip pieces every so often.
2) Preheat the oven to 400F. Warm an oven-safe pot (dutch oven) over medium-high heat. Remove the oxtail from the wine (save the wine). Dry off the oxtail and rub well with salt and fresh ground pepper. Brown all sides of the meat in the (dry) pot. This can be done in 2 rounds, takes about 3 minutes on all sides. This locks the meat moisture in. Remove and set aside.
3) In the meat juices, sauté the celery, carrots and onion, about 8 minutes until onions begin to soften. Add the tomato paste, reserved wine and parsley; stir to blend evenly. Add the oxtail (liquid should come just to the top, but not covering the oxtail. Add a little water, about 1 cup, if this is not the case) and cover tightly. Bake in middle of the oven for 2-½- 3 hours. Meat is done when it falls off the bone with little effort. Check the braising process once every hour to ensure liquid is still present. Add a little water if too much liquid evaporates (some liquid will cook off, but you want some sauce for the meal).
4) When meat is ready, remove from the oven and de-bone (reserving the bones for a future soup or stew). Push the vegetables through a large sieve (or mash with a potato masher) to create a thick sauce. Return the meat to the pot. Using the back of a large ladle, create 5 divots and crack one egg in each divot. Bake 10 minutes so eggs are just white and still runny.
NOTE: To be served with a Perfect Bloody Mary, recipe below.


THE PERFECT BLOODY MARY
Serves 4. Prep time= 8 minutes. Inactive time= 1 hour.
* 1 liter quality tomato juice, with no additives (I think Looza makes an excellent line of juices and nectars and should definitely be purchased if available.)
* juice of 1 lemon
* juice of 1 lime
* 1 Tbl Worchester Sauce
* 1 Tbl hot sauce
* 5 Tbl quality fresh, plain white horseradish
* 1 Tbl celery seeds
* fresh pepper to taste
* 1 Tbl balsamic vinegar
* 8 ounces vodka
* celery stalk with leaves for garnish (olives or pickled green beans work well too)

1) In a pitcher, mix tomato juice, lemon juice, lime juice, Worcester sauce, hot sauce, horseradish, celery seeds and fresh pepper. Cover and place in refrigerator for 1 hour.
2) When ready to serve, remove from refrigerator and stir well. Pour 2 oz vodka into each glass (4), add tomato mixture (another tsp horseradish is optional). Add celery garnish. Gently pour the balsamic vinegar over the top of the tomato mixture so it floats. This provides an excellent visual and olfactory effect. Once served, mix and enjoy.

NOTE: A good Bloody Mary starts in the juice. If one uses a poor quality juice, the final product will taste off. I have had this happen. Do not attempt it at home. The taste of a dish depends on the quality of the products used.
ON HOT SAUCE: I am by no means a hot sauce expert, but I do like a little flame every once in a while. I have foodie friends from New Orleans that will add Tabasco to everything. I surprised them with some Dragon’s Fire Hot Sauce from Greene’s Gourmet in Vermont. (D and I picked some up during a camping trip.) This boutique sauce is made with ginger root which we were told makes the sauce extra hot because it opens the sinuses giving one full onslaught of the pepper—the Naw’lins boys were speechless.

Monday, January 23, 2006

Mussels in Tomato-White Bean Sauce & Fried Calamari


On holiday in Italy, J and I broke off from the larger group. We ditched them in Rome with a bottle of Limoncello stuffed in our bag, and set off to explore the coast. Two girls ready for life with the locals, we were also two keen food snobs (a delight to be in Italy).

We began our journey heading south to Napoli. As we de-boarded the train, the energy and life of the city engulfed us. Two out-of-place New Yorkers, we felt at home amongst the bustle of locals. We found a cheap hotel near the train, threw our bags down, and headed to city central. We walked the narrow backstreets where young boys kicked soccer balls against the building walls. Laundry hung at haphazard angles overhead. Women teetered out the window, calling loudly to the children below. Men sat in small groups busily talking with their hands. We found the central piazza where the teenagers sat around the fountain. Surrounding the fountain were coffee shops where the twenty-somethingers flirted the afternoon away. We found a small stairway and sat down, taking in the spirit of the city.

Our stomachs growled as night came. We wandered into the commercial downtown and asked locals where to get some good seafood. In a winding backstreet full of street-hawkers, we were pointed into a restaurant. Led up to the second floor, we were seated on a balcony that overlooked the street. The smells overwhelmed us, and our stomachs deceived us—we ordered more than any two mortals could ever finish, daring ourselves to clear the plates.

For starters, I ordered grilled calamari: Perfect oval squid bodies, with a full bunch of tentacles. I slowly plucked each single tentacle and dropped it into my mouth. These little critters were the right ratio of chew to crispy grilled flavor, drizzled in olive oil and garlic. For my entrée I had mussels. The most perfect mussels I have ever had swimming in a red tomato sauce: salty-sweet and a model broth consistency for easy scooping. J and I passed our dishes back and forth, well aware we were nearing the bursting point. The third hour of the meal rolled around and we began giggling in disbelief of our good fortune and full bellies. Our gluttony had driven us too far: we had consumed everything. We rolled ourselves out of the restaurant and back to our hotel. We slept the most content night that trip with visions of the ocean dancing in our head: we were satisfied.

A few years later, my mother would take my little brother and me to an Italian restaurant in Chicago. Hoping to re-create my fading memory of the gluttonous Napoli feast, I happily ordered the mussels. As family tradition would dictate, my brother decided on the fried calamari appetizer for the table. Rings of crispy calamari arrived. It is a dish that is easily ruined if the batter is too thick or soggy. These critters were a delight. Soon a half-moon bowl arrived overflowing with blue shells and hidden orange treasures. The broth in this mussel batch was thick with tomatoes. Pearls of white beans accompanied the texture and flavor of the dish to perfection. Buttery, salty, and savory, I was brought back to my gluttony. I sopped the final drops up with a crispy crustini: pure heaven.

This meal was inspired by past and future memories of calamari and mussels, probably my two favorite seafood dishes (lobster is up there too). For the calamari, D and I used the batter we use for our fried chicken. Because we use farm-fresh cornmeal (ordered direct from an Indiana farm), the texture is a bit grainy. For something as delicate and chewy as calamari, I think this texture fought a little too much with the dish. If extra-fine cornmeal is used, I think it would be perfect since the taste of the corn is an excellent compliment to the dish. At first D pooh-poohed my cocktail sauce. Soon he was licking the dish exclaiming, “but I didn’t think it would be so good!” It is the most simple of condiments to make (a dollop of ketchup and a heaping spoonful of good fresh horseradish).

I created this mussel recipe from memory and combined what I believe to be good compliments to the dish. This meal is far to easy and inexpensive not to eat more often. The result was a succulent tomato-based sauce with a hint of cream to amplify the texture and flavor. I think with some white wine, this sauce would have been even better (we were too lazy to run down the street to get some), without wine, it is very fresh tasting. The best part of this dish was our vegetable side: a steamed artichoke. Once all mussels were consumed and we were left with a bowl of tomato broth, the spoon-like leaves of the artichoke was used to scoop up the sauce and enjoy with the meaty earthiness of the vegetable.

Pre-Cooking Note: Be careful when cooking with hot oil. The key to cooking with oil is that it must be extremely hot for a quick fry. The oil splatters easily so it is advisable to wear an oven mitt over the hand, long sleeves, or use long tongs to place the food into the skillet. Remember to gently place the food down to prevent unnecessary splatter.

FRIED CALAMARI
Serves 2. Prep + Cook time= 15 minutes.
* ½ pound fresh calamari rings
* ¾ cup cornmeal
* ¾ cup breadcrumbs (or flour)
* salt/ pepper to taste
* 1 tsp paprika
* 1 egg, beaten
* 3 cups vegetable oil

1) In a high-rimmed skillet, heat the oil over medium-high heat until hot. While oil is heating, beat egg in a small bowl. Place the calamari rings into the bowl and stir to coat. In another bowl, mix the dry ingredients (cornmeal, breadcrumbs, salt, pepper, paprika). Toss the calamari in the dry mixture to coat well.
2) To test heat of oil, place on calamari into the skillet. If calamari sizzles, the pan is ready. Fill skillet with calamari. Cook about 2 minutes, flip, cook 2 minutes more. You may want to cover the pan to prevent splatter.
3) Remove calamari onto a napkin to absorb some oil. Transfer to serving plate and enjoy with a sprinkle of fresh lemon juice or cocktail sauce.


Pre-Cooking Note: Mussels are in season October- April, so now is a perfect time to enjoy these bivalves. They can really be eaten all year round, but it should be noted that spawning season is late spring and try to avoid them at this time. When buying fresh mussels, make sure all shells are closed. Any open shells should close immediately when tapped lightly with your finger. If they do not close, throw them away. These dead mussels will contaminate the fresh ones. Also discard any mussels with cracked shells, feel heavy (full of sand), or feel loose when shaken (mussel is dead). Trust your nose: anything that smells overly fishy is probably no good. You can store mussels for up to 2 days in your refrigerator. Place them in a bowl, covered with a damp cloth. Do not place them in an airtight container or in fresh water, this will kill them. Before cooking, debeard and scrub the shells clean under cold running water.

MUSSELS IN TOMATO-WHITE BEAN SAUCE
Serves 2. Prep + Cook time= 20 minutes.
* 2 lbs fresh mussels, debearded
* 2 Tbl olive oil
* 4 cloves garlic, crushed
* 1 small vine ripe tomato, cubed
* 1-½ cups water (or white wine)
* 1- 5oz can tomato paste
* 1-½ cups white Northern beans, thoroughly rinsed
* 1 Tbl dry parsley
* Fresh pepper to taste
* ¼ cup cream (half and half or milk works too)

1) In a large saucepan or pot, warm the olive oil over medium heat. While warming, clean the mussels well under running water.
2) When oil is warm, add garlic and sauté about 2 minutes so aroma is let out and garlic begins to turn golden. Add water (or wine) and chopped tomato. Let simmer for about 2 minutes to break down the tomato. Add mussels, cover to steam about 4 minutes. Watch for mussels to open.
3) Add tomato paste, beans, parsley, pepper and stir to distribute evenly. Cover and allow to simmer 5-8 minutes. Turn heat off and add cream, stir. Serve with crustini or fresh bread.

Saturday, January 21, 2006

Stuffed Crème Anglaise French Toast


A good cookbook is a beautiful thing. One that is not a brick, that can easily be picked up and held close, with good crisp pages that are easy to turn, that is spectacular. One with a good table of recipes and an index of ingredients is a recipe-searchers dream. The best part about a cookbook, are the pictures.

The more pictures a book contains the more likely I am to purchase it. This is one reason I always post pictures about my recipes. I more often desire to try a recipe that is buddy to a picture than one that lacks a few good beauty shots. So it was upon a recent trip to the local B&N that I wandered to the food section and within seconds my eyes fell upon a very clean looking book with a delicious potato latke, smoked salmon egg benedict pictured, holding a simple title: Brunch .

Brunch is that fabulous meal everyone loves. It means one is at their leisure with the day and can rise late, mull about, then fix a casual and delicious spread. It reminds me of summer weekends when all of New York seems to be meeting up with friends and dining outside. My problem with brunch is I often feel at a loss for new ideas. How many ways can eggs, french toast or pancakes be glitzed up before we realize it really is just the same old meal with a different topping? So it was with hope that I cradled the book in my hands and retired to the second floor to find a good chair to park myself in.

Of course with the intent to eventually purchase, as I flipped through the pages I realized many of the recipes I was interested in were simple enough to memorize. Not the exact ratios, but many of these recipes called for some leeway in terms of personal taste, or were recipes common enough that I had already made them, with a little bit extra to create something truly special. I was hooked on the book (baked eggs?!) and flipped from page to page soaking up the pictures (which I think actually helps with remembering how to create the final product).

The recipe I saw that really drew my attention was french toast soaked in a crème anglaise batter. This sounded (and looked) fabulous because 1) I had some leftover crème angalise from the very decadent soufflé I made a few days back. And 2) because the secret (other than the rich, creamy, vanilla bean spiked batter to soak the bread in) is that this french toast is stuffed. The picture showed banana stuffed toast, but I had fresh package of blueberries calling my name in the fridge and they would be used instead. The last secret to this french toast is to buy an eggy bread (like challah) that you can slice yourself into thick 2-3 inch chunks.

STUFFED CRÈME ANGLAISE FRENCH TOAST
Serves 2. Prep + Cook time= 15 minutes.
* 4 thick (2-3 inches) slices of good egg-based bread, ends removed
* crème anglaise sauce (recipe below)
* ¼ cup fresh blueberries, slightly mashed with fork (or other fresh fruit like bananas, strawberries, etc)
* 1 Tbl butter

1) Cut the ends off the bread. Carefully with a knife, slice a small pocket in one end of the bread (keeping a few centimeters away from the edges).
2) Using a spoon or fork, carefully stuff the mashed blueberries into the bread. Dunk the bread into the crème anglaise making sure the bread readily absorbs the crème.
3) Place the soaked bread in a warm skillet on medium-low heat with the butter melted. Cook on both sides until golden brown, about 3 minutes.


CRÈME ANGLAISE
Makes about 4 servings. Prep time= 10 minutes. Inactive time= up to 2 hours.
* 2 cups half-and-half
* 1 vanilla bean, split lengthwise
* 5 large egg yolks
* 1/4 cup sugar
* 1 tablespoon dark rum, or to taste

1) In a small saucepan bring half-and-half just to a boil with vanilla bean and remove pan from heat. Scrape seeds from bean with a knife into half-and-half, reserving pod for another use if desired.
2) In a bowl, whisk together yolks, sugar, and a pinch of salt and whisk in hot half-and-half in a stream. Return custard to pan and cook over moderately low heat, stirring constantly with a wooden spoon, until thickened (170°F. on a candy or digital thermometer), do not let boil. Pour sauce through a fine sieve into a bowl and cool, stirring occasionally. Stir in rum. Chill sauce, covered, until very cold, at least 2 hours and up to 2 days.

WCB 33


I start Weekend Cat Blogging with a new addition to the family (okay, he's been with us for about 2 months now). Whiskey has joined us from the shelter full of spring in his step, a rowdy young boy. He loves to terrorize his elder semi-feral sister Kitty BoJangles (also a former street walker). How glad we were to sneak up on them one day happy in daydreams and lounging on the couch.

Feelin' Fruity: Part III Berry Merry Smoothie


The weather in New York has been a tease this last week. Mild, breezy and spring-like, people are shedding their winter frocks and embracing the warmth. We should enjoy it while we can, but really, why give the people such a pure indication of a change when the bitter winds are sure pull around again? With this in mind, we must keep healthy. Keep up our intake of antioxidant rich fruits and vegetables, and more importantly, allow it to please out palate.

Herewith, a favorite installment of mine: the berry smoothie. There is nothing like a fruit smoothie to boost your energy. Pack it with energy inducing fruits and a scoop of yogurt, this sweet drink helps get you through the morning with a tropical state of mind, regardless of the dropping mercury. Today’s is an odds-and-ends of leftover fruits I found while cleaning out the freezer.

How surprised I was to uncover some long-forgotten blueberries. I also found a small stash of currants that I had purchased for New Year’s to drop in Champagne (this was a great trick: the light currants danced marvelously in the bubbly). Currants are just now making a name in the U.S. Long a European favorite, these poison-looking berries are rich in disease-fighting abilities; thought to be more potent than blueberries and pomegranate pulps. They are also packed with vitamin C, A, potassium, calcium and phosphorous. Even better: I met a man a few months back who planted the first currant farm in the U.S. to produce currant juice. It tastes delicious and I cannot wait until it hits my local store.

BERRY MERRY SMOOTHIE

Makes 2 smoothies. Prep time= 5 minutes. Use a hand-held or stationary blender.
* 10 blackberries
* handful of currants (red, black or white)
* ¼ cup ripe blueberries
* 4 ripe strawberries
* 1 ripe banana
* ¼ cup plain yogurt (vanilla, low-fat, no-fat, regular or soy options work too)
* ½ cup orange juice

1) Place all ingredients in blender. Blend and serve.


Other smoothie options:
Apricot-Mango Smoothie
Berry-Banana Smoothie

Wednesday, January 18, 2006

Mushroom Celery Root & Leek Soup


When I spent a semester in Prague, I was jealous of a girl in my program who went to the woods with a Czech family to pick mushrooms. How was I not informed of this journey?! I had a fabulous cliché vision of a Mucha maiden, basket in hand, bonnet in hair, foraging around mossy logs. I attempted to steal away one weekend myself, but was warned of the dangers of picking harmless looking poisons. I remained in the city sulking.

A few years later I met up with family in Latvia. The days were full of sightseeing in and around Riga and visits to the countryside to meet assorted relatives. Nights were another story… Attempting to hold my own against Baltic blood, I confronted 2 straight weeks of vodka soaked nights. I would awake mid-morning to find bottles from the night before stacked by the door. My uncle laughed as he told me the golden rule if invited to a dinner party: one bottle of vodka per person will be consumed, plus one for the hosts to save. I was proud my college days kept me going as long as they did. By the start of the second week I was tired of drinking. “Stacite, no drink?” “NO! Done. No more.” I would go to the bathroom and return to find my juice spiked. One of those hazy mornings my uncle shook me: “I’m going to pick mushrooms, want to come?”

Yes! I want to go! But you fill me with so much vodka, challenging my heritage I cannot move!

So he left, without me, and returned hours later with a full garbage bag size of mushrooms. Fresh—from the market—not the forest. I may still have my chance yet.

I love mushrooms earthy meaty flavor. Raw, buttery, caramelized, fried or in soup, they are a perfect addition to countless feasts. This soup is great because it uses so few ingredients. I took the brain-like ball that is celery root, added my all-time favorite flavor enhancer the leek, and tossed in the protein savory goodness of cremini mushrooms. Cremini mushrooms are also known as brown mushrooms, they are a bit more flavorful than the standard white button mushroom. Once blended, the result is a delicious thick soup with chunks of mushroom. Add cream and it turns into a creamy treat.

MUSHROOM CELERY ROOT & LEEK SOUP
Makes 6 servings. Prep time= 30 minutes. Cook time= 40 minutes
* 1 lb cremini mushrooms, quartered
* 3 leeks, cleaned well and chopped
* 2 celery roots, skinned and cut into 8 chunks (celery root has the consistency of a potato with a salty celery-like edge)
* 1 medium onion, chopped
* 2 stalks celery, chopped
* 4-6 cloves garlic, chopped
* 4 Tbl butter
* 6 cups water (or leftover vegetable juices. Yes, I save vegetable juices)

1) In a large pot, melt the butter over medium heat. Add the mushrooms and allow to cook down, 10-15 minutes, stir occasionally. (While mushrooms are cooking, slice the other vegetables.)
2) Remove half the mushrooms and set aside. Add leeks, onion, celery, garlic. Sauté until limp, about 8 minutes. Add celery root and water (or vegetable juice). Cover, bring to a boil, reduce heat. Simmer until celery roots are soft when poked with a fork (about 30 minutes).
3) Once celery roots are soft, blend the soup. Use a handheld blender (highly recommended) or in batches with a stationary blender. Dish into bowls, pour in 1-2 Tbl of cream or milk, sprinkle with mushrooms that were set aside. Flavor with salt/ pepper to taste.

Tuesday, January 17, 2006

Apricot Soufflé w/ Vanilla Rum Crème Anglaise


(Otherwise known as Heaven: Part II)

For New Year’s D and I threw a Sweet Cookie New Year Party. I scoured cookbooks, the Internet, recipes handed down on greased up pieces of, and even invented a concoction or two. There was one cookie I thought sounded amazing. It included a fabulously decadent vanilla bean in the recipe.

As D and I stood in the spice section marveling at all the colors, our eyes finally fell onto the prized vanilla bean. D picked up the container, the same size as all the other spice jars, and made some snide comment about there being a single pod resting comfortably at an angle, while all the others spices were packed to capacity. What a holy bean. After checking the price tag, I decided not to make the purchase—that was one cookie recipe we could do without.

I returned home to delve into the mysteries of the vanilla bean. How can such an ugly little pod hold so much value? I asked my mother’s friend who regaled me with stories of cooking shows in the 70’s using vanilla beans in the recipes. Those were the days when vanilla beans were $400-600 for a single pod. Imagine a 70’s housewife purchasing ingredients for that dinner realizing the single bean was that month’s mortgage payment! I thanked my stars I could actually afford a bean these days, even if the price still made me do a double-take.

A few months ago, I read Pollan’s The Botany of Desire. I passed it along to my friend D, who subsequently did a great summary of the text. As I dug into the chapter about tulips, I could not but help wonder why the chapter was not actually about orchids (though they were mentioned). With orchids fetching prices upwards of $50 per plant, why were these prized beauties not considered? Uncovering more vanilla history only made me wonder more…
____________________
Vanilla, Birds and the Bees:
The vanilla bean originally hails from Central America. The bean is the only edible byproduct of about 20,000 orchid varieties. In order for this orchid to produce a vanilla pod, it must be fertilized by a Melipona bee which is only found in Central America. This bee cannot survive outside of Central America’s vanilla region. With the wiles of science, we are fortunate enough have developed a hand pollination technique (developed in 1836) still used by commercial growers today. Problems do not stop there.

The vanilla bean orchid only opens once a year for less than 24 hours. Today’s commercial growers must patiently, and often, check these precious orchids, ready to pollinate by hand. The vanilla pod is the fruit that grows off this orchid’s vine. In the wild, these vines will reach the canopy of the rainforest. Commercially, they are trimmed to ease the picking process. After pollination, orchid flowers eventually develop into long green beans (up to 12 inches long). These pods are handpicked before they are ripe. Now, growers may begin fermentation which lasts 2 to 6 months until the beans become dark brown and develop white crystalline coating, called vanillin. This vanillin is the scent and flavor that is valued throughout the world. Still, the beans must be aged for up to 2 years to fully dry the bean out to prevent rotting, packaged airtight, and shipped around the world.

Today, vanilla is produced in 3 main areas of the world. Each area’s vanilla bean produces a specific flavor and coloring that is unique to the region.

1) Madagascar is the largest producer of vanilla beans with about 80% of the industry. Their vanilla is known as Madagascar Bourbon Vanilla. This vanilla is considered to be the highest quality pure vanilla available, described as having a creamy, sweet, smooth, and rich flavor. They are the thinnest beans grown.

2) Mexican vanilla, where the orchid originated, now produces only a small percentage of the world’s crop. The bean is thicker and darker with a smooth, spicy, rich fragrance and flavor. Many vanilla aficionados believe this to be the best vanilla available. Be warned: some manufacturers add coumarin to their vanilla. This is banned by the FDA because it can cause liver and kidney damage. So be wary of fabulous deals on Mexican vanilla and always buy from a reputable source.

3) Tahitian vanilla is more flowery and fruity than the other varieties. It is also the thickest and darkest of the three pods. This vanilla bean is more popular for fragrances.
____________________
Extracts:
Extracts are the most popular way vanilla is used in baking. Extract is produced by steeping vanilla beans in a water-alcohol solution for a number of months (sometimes with added sugar). The FDA requires vanilla labeled “pure” to contain 13.35 ounces of vanilla bean and 35% alcohol per gallon of liquid. This is the pure vanilla most often found at the grocery.

When buying vanilla, make sure to purchase “pure” vanilla. “Imitation” vanilla extract is produced with synthetic vanilla. Items labeled vanilla “flavoring” are a combination of pure and imitation vanilla extracts.
____________________
A tasty way to extend the life of a vanilla bean after its use in your custards, milks, creams, syrups, and soufflés is to remove, rinse and dry the used pod. Place it into granulated white sugar to create vanilla sugar. Use this as regular sugar with a hint of vanilla.

Pre-Cooking Note:
I found this recipe on epicurious. Because I had a vanilla bean, I searched recipes for “vanilla bean” and sorted by “fork rating”. This recipe received 4 forks and 100% “would make this again”. I will make this everyday. Before I provide the recipe, let me mention this: D tasted this and all he could say was “this is really, really, really, really goooood.” He took another bite: “This is sooooo good. This is better than anything I have ever had in any restaurant anywhere.” (Let me also add that D is a chocolate dessert man—not a fruity dessert man.) After finishing the soufflé, we both drank the remaining crème and contemplate adding the leftover to coffee in the morning…

APRICOT SOUFFLÉ W/ VANILLA RUM CRÈME ANGLAISE
Makes 6, 7-oz servings. Prep time= 30 min. Cook time= 30 minutes. Inactive time= 2 hours.
* 6 ounces dried apricots (about 1 ½ cups), quartered
*1 ½ cups water
* ¾ cup sugar plus additional for coating ramekins
* 1 tablespoon fresh lemon juice
* 1 tablespoon dark rum if desired
* ½ teaspoon vanilla
* 5 large egg whites
* 1/4 teaspoon cream of tartar
Crème Anglaise:
* 2 cups half-and-half
* 1 vanilla bean, split lengthwise
* 5 large egg yolks
* 1/4 cup sugar
* 1 tablespoon dark rum, or to taste

APRICOT SOUFFLÉ
1) In a saucepan simmer apricots, water, and ½ cup sugar, covered, 20 minutes. Transfer hot mixture to a food processor and purée until very smooth. Force purée through a fine sieve into a bowl and stir in lemon juice, rum, vanilla, and a pinch of salt. Cool purée completely. Purée may be made 2 days ahead and chilled, covered. Bring to room temperature before proceeding. Transfer purée to a large bowl.

2) Preheat oven to 350°F. Generously butter 7-ounce (3½ by 1¾ inch) ramekins and coat with additional sugar, knocking out excess. In a large bowl, beat whites with pinch of salt until foamy. Beat in cream of tartar and beat whites until they hold soft peaks. Beat in remaining ¼ cup sugar, a little at a time, and beat meringue until it just holds stiff peaks. Whisk about one forth meringue into purée to lighten and fold in remaining meringue gently but thoroughly. Ladle batter into ramekins and bake soufflés on a baking sheet in middle of oven 20 to 25 minutes, or until puffed, golden brown, and just set in center.

3) Remove ramekins from oven. With 2 forks pull open center of each soufflé and pour some crème anglaise into each opening. Serve soufflés immediately.


VANILLA RUM CRÈME ANGALAISE
1) In a small saucepan bring half-and-half just to a boil with vanilla bean and remove pan from heat. Scrape seeds from bean with a knife into half-and-half, reserving pod for another use if desired.

2) In a bowl, whisk together yolks, sugar, and a pinch of salt and whisk in hot half-and-half in a stream. Return custard to pan and cook over moderately low heat, stirring constantly with a wooden spoon, until thickened (170°F. on a candy or digital thermometer), do not let boil. Pour sauce through a fine sieve into a bowl and cool, stirring occasionally. Stir in rum. Chill sauce, covered, until very cold, at least 2 hours and up to 2 days.

NOTE: The most time consuming part of this was sieving the apricot purée. I was having a hard time so actually ended up dumping an extra spoonful of apricot that would not sieve through. In the end, this left some satisfying apricot chunks in the soufflé. To save time, make the apricot purée and crème anglaise 1-2 days ahead of time. I halved this recipe and made two heaping soufflés. The soufflé was actually peaking twice as high when taken out, but once it is pierced with a fork and the crème is poured in, it deflates, absorbing the crème. For the crème anglaise, even after halving this recipe, I added about 4 Tbl of dark run to the crème. This gave the sauce a very punchy rum, full flavor. The extra rum is highly recommended.

Monday, January 16, 2006

Huevos Rancheros con Guacamole


An ode to Mexican food: You hold comfort in the bean, spice in the pepper, butter in the avocado, dipping in the salsa, and manly challenges in the tequila’s worm-- I believe that covers all necessary categories for fun eating. One can also dine out on superb Mexican food for relatively cheap, making this the college student or starving artists’ favorite food. Is there any other country brilliant enough to incorporate chocolate in a main dish?

My personal belief is that Mexican food is aided greatly by the avocado. That beautiful green butterball is pure decadence in dining. Originally known for its sexual powers (throw away the Viagra boys!), the avocado’s original name was ahuacati or “testicle”. But alas, the Spanish Conquistadores could not pronounce the Aztec name, dubbing this delight aguacate. This fruit eventually became popular to sea-faring Europeans, who called the avocado, midshipman’s butter, spreading it on their biscuits.

I personally keep an avocado on hand for any emergency situation that may arise: for a salad, in a sandwich, sliced with eggs, blanketed in proscuitto… I could go on. My favorite way to enjoy an avocado though is in guacamole.

I received this recipe from a good friend who manages a Mexican restaurant. The food is so good I rarely attempt to shame myself with any recreation of their dishes. But guacamole is a life-saver, so it was the one recipe I had to have. I once made this over Thanksgiving: I handed the bowl to my brother, ran downstairs to put my wet clothes into the dryer, and returned to find the bowl was (literally) licked clean. He slouched low on the couch, the empty bowl resting in the cradle of his arm, while he giggled in delight at his deft eating abilities. I made another batch and ate it in front of him, making sure to keep it just out of reach, just like a good sister should. Stupidly, I taught him the recipe so anytime I was on my way home craving guacamole I found the avocado stash cleaned out.

The key to an avocado (and therefore guacamole) is to ripen it properly. Purchase a seemingly soft one only to slice it open and find it bruised and unusable. Purchase a rock hard avocado and the time spent waiting for it to ripen is heart-wrenching. I assure you, ripening the avocado in your own home is the wiser choice (as is the Hass variety):

Hass avocadoes are rough-skinned and smaller. They have a nutty, buttery flavor. The thin-skinned large, lighter variety is not as flavorful and more watery. It is best to purchase avocadoes when they are hard. Allow the avocado to sit on your counter (or fruit bowl) to ripen (or in a paper bag with an apple for faster results). This process will probably take about 3-4 days and the avocado skin will darken as it matures. The avocado is ripe when the skin gives under a little pressure (the innards are soft). Once they are ready, they can remain for a few more days on the counter or be placed in the refrigerator for about 2 weeks. When ripe, the skin easily peels off (once started with a knife) and the seed is easy to remove. If you do not use an entire avocado, sprinkle it with lime or lemon juice and wrap it air-tight to prevent discoloration.

For this meal, the most time-consuming preparation is in the guacamole: 5 minutes. This makes today’s meal one of the fastest and most delicious breakfast dishes available. This was made a) because I had a ripe avocado itching to be used and b) I had the broken ends of un-dipable tortilla chips I could not make myself throw away. It is important to keep guacamole simple and more importantly, dairy-free. Many Mexican restaurants will bulk up their guacamole with sour cream or yogurt and ruin the natural buttery flavor of the avocado. As long as your avocado is good and ripe, your guacamole will be great.

HUEVOS RANCHEROS CON GUACAMOLE
Makes 2 servings. Prep + Cook time= 8 min.
THE GUACAMOLE
* 1 ripe Hass avocado
* 1 garlic clove, crushed (optional)
* 1 small vine-ripe tomato, chopped and deseeded
* ½ medium (or 1 small) white onion, chopped
* ¼ cup corn kernels (optional, but adds nice color and flavor)
* 2 Tbl fresh cilantro, chopped (optional)
* juice of ¼ lime (be careful not to overwhelm your guacamole with too much juice)
* splash of hot sauce, your preferred brand

1) Slice the avocado in half and remove the pit. (If your avocado is ripe it is easy to remove the pit by hitting it with a sharp knife—watch your fingers—and wedging it out from there.) Slice each half into another half and peel off the skin. Place in a bowl. Using a potato masher or fork, break down the avocado meat, leaving it slightly chunky. Do not use a food processor or blender. This will pulverize and thin out your guacamole.
2) Add remaining ingredients and mix until evenly blended.
NOTE: My friend told me the restaurant uses red tomatillos. I have searched gourmet and regular groceries, Mexican delis, and my local fruit stands, but have never seen red tomatillos. I would like to say this ingredient is a lie, but I do know they exist. Use them if you can find them.


THE HUEVOS
* 4 eggs
* 1 Tbl butter

1) Just before starting the guacamole, get the eggs going. In a fry pan, melt the butter over medium-low heat. Crack eggs, cover tightly and allow to cook for 3-4 minutes until a light film covers the eggs but they are still gooey. Remove.

NOTE: I served these huevos with guacamole and salsa on the side. I added ¼ cup black beans to whatever salsa I had in the house (I believe it was an organic roasted tomato variety). The crushed ends of tortilla chips were mixed in eventually. One can substitute soft tortillas for the chips. Delicious.

Sunday, January 15, 2006

Bourbon-Pomegranate Molasses Beef Short Ribs w/ Broccoli Rabe


*Just Braise has moved. Please visit me at www.justbraise.com!*

To braise, or not to braise, that is the question. Whether ‘tis nobler in the mind to purchase expensive meat and suffer the slings and arrows of outrageous fortune,-- or to fool your audience with inexpensive meat that melts in the mouth and is pure succulence.

I choose to fool, and with rave reviews.

Braising is the frugal gourmet’s trick on the audience: It turns tough meat tender. This is a process where one can throw everything-but-the-kitchen-sink into the pot, walk away, and return a few hours later to remove spectacular meat with little effort (I have discussed the process and various techniques more in depth in my first post of this New Year. I will also make the promise that more braising will be discussed this year, than last.) For tonight, it is beef short ribs.

As a child, I cannot remember ever eating authentic southern BBQ ribs. Steaks, BBQ chicken, hamburgers, hot dogs—those were all covered. I cannot recall once stepping foot into a BBQ joint until I was in high school. This moment was bliss and I often requested return trips.

My family did eat ribs though. There was only one location we ever consumed ribs: at New China Restaurant. We walked in, summoned by the larger-than-life giggling gilded Buddha that rested above the host stand, and soon sat at our regular table. I always thought we were so special sitting at this corner booth right near the bustling kitchen. Looking back, I am sure three young rowdy children are not a restaurant favorite. Regardless, their ribs were amazing, dripping with a soy-BBQ sauce that my family always had to order at least 2 plates of to satiate all.

But I have aged, and with age I have come to enjoy ribs beyond the comforts of the local Chinese restaurant. I still crave authentic southern BBQ. This is good since D is a southern boy: Tonight we summoned the southern kitchen.

On short ribs:
There are two kinds of beef short ribs. One is the shoulder (or chuck). These pieces are cut into individual rectangular slices, 2 to 3 inches long. They are thick, have layers of fat and connective tissue, and a thick bone running along them. The second kind of short rib is the short plate (underside of the chest). This is typically what you receive in a BBQ restaurant when you ask for “short ribs”. It usually consists of five connected ribs (numbers 6 to 10). This section is meaty but also contains a lot of connective tissue. Both cuts are tough and require long cooking (in this case braising) to soften them up.

When purchased in the supermarket, this cut of meat is a bargain. For tonight’s meal I purchased a package of chuck (loose) short ribs. They were large, meaty and marbled. They arrived in a package of 4, totaling just under $4. The rest of the ingredients are staples I generally have at home so with the broccoli rabe (about $2.50) this meal for two was about $7. I was happy with this math and returned home to braise. (Okay, the bourbon is not a staple, but leftover from a New Year party. This girl loves her hot toddies.)

Other notes on this recipe:
I combined and adapted this recipe from two I found online (one from starchefs, the other from epicurious). The pomegranate molasses can be substituted for regular molasses. I just happen to enjoy the sweeter pomegranate molasses. It is available in Middle Eastern markets (for about $1.50) or is now showing up in many general supermarkets (for about $3.00) in the Mediterranean food section. Whichever molasses you use, make sure to add it at the end of the cooking process. The pomegranate seeds in the braise process are also optional. I had some leftover seeds from a recent heavenly dessert and threw them in (as I said, everything-but-the-kitchen-sink.)

Bourbon-Molasses Beef Short Ribs w/ Broccoli Rabe
Makes 2 servings. Prep time= 20 min. Cook time= 2.5 hours
Bourbon-Molasses Beef Short Ribs
4 short ribs (Find ones with a good fat-meat ratio)
1 Tbl butter
4 cloves garlic, chopped
1 carrot, chopped
1 celery stalk, chopped
1 medium onion, chopped
1 jalepeño pepper, chopped (if a little spice is desired)
3 bay leaves
¼ tsp thyme
¼ cup bourbon
1 Tbl tomato paste
1-½ cups water
1 Tbl soy sauce
2 anchovy filets
seeds of ½ a pomegranate (optional)
1/3 cup pomegranate molasses (or regular molasses)
fresh ground pepper

1) Preheat oven to 350F. In an oven safe pot, or dutch oven, melt the butter over medium heat. Cover both sides of the short ribs with an ample amount of pepper and brown the ribs (about 3 minutes each side). In the braise process this initial quick heat process locks the juices inside the meat. Remove the ribs and place on a separate plate.
2) Add the garlic, carrot, celery, onion, jalepeño and anchovies. Sauté for 5 minutes.
3) Add bay leaves, thyme, bourbon, tomato paste, water, soy sauce and (optional) pomegranate seeds. Return ribs to pot, cover tightly and place in oven on center rack. Cook for 2.5 hours.
4) Once removed from the oven the sauce will have thickened and the aroma will be overwhelmingly delicious. Add pomegranate or regular molasses, stir and serve.


Broccoli Rabe
1 bunch broccoli rabe
2 Tbl butter

1) When there is 10 minutes left of the braising process above, warm a medium sized saucepot over medium heat with the butter. Add broccoli rabe, cover tightly and allow to sit for 5 minutes. Stir, cover again, and cook until leaves are wilted (about 4 more minutes). Remove and serve.


Check out this recipe featured on Chef Michele!

Head on over to Lindy Toast for the Something For Nothing wrap up!

Friday, January 13, 2006

Feelin' Fruity: Part II Apricot-Mango Smoothie


*Just Braise has moved. Please visit me at www.justbraise.com!*

For today's installment of "Feelin' Fruity" let us journey to India...

Mangoes originated in India where they have been cultivated for over 4000 years. Buddhist monks spread the joys of this fruit across the land, carrying them on their long treks. In the 4th and 5th centuries, mangoes turned up in the Middle East and Africa, eventually making their way to South America and other tropical areas. Today with the joys of industrialization, I can enjoy this fruit in New York, even in the bitter winter.

There are many mango varieties. The most interesting I have tried is the Haitian mango. It is a bit smaller than the standard mango usually available. It seems only to be available in the summer, and only in Chinatown or my small local fruit markets (not in my regular grocery store's fruit section). It ripens to a deep yellow and can be highly speckled with brown spots. The inside is an intense deep orange with an extremely potent flavor. If you come across it, by all means give it a try.

Slicing a mango can seem daunting. I sparingly bought mangoes until I went to my friend A's home for Thanksgiving a few year's back for a "Lebanese Thanksgiving". Needless to say this meal was spectacular: the standard turkey was accompanied with Lebanese potatoes, foul (pronounced fool), hummus, and fresh hot pitas. The dessert was beyong special: A's aunt had just returned from a visit in Lebanon, producing a platter of honey and pastacio laden filo. If you are ever in Lebanon the smell of these pastries is intense mixing with the cardamon of Arabic coffee. Back to the mango... A's cousin was over as well. The irrisistable pastries arrived and said cousin retreated to the kitchen for fruit, returning with a ripe, red mango. I was enthralled at his deft slicing job. The mango was quickly consumed, juices licked from his hands, he was on the couch chewing on the pit:

To slice a mango:
We must first understand the mango's pit. It is essentially a flattened oval. The flat sides of the pit are where more mango meat lies. The outer edges being very close to the skin. The meat around the mango pit is very fibrous and it is near impossible to totally clean the pit in the slicing process. When cutting, slice off the flatter sides as close to the pit as possible. Remember, the pit it is a flattened oval, but there is still a little gut to it. Once the two larger sides are off, place the mango flat, start your knife at the pit and slice at an angle into the meat. Make your way around the one side then flip the mango and do the same for the other side. The next step depends on what you are using the mango for. If producing cubes, take the two larger meat slices. Leaving the skin on, cut your cube outline into the meat, careful not to cut through the skin. Once done you can invert the skin and slice each cube off. Or... slice the two larger halves in half again. Using a thin knife slice between the skin and meat as close to the skin as possible. This will leave you with large mango meat wedges.

Now you know how to slice and dice, go forth with your fruit adventures.

APRICOT-MANGO SMOOTHIE
Makes 2 smoothies. Prep time= 8 minutes. Use a hand-held or stationary blender.
1 ripe mango
2 ripe apricots
4 ripe strawberries
½ cup plain yogurt (vanilla, low-fat, no-fat, regular or soy options work too)
½ cup milk (your choice of 1-2%, whole or non-fat, soy, etc)
splash of orange juice
1/4 tsp vanilla
dash of cinnamon

1) Place all ingredients in blender. Blend and serve.


Feelin' Fruity: Part I. Berry-Banana Smoothie

Tuesday, January 10, 2006

You Have Reached Heaven


I approached the gate. “Tickets, please,” said the Gatekeeper.
“Sorry sir, tickets, for heaven?”
“Everybody needs a ticket. End a’ da line.”
Searching for camaraderie, I spot a stout man. His skin is dark and rugged, like sea-faring men. A white top hat caps his thick silken hair melting down his back.
“Sir?”
A crimson plume flutters as he turns and with a broad smile he flashes his garnet teeth.
“My child, do not be alarmed,” he chuckles. The chuckle erupts into a laughter that soon becomes soundless-- full of motion: his shoulders convulse and his belly undulates with the weight of his happiness in his own voice. A small pool of drool forms at the corner of his mouth and dribbles down his chin.
“Sir?”
“Yes, my child?”
“I don’t have a ticket.”
“Everyone has a ticket. You must know where to find it.”
“But I don’t. I don’t have a ticket.”
From behind his back he flings a gnarled, ebony cane into the air: “You must know where to FIND IT!”
I search my pockets, patting myself over. I am at a loss. The line is progressing and still I am without a ticket. “Please sir,” I beg, “you must help me!”
The gate begins to radiate. In its ballooning heat it turns from gold to blue to red. Its heat is overtaking me. I am sweating, blind, losing control of my senses and I fall to my knees, desperate. The gate erupts, sprinkling a crimson dust onto the crowd. The stout man giggles. His dark skin quivers. Flinging off his white top hat, hopping from foot to foot, he flashes his scarlet teeth. The erupted gate covers his white top hat and dribbles onto his skin. It is thick, molasses-like. “You have FOUND IT!” He shouts. “My child you have found it!” It is heaven.

This cake is ecstasy. It is heaven. It is sin, joy, rich, chocolatey, gooey, crisp and pure, sweet gluttony. I received this recipe from my mother. As noted earlier, she takes the odd cooking class and passed this recipe on to me (though I added the crowning glory: a drizzle of pomegranate syrup).

This recipe is often found on menus. Usually it goes by the name of “Molten Lava Chocolate Cake” or something of the sort. That is a misnomer. It is more than that. It is perfect. It is decadence, gluttony, golden. It is heaven.

Weighing effort against results, this is one of the most painless recipes I have ever tried. When this emerged from the oven, D danced gleefully from foot to foot. He giggled incomprehensible words while he added the crown of ice cream, and his hands shook with anticipation when I began to drizzle the pomegranate syrup on top. When consumed, I sat motionless in my chair, unable to speak, smiling weakly at the stout man in my belly. I shamelessly licked my plate. I dare you not to.
HEAVEN
Makes 5- 4oz. ramekins. Prep time= 15 min. Cook time= 12-15min
FOR CAKE
8 Tbl unsalted Butter
8 oz bittersweet or dark Chocolate
4 large eggs
1 large egg yolk
1 tsp vanilla extract
¼ tsp salt
½ cup granulated sugar
2 Tbl all-purpose flour

1) Preheat oven to 400F. In a double boiler, melt the chocolate and butter
2) While melting, put the eggs, egg yolk, and sugar in a bowl. With a mixer fitted with a whisk attachment, whip the eggs until they triple in volume
3) Add salt and vanilla extract to the chocolate mixture. Fold the egg mixture into the chocolate mixture until it is fully incorporated. Sprinkle the flour into the mixture and gently fold until incorporated.
4) Pour into buttered and floured 4 oz ramekins. Bake 12-15 minutes. The tops should set, yet will jiggle slightly when shaken. Unmold and enjoy.
NOTE: Since we were only 2, I halved this recipe. It made two very full cakes. We baked them for 16 minutes, which I believe is too long—too much of the gooey chocolate filling cooked. Also, because this batter was a little large for two, when baked, the cake erupted over the edges of the ramekin (without spilling), making it impossible to remove. No loss, we covered it with ice cream and pomegranate syrup (recipe below).


FOR POMEGRANATE SYRUP
1 pomegranate, deseeded. Retain juice
½ cup sugar

1) Before starting cake, deseed pomegranate. On low heat on the stovetop, place all seeds, juice and sugar in a small saucepan.
2) Allow to simmer while you prepare the cake, stirring every so often so as not to burn. Let thicken. Mixture will bubble. This is okay, keep stirring.
3) With about 5 minutes left in the cake baking, turn heat off syrup. Once cakes are out and ice cream is on, hold a strainer over cake and pour mixture through, catching seeds as syrup drizzles onto the cake. At this point the syrup will be sugar-like crystals and if you're crafty enough you can build some sugar structures as it hardens on the ice cream surface. Succulence. Enjoy.

Monday, January 09, 2006

Feelin' Fruity: Part I Berry-Banana Smoothie


Why, for the past week, has D been spoiling me with a smoothie upon waking? I think we are in need of some warmth...

I love where I live because there are countless 24-hour fruit and vegetable stands on my walk home from the train. The best time to shop at them, I have found, is after 11pm on Sundays. I have produced two reasons for this: 1) Shipments arrive Mondays and they want to clear out the merchandise before it arrives. 2) Prices are raised on the weekends before they are drastically slashed Sunday night for reason #1 (possibly making them seem lower than they really are). Regardless, it is at this time that I stock up on strawberries, blackberries, bananas, blueberries, mangoes, and other tasty looking fruits miraculously in-season in the middle of January (oh sweet Industrialization).

A recent conversation at work had X complimenting my grapefruits. X is prone to attempting to steal my grapefruits. X is also prone to stealing (or ogling) my oranges, clementines and/ or kumquats-- maybe X has scruvy? I “always have such great big grapefruits,” X says, “they look so juicy.” We got into a conversation about how expensive these large grapefruits are, “$1 each, so expensive!" But that was a guesstimate and upon further investigation this Sunday I have come to realize grapefruits in my neighborhood—big hulking, face-sized fruits—are 3 for $2. Making all this goodness all the easier to acquire and keep the body healthy in the midst of the chill.

I love smoothies because they are filling. I make thick, yogurt-based smoothies that never become runny like those cheap, imitation ice-based ones (cough Jamba cough). I also do not add sugar (cough Jamba cough) allowing the fruits natural flavors to sweeten the drink. They are a meal in themselves. Best of all, they can cover your daily fruit intake, no matter what the government suggests your personal food pyramid is.

Mix and match your favorite fruits for countless variations. You can use vanilla yogurt for an extra sweet flavor or plain (I use plain because I use a little yogurt in my hummus and baba ganoush so one container is multi-purposeful). I also buy fruit whenever I see it on the cheap. I freeze it and use it for smoothies, or syrups when the urge hits.

The smoothie pictured above is Berry-Banana. My bananas are not very ripe just yet so I only used one and bulked it up with more berry flavor. The results were excellent. Also, please notice how the thick smoothie consistency acts as a pillow for the added blackberry.

BERRY-BANANA SMOOTHIE
Makes 2 smoothies. Prep time= 5 minutes. Use a hand-held or stationary blender.
1 ripe banana (for more banana flavor use 2)
10 ripe strawberries
15 ripe blackberries
½ cup plain yogurt (vanilla, low-fat, no-fat, regular or soy options work too)
1 cup orange juice

1) Place all ingredients in blender. Blend and serve.


More smoothie variations and pictures to come…
Feelin' Fruity: Part II. Mango-Apricot

Friday, January 06, 2006

Tri-Bean & Beef Chili


My first and second grade teacher was a fabulous mentor for all things culinary. Mrs. G must have been an amazing cook and she encouraged our little hands at the same. At one point, we must have been learning about bivalves. Something very basic I am sure (there is only so much bivalve information a first grader can pick up). Later that day, we had 3 large batches of mussels steaming in the back of the class, “see how they open when they are ready to eat!” Mrs. G exclaimed. During the lesson, I can remember thinking why would anyone want to eat a “muscle”?! I could not imagine the muscles in my body resembling these hard-shelled critters and I was slightly repulsed by these midnight blue orbs cooking away at the back of the class.

A few minutes later, everyone was served up a small plate of mussels. I cannot imagine that I ate mine. Now that I think about it, this lesson must have done the teachers’ lounge much more good, because I am sure that is where the bulk of the mussels ended up. If I was in that classroom now, I would steal all mussels from all those grubby little hands, devouring them in great triumph. I would later marvel at how strong my own muscles were to steal such a quantity away!

The following year, second grade, still with Mrs. G, my elementary school hosted an all-school event. Every classroom chose a booth to host: Some made popcorn, some spun cotton candy, others ran a musical-pie-chair (the winner won a home-baked pie). Mrs. G signed us up for the chili booth. (I wonder if we were consulted on this because for a second grader the other booths sound much more appealing.) Mrs. G came to class one day and told us we were making chili. Mrs. G told us she was an award-winning chili chef, and we would be making her secret chili recipe. (I guess secret chili recipe sounds good enough for a second grader.)

Sure enough, event day was approaching. Some facts to know before we proceed:
1) There were about 500 students in my elementary school.
2) The event was held on the weekend so parents could attend and therefore, help raise money.
3) This equals about 1,500 heads to feed (figuring on some families only 1 parent will show, or there are multiple children + the staff)
4) My class had maybe 25 students in it.
5) A classroom full of second and third graders were to make chili for say, 1,000 people (my school had a 1-2 then a 2-3 grade split which is how I had Mrs. G for 1st and then 2nd grade)

So as event day approached our classroom was full of green peppers, onions, beans, tomato sauce and other assorted secret ingredients, enough to feed 1,000 people. I was lucky enough to be a green pepper chopper. I now feel sorry for any student that was given onion duty. Each of us were handed 5-10 of each vegetable and proceeded to chop. The last thing I remember of this process was a field of greenery covering my desk. The following day my classroom worked in shifts of 2 or 3 serving up cupfuls of chili to hungry event-goers, “That’s right! I made it!”

Last I heard Mrs. G was around the San Francisco area working as a principal in an elementary school. While visiting relatives in the area in 5th grade, my mother and I took a detour to Mrs. G’s new home. I remember groves of avocado, lemon and orange trees as we drank tea and reminisced.

Today’s chili is in honor of Mrs. G. I cannot remember any of her secret ingredients, but I still think it is pretty darn good. I was a vegetarian for six years and one think I take away from that is filling my chili with extra beans. A more colorful chili, this one is made with three different beans. I also tried something new, and threw in some hot Italian sausage, in addition to the standard ground chuck-- an excellent spice surprise. Next time I might add a third meat or other sausage variety (like chorizo). Do not be overwhelmed by the long list below. Many of these are items you may already have at home (or different varieties of the same food).

3-BEAN & MEAT CHILI
Use a 16-quart pot. Makes 12 servings (enough to freeze for future lunches). Prep time= 30 min. Cook time= 3+ hours (less if you used canned, not dried beans)
4 Tbl olive oil
6 garlic cloves, crushed
1 green pepper, cubed
1 yellow pepper, cubed
1 large onion, cubed
4 large links hot Italian sausage, removed from casings
1 lb ground chuck
10 sun-dried tomatoes, sliced (optional)
12-15 jalepeño peppers, sliced (optional)
1- 28 oz can tomato puree (no salt added)
1- 28 oz can diced tomatoes (no salt added)
2- 8 oz cans tomato sauce (no salt added)
1-½ cups red kidney beans, dry**
1-½ cups black beans, dry
1-½ cups white beans, dry
1- 28 oz can water (if you use canned beans this is not necessary)
2 Tbl Worchester sauce
2-3 Tbl Tabasco sauce
5 Tbl chili powder
3 Tbl cumin
2 Tbl oregano
1 Tbl cinnamon
4 bay leaves

1) In a 16-quart pot, over medium heat, warm the olive oil. Once warm, add the first 8 ingredients (garlic, (2) peppers, onion, sausage, meat, sun-dried tomatoes, jalepeño peppers). Stir occasionally, and allow meats to fully brown, about 15 minutes.
2) Add remaining ingredients, stir and cover leaving the lid slightly cracked. Bring to a boil then turn heat to medium-low. Simmer until beans are soft (about 3 hours), stirring occasionally. Add more chili pepper/ cumin to taste.

NOTE: 1) I try to buy tomato sauces with no salt added and then add my own salt. If I cannot find any no salt added cans, I will dismiss my own salt addition. 2) You can mix and match any form of tomato product you like for the base sauce. I like diced tomatoes because they add a nice texture. 3) **If you use canned beans cooking time is only about 30 minutes. I like the dried because I can throw this on the stove and forget about it while the smell fills the house.

OTHER OPTIONS: 1) Try roasting some red peppers and/ or tomatoes and add to the chili (roast a red pepper by placing it directly over flame. This is messing since some juices will drip. Once totally charred, place in paper bag to cool. Peel off blackened skin, chop and add to chili). 2) Use more sun-dried tomatoes. 3) Add brown sugar, honey, unsweetened, or very little semi-sweet chocolate to the batch. 4) Try other meats. I’m trying a second sausage next time. Bacon might do well too. Veal or shredded pork are other options. 5) Shrimp might do well in the above recipe, though it might create more of a gumbo flavor. 6) Add a can of beer or 2 cups red wine

Thursday, January 05, 2006

The Sweet Stink of Cheese


I must digress from my normal musings of my home-cooking adventures for this: Consider the stink.
I like cheese. I really do. It is fabulous: Stinky, sweaty, gooey cheese or firm, nutty and buttery-- cheese is just plain good.

Like most American families growing up, my refrigerator contained plastic— or rather, “American Cheese”. From time to time, we would head north to Wisconsin and pick up some good cheddar or swiss for a traditional grilled cheese. Every now and then, my mother would bless us with some brie. Delicious, buttery brie, which we would melt for a few seconds in the microwave and sop up with some good bread. I remember this distinctly. Most American children are not exposed to real cheese.

I began taking French language lessons in elementary school. I continued in junior high school, and like the other French language learners, I was provided a pen-pal in the 6th grade. The highlight of my school’s French program was the 8th grade: All French classes were given the opportunity to go to France and really apply our language skills. Even at this young age, I was consumed with wanderlust-- of course I went.

The fabulous parent-less journey was 3 weeks long. 1-½ weeks spent in Strasbourg with our pen-pals. We stayed with our pen-pal’s families, attended school, went wine tasting… Then 1 week in Paris for the traditional sites, and ½ week on the beaches of Nice, where most of us had our first topless experience.

My pen-mother was a fabulous cook. Every lunch, we sat down to a traditional French feast. The homemade cuisine featured many regional dishes, saturated in ham, they were pure and succulent. After every meal, my pen-father would yell to the son something I could never understand. Moments later, the sacred box of cheese would emerge. For the next 20 minutes, we gluttonously devoured our cheese course.

Years later, I found myself studying in Prague. Before my studies, I took some welcomed travels to visit my friend L who was living and studying in Paris. Everyday, we awoke late after a night out on the town. Next was the boulangerie for a baguette, then to fetch a reasonably priced local wine, and the favorite part of the shopping: the local market where cheese filled an entire aisle. L and I would walk up and down smelling all the unpasteurized goodness. We would return to the apartment, or the nearby park to a bench, and stuff ourselves silly. It was a deliciously cheese-laden time.

My friend A may attempt a claim that I do not like cheese. This is not true. A went through a macaroni period. (I must at this time point to the recent NY Times editorial on mac and cheese.) A, in fact, became an expert macaroni and cheese chef. She and her roommates tested and combined all varieties of cheese and added all sorts of sausages, hams, or beef to the mix. They perfected The gooey cheesey sauce. But I quickly became tired of the sometimes failed attempts (and the overindulgence of cheese) making claim that I could eat cheese no more…

Until a work holiday party at Artisanal. The sweet stink of this lovely restaurant. My coworkers and I walked in and were dutifully overwhelmed by the stench of this fabulous establishment. My boss at the time became giddy, standing on her tiptoes to spy the delights behind the counter. The uncultured men of the group complained they could have spent dinner in a locker-room for a more pleasant smell. But the fromagier in us knows when a bad stink means good.

I cannot recall the main course I ordered. I do remember the two savory, ribbon-like productions of our starter fondues as cheese dripped luxuriously from our forks. I will also reminisce on their famed cheese puffs (which inspired a much more simple recipe in me that is yet to come): Soft, fluffy balls of pure debauchery in the mouth. And of course, the final cheese platter. My boss and I ran to the counter to imbibe in cheese knowledge and select our desserts. Two tots in a toy store, we ogled, we salivated, we begged the master behind the counter for more of what we desired: cheese.

Today it brings me great pleasure to welcome Artisanal into my home. To my delight I hold in my possession two newly acquired stink bombs. The first, pictured on top is the Fium’Orbo. A goat cheese from Corsica that is “sheepy and persistent but not overly funky.” I say it is slightly salty, with a powerful and delightful afterglow that pairs well with dried fruit. Or, as D makes claim, “strong like Napoleon” (who was born in Corsica). At bottom the Flada, a Swiss cheese, I like to call The Brain. A much stronger flavor and “barnyardy aroma.” This one just melted as I indulged-- I traded my cheese knife for spoon as the stench filled my apartment. I suppose more of an acquired taste, D stated this one was more like “Napoleon’s stables.” His loss, more for me.

There actually is a proper way to eat, or prepare cheese:
1) Provide each cheese with one (more more) knives. This way cheese flavors will not intermingle when cutting.
2) Cheese should be served at room temperature to get the most flavor out of it. In other words, if you're having a party and cheese is involved, put the cheese out about 1 hour before guests arrive for full cheese flavor.

In the next few hours I will lose myself to cheese, adieu.

Wednesday, January 04, 2006

Savory, Hearty, Chicken Soup


My mother was, and still is, a big soup maker. In the winter, I would come home from school and was hit with the smell of chicken soup (or fresh chili) wafting through the house. My friends loved to come over because of this. Who wouldn't want to trudge home through a cold Chicago winter, fending off the odd snowball, slipping on black ice, welcomed by a bowl of steaming soup?

At school, we would decide which house to go to afterward: "Well, what's your mother making for dinner?" I don't know, there is probably some soup, though. "Okay, let's go." Sure enough, the first question out of my mother's mouth was whether we wanted a bowl. Second question: with noodles, rice or both (and sometimes matzah balls were listed). We would scramble upstairs to the loft, enjoying our Saved By The Bell. Seconds later, a tray full of hot soup with oyster crackers and a cup of cold milk was served. If the soup was too hot, I would add the milk to my soup, creating creamy delight.

In my house, extra broth was always frozen and incorporated into later soups, or warmed when my brothers or I fell ill. I still follow this trend of always keeping frozen, serving size containers of soup around-- they are great to bring to work for lunch, in a pinch at mealtime, or to gift to a sick friend. And now, I have added to my own soup madness: I freeze vegetable juice, to incorporate into my soups. I know, this sounds strange, but it is a fabulous flavor booster for the soup maker. Consider this: when steaming artichokes or boiling beets you hold the remnants of a fabulous vegetable bouillon.

What do you do? Usually, it is thrown down the sink. Or perhaps incorporated into a salad dressing? I hate seeing that good juice go to waste. Instead of down the drain, my vegetable juice goes into a large container in the freezer, all mixed up: beets, artichokes, carrots... When I make soup, I toss 1-2 frozen juice containers into the mix, voilà: vegetable bouillon. Combine this with some succulent chicken and you have an amazingly tasty meaty soup broth that is extra hearty and full of otherwise wasted vitamins.

This soup is sure to keep you healthy for the remaining winter. The smell along will heal you with memories of youth. I made mine so hearty that rice, noodle or matzah ball has no place to fit. The secret in soup, like braising, is to let it cook as long as possible. It is done when the meat falls right off the bone (making cleaning a cinch).

Another hint to make soup-making easy: when I buy carrots and celery I cut it all into sticks when I bring it home and store it in tupperware, in water, in the refrigerator. I also save the leafy top of the celery stalk to throw into my soups. This makes snacking on these vegetables quick and easy, and further cutting a breeze.

SAVORY CHICKEN SOUP
Makes about 12 servings, 14 quarts. Prep time= 20 min. Cook time= 3+ hours
* 2 lbs whole chicken with bones, the bones hold the flavor in broth. You can buy whole and cut the chicken into pieces or purchase already separated.
* 2 Tbl butter or olive oil
* 1 large white onion
* 3 cloves garlic
* 5 celery stalks, cut into bite size pieces (include celery leaves and any extra if you have them)
* 5 carrots, cut into bite size pieces
* 1 turnip, cut into bite size pieces (a turnip provides soup with a slight sweetness)
* 2 parsnips, cut into bite size pieces
* 1 tomato, cut in half (my mother would always discard this before serving the soup, she said it collected the fat. I don’t know if this is true, but it must add flavor)
* 4-6 bay leaves
* 1 Tbl of any or all of the following: fresh ground pepper; thyme; oregano; basil; celery seeds; or any other tasty green herb
* 6 cups beet juice or leftover juices from other vegetables (if none is available substitute water)
* water (fill a 16 quart pot about 1-inch under the rim)

1) In a 16-quart pot, on medium heat, melt butter. Add onions, garlic and chicken. Brown the chicken about 8 minutes on both sides.
2) Add remaining vegetables, herbs and juice/ water. Cover and bring contents to a boil (will take about 20 minutes). Turn heat down slightly, crack the lid, allow to simmer for 3+ hours. The longer the soup simmers, the more flavor will escape from the bones.
3) Remove bones and celery leaves. Season with salt and fresh pepper per serving. Add rice, noodles, matzah balls, crackers, etc.


View Stats
Rankingblogs.com: Defining your blogs worth..